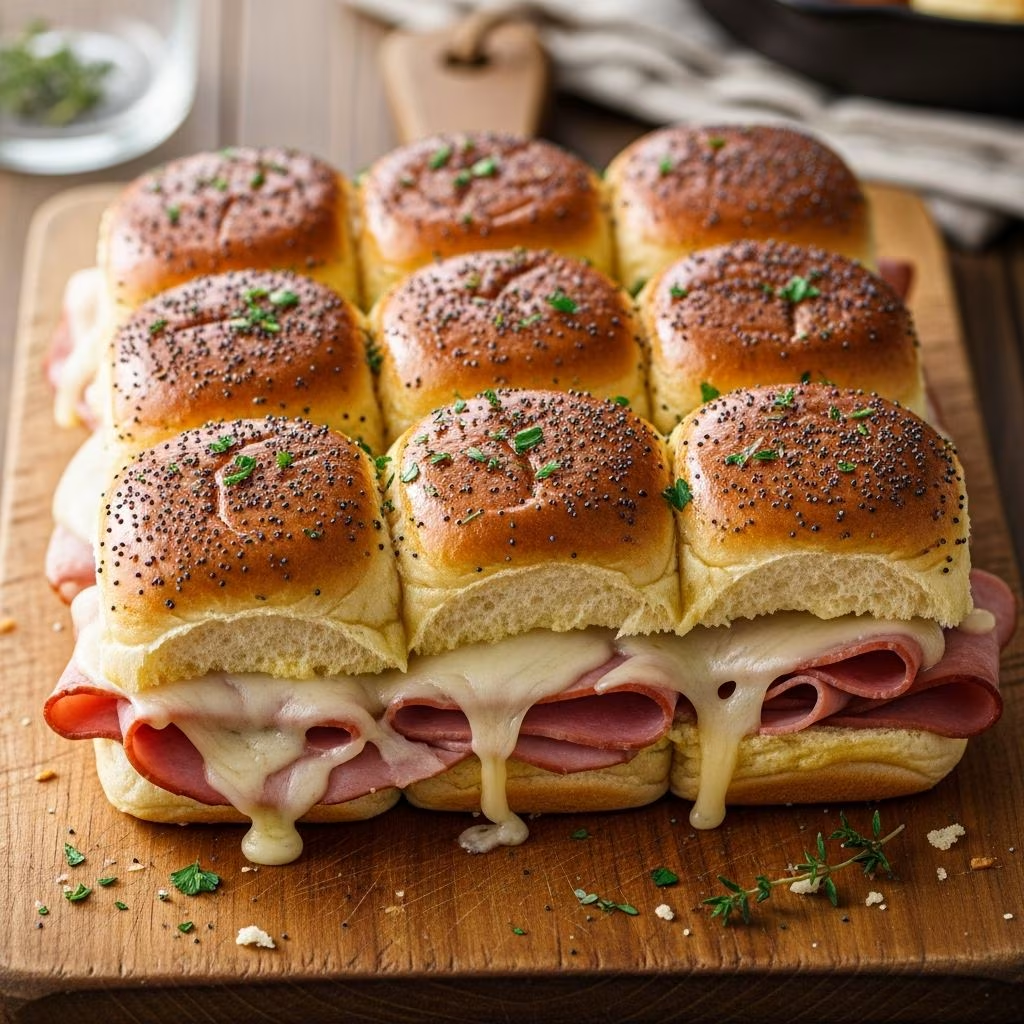
These delightful handheld sandwiches have become a staple at gatherings, celebrations, and moments when comfort food is most needed. Combining soft, pillowy rolls with layers of quality ham and melting cheese, topped with a savory-sweet glaze, these sliders offer an irresistible combination that appeals to both children and adults. What makes them particularly appealing is their versatility—they work equally well at casual game day events, formal celebrations, or intimate family dinners.
The beauty of this recipe lies in its simplicity. With just a handful of ingredients and minimal preparation time, you can create a dish that looks and tastes far more complex than it actually is. Whether you’re feeding a crowd or preparing an elegant appetizer, these sliders deliver consistent, crowd-pleasing results every single time.
Understanding the Essential Components
The foundation of outstanding sliders begins with selecting quality ingredients. Each component plays a specific role in creating the final flavor profile and texture that makes these sandwiches memorable.
The Foundation: Choosing Your Rolls
The base of any great slider starts with the right bread. Hawaiian-style sweet rolls have become the traditional choice for this recipe, and for good reason. These rolls possess a naturally sweet flavor and soft, tender crumb that complements both the savory ham and the rich cheese filling. The slight sweetness of the rolls balances the salty ham and creates a more complex flavor experience than ordinary dinner rolls would provide.
When shopping for rolls, look for varieties that are fresh and have a soft texture. King’s Hawaiian Rolls are a popular commercial option, though many grocery stores offer their own branded versions that work equally well. If you cannot locate Hawaiian rolls, brioche slider buns serve as an excellent substitute, offering similar sweetness and tenderness. Focaccia-style rolls or soft pretzel slider buns can also work in a pinch, though they will produce a slightly different flavor profile.
The Protein Layer: Selecting Quality Ham
Ham serves as the central protein component of these sliders. The type of ham you choose will significantly influence the final result. Thinly sliced deli ham works wonderfully, as does pre-packaged honey ham or Virginia ham. The key is ensuring your ham is sliced thin enough to layer easily without creating overly thick sandwiches, yet substantial enough to provide genuine ham flavor in each bite.
Consider purchasing ham from your grocery store’s deli counter rather than pre-packaged options, as freshly sliced ham often has superior flavor and texture. If you have leftover ham from another meal, this recipe provides an excellent way to use it. Black Forest ham or specialty varieties can add interesting flavor dimensions if you want to experiment beyond traditional options.
The Cheese Selection: Why Swiss Works Best
Swiss cheese has become the traditional choice for these sliders, and its characteristics make it nearly ideal for this application. Swiss cheese possesses a nutty, slightly sweet flavor that complements both the ham and the buttery glaze without overwhelming other ingredients. Its melting properties are excellent, creating a creamy texture that binds the sandwich components together.
The characteristic holes in Swiss cheese also allow the glaze to penetrate the cheese and reach other sandwich layers. However, Swiss cheese is not your only option. Provolone offers a slightly sharper flavor, while white cheddar provides a more assertive cheese presence. Havarti cheese brings a creamy richness that some prefer, and even mild pepper jack can work if you enjoy a subtle heat.
Crafting the Signature Glaze
The glaze transforms these simple sliders from good to extraordinary. This combination of flavors creates a complex, savory-sweet coating that elevates every element of the sandwich.
Building Layers of Flavor
The glaze begins with melted butter as its base, providing richness and helping distribute other flavors evenly across the sandwich tops. To this foundation, you add brown sugar, which caramelizes during baking and creates a subtle sweetness that balances the salty ham. Dijon mustard contributes tanginess and depth, cutting through richness and adding complexity that simple yellow mustard cannot provide. Worcestershire sauce introduces umami—that savory, satisfying quality that makes people want another bite. This combination of ingredients creates a sauce that is far greater than the sum of its parts.
Some variations include poppy seeds sprinkled on top, which add slight textural interest and a subtle nutty flavor that enhances the overall experience. Others incorporate onion powder or garlic powder for additional savory notes. Experimentation with these optional additions can help you customize the recipe to your personal preferences.
Proportions Matter
The standard formula uses half a cup of melted butter combined with two tablespoons of brown sugar, two tablespoons of Dijon mustard, and three tablespoons of Worcestershire sauce. This proportion creates a glaze that is flavorful without being overwhelming. However, these measurements are flexible—if you prefer sweeter sandwiches, increase the brown sugar slightly. If you want more pronounced savory notes, add an additional half tablespoon of Worcestershire sauce.
Step-by-Step Assembly Process
Preparation and Setup
Begin by preheating your oven to 350 degrees Fahrenheit. This moderate temperature ensures even baking without browning the rolls too quickly. While the oven heats, prepare your baking dish by lining it with aluminum foil for easy cleanup, or simply greasing it lightly with cooking spray.
Remove your ham and cheese from the refrigerator so they can reach room temperature. Cold ingredients resist layering and can tear, particularly with delicate deli ham. Allow them to sit out for ten to fifteen minutes before assembly.
Layering Technique
Slice your Hawaiian rolls horizontally, creating top and bottom halves. Arrange all bottom halves in your prepared baking dish, creating a single layer that covers the bottom evenly. This approach keeps all rolls connected, making them easy to serve and preventing individual pieces from drying out during baking.
Over the bottom halves, layer half of your sliced Swiss cheese. This initial cheese layer should cover the entire surface evenly. Next, arrange your ham slices over the cheese. Overlap the ham slightly to ensure complete coverage. Finally, layer the remaining cheese on top of the ham. This cheese-ham-cheese arrangement ensures the cheese directly contacts both the roll and the ham, promoting even melting.
Place the roll tops back onto the sandwiches, creating complete sliders. Now your sliders are ready for the glaze application.
Applying the Glaze
Whisk together your butter, brown sugar, Dijon mustard, and Worcestershire sauce until well combined. Using a brush, generously coat the entire top surface of each roll with this mixture. Ensure even coverage—this glaze is what creates the signature flavor and golden-brown exterior. Do not be shy; these sandwiches should look visibly coated.
Resting Period
After applying the glaze, allow the assembled sandwiches to rest for ten to twenty minutes. This resting period allows the glaze to begin penetrating the rolls and helps the flavors meld together. During this time, the rolls begin absorbing the flavorful liquid, which enhances the final result significantly.
Baking Instructions
Place your baking dish in the preheated oven on the center rack. Bake uncovered for ten to fifteen minutes, monitoring closely toward the end of the cooking time. The sandwiches are ready when the cheese has melted completely and the roll tops have achieved a light golden-brown color. Overbaking can result in dry rolls and overly dark tops, so monitor carefully during the final few minutes.
Make-Ahead and Storage Strategies
Advance Preparation Benefits
One significant advantage of this recipe is its make-ahead capability. You can assemble the sliders completely up to twenty-four hours before serving. Keep them covered with plastic wrap in the refrigerator until you’re ready to add the glaze and bake them.
Alternatively, you can prepare the glaze separately and store it in an airtight container in the refrigerator for up to three days. When you’re ready to serve, simply assemble the sliders, apply the glaze, and bake. This flexibility makes the recipe perfect for party planning, allowing you to spread the work across multiple days.
Storing Leftovers
Wrap any remaining sliders tightly in aluminum foil and store them in the refrigerator for up to four days. To reheat, place the wrapped sandwiches in a 300-degree oven for eight to ten minutes until warmed through. This gentle reheating prevents the rolls from drying out while ensuring the cheese melts again evenly. Leftover sliders also taste surprisingly good at room temperature, making them convenient for next-day lunches.
Customization and Variation Ideas
Protein Alternatives
While ham is traditional, these sliders adapt well to other proteins. Thinly sliced turkey creates a lighter variation perfect for those watching fat intake. Roast beef offers a richer, more substantial option. Even vegetarians can enjoy these sliders by substituting the ham with roasted vegetables like bell peppers, mushrooms, or sun-dried tomatoes.
Cheese Variations
Beyond Swiss cheese, numerous options work beautifully. Aged cheddar adds a sharper, more pronounced cheese flavor. Gruyère provides a sophisticated, complex taste. Fontina melts beautifully and adds subtle sweetness. Even a combination of cheeses can create interesting flavor profiles—try mixing Swiss with a sharp cheddar for enhanced depth.
Glaze Modifications
The brown sugar in the glaze can be adjusted based on preference. Using dark brown sugar creates a deeper molasses flavor, while white sugar produces a cleaner sweetness. Some cooks add a touch of honey for additional sweetness and subtle floral notes. A pinch of smoked paprika can introduce subtle smokiness, while cayenne pepper adds gentle heat.
Frequently Asked Questions
Can I make these sandwiches the day before?
Yes, absolutely. Assemble the sliders completely, wrap them in plastic wrap, and refrigerate them overnight. When ready to serve, add the glaze and bake as directed. The flavors actually develop and meld more thoroughly overnight, sometimes producing even better results.
What’s the best way to serve these?
Serve the sliders warm, directly from the oven. They maintain their appeal for thirty to forty minutes at room temperature, making them ideal for buffet-style serving. For longer gatherings, you can keep them warm in a 200-degree oven, though they’re best enjoyed relatively soon after baking.
How many sliders does this recipe make?
A standard recipe using a twelve-count bag of Hawaiian rolls produces twelve individual sliders. A twelve-pack of rolls typically serves six to eight people as a main course component, or twelve to sixteen as an appetizer.
Can I freeze these for later?
Yes, you can freeze uncooked assembled sliders for up to two months. Wrap them carefully in plastic wrap and then aluminum foil for freezer storage. When ready to bake, apply the glaze directly to the frozen sliders and bake for an additional five to ten minutes beyond the normal baking time.
What drinks pair well with these sliders?
Given the sweet and savory flavor profile, these sliders pair well with cold beverages like iced tea, lemonade, or cola. For adult gatherings, light beers, crisp white wines, or apple cider complement the flavors nicely.
Nutritional Considerations and Serving Suggestions
Each slider contains approximately 200-250 calories, with protein from both the ham and cheese. The buttery glaze contributes significant fat content, which creates the rich flavor profile. These sandwiches work best as part of a balanced meal, paired with vegetable sides like coleslaw, green salads, or roasted vegetables that provide freshness and fiber.
For healthier variations, consider using low-fat cheese and reducing the butter in the glaze, though this will impact the signature flavor somewhat. Whole grain slider buns increase fiber content, as do serving the sliders with vegetable-based sides.
Why These Sandwiches Have Enduring Appeal
These sliders have become beloved at various occasions precisely because they satisfy multiple desires simultaneously. They offer comfort through familiar flavors and soft textures. They provide impressive presentation despite minimal effort. They adapt to various occasions, from casual to formal. They can be prepared ahead, reducing last-minute stress. Most importantly, they taste genuinely delicious, with complex flavors that emerge from surprisingly simple components.
The combination of sweet rolls, salty ham, creamy cheese, and savory-sweet glaze creates an experience that lingers pleasantly in memory. Whether you’re hosting a casual gathering or planning an elegant event, these sliders deliver consistent excellence every time.
References
- Funeral Sandwiches Recipe — SheSaved®. Retrieved from https://www.shesaved.com/funeral-sandwiches-recipe/
- Funeral Sandwiches (Ham and Cheese Sliders Recipe) — Grilled Cheese Social. 2020-01-19. Retrieved from https://grilledcheesesocial.com/2020/01/19/funeral-sandwiches/
- Funeral Sandwiches Recipe (Ham and Swiss Sliders) — The Fresh Cooky. Retrieved from https://www.thefreshcooky.com/ham-cheese-sliders/