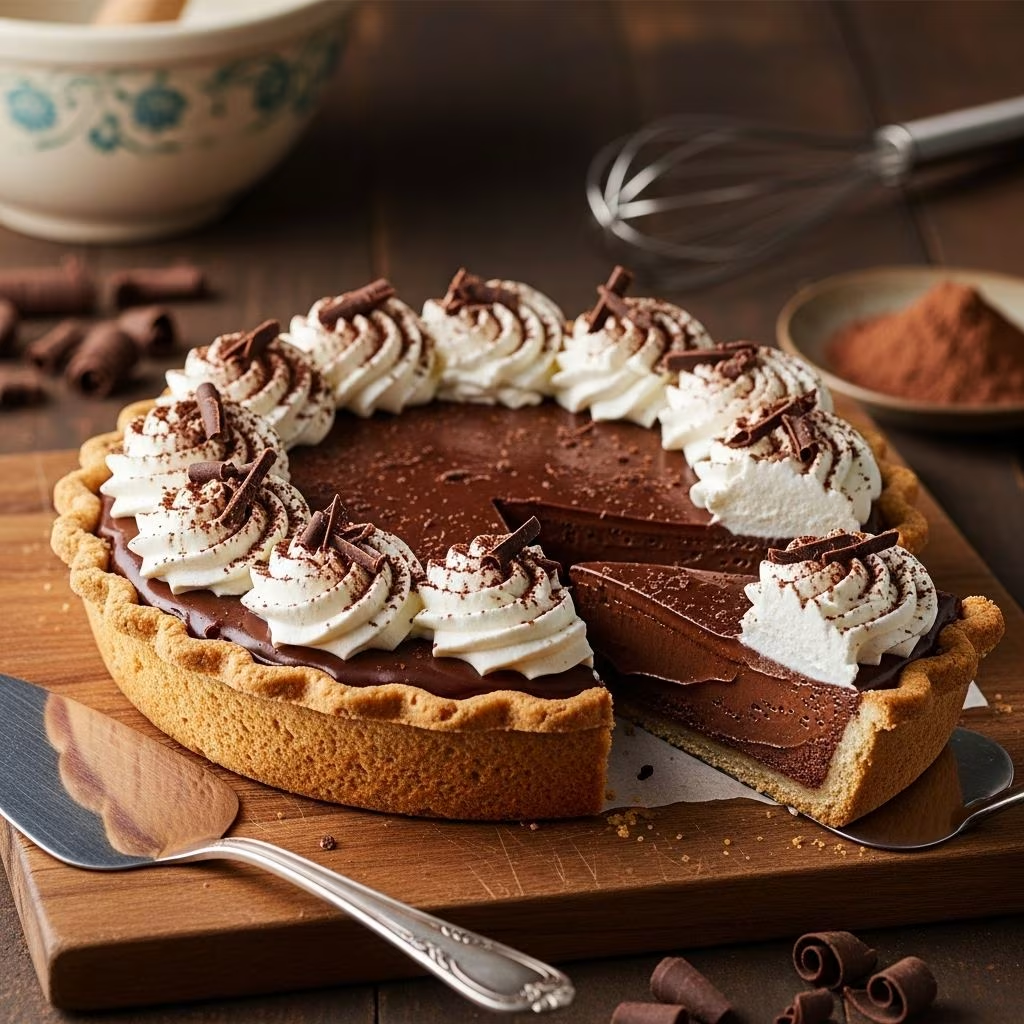
Indulge in the luxurious texture of **French silk pie**, a timeless dessert featuring a tender crust cradling an impossibly smooth chocolate filling topped with billowy whipped cream. This guide demystifies the process, ensuring your pie achieves that signature airy elegance without common pitfalls like dense filling or soggy crust.
Why French Silk Pie Captivates Bakers
French silk pie stands out for its melt-in-your-mouth quality, born from meticulous creaming of butter and careful incorporation of aerated elements. Unlike dense chocolate pies, its lightness comes from whipped components folded into a cooked egg base, eliminating raw egg risks while delivering mousse-like decadence. Originating as a Midwestern favorite, it has evolved into a holiday staple, rivaling cheesecakes and tarts in popularity.
The magic lies in technique: cooking eggs with sugar to a safe 160°F pasteurizes them, then blending with melted chocolate and creamed butter creates volume through high-speed beating. Topped with fresh whipped cream, it offers balanced sweetness and visual appeal, making it ideal for gatherings.
Choosing and Preparing the Perfect Crust
A great crust provides structure without overpowering the delicate filling. Opt for an all-butter pie dough for flakiness or a cookie crust for contrast.
All-Butter Flaky Crust
Start with high-quality unsalted butter cut into ½-inch cubes and chilled. Combine 1⅛ cups all-purpose flour (spooned lightly), ½ teaspoon salt, and ½ teaspoon sugar. Pulse in a food processor or cut by hand until pea-sized crumbs form, then add ice-cold water gradually until dough just holds together.
Roll to ⅛-inch thickness on a floured surface, fit into a 9-inch pie pan, crimp edges, and chill 30 minutes. Blind bake to prevent sogginess: dock with a fork, line with parchment and pie weights (or dried beans), bake at 375°F conventional (350°F convection) for 20 minutes, remove weights, and bake 10-15 more until golden.
No-Bake Oreo Crust Alternative
For ease, crush 20 Oreos (about 170g without filling), mix with 5 tablespoons melted unsalted butter, press into pan, and chill 10 minutes. Bake briefly at 350°F for 10 minutes if desired for crispness. This adds a chocolatey crunch that complements the filling.
| Crust Type | Prep Time | Texture | Best For |
|---|---|---|---|
| All-Butter | 45 min + chill | Flaky, tender | Classic purists |
| Oreo | 10 min | Crispy, chocolatey | Quick prep |
Crafting the Signature Silky Filling
The filling’s silkiness demands precision: temperature control, thorough beating, and gentle folding.
Step 1: Cook the Egg Base Safely
In a heatproof bowl over simmering water (double boiler method), whisk 3-4 large eggs with ¾-1½ cups granulated sugar until it reaches 160°F and thickens to coat a spoon—about 5-10 minutes of constant whisking. This pasteurizes eggs for safety. Remove from heat immediately to avoid scrambling.
Step 2: Temper with Chocolate
Stir in 6-8 oz finely chopped bittersweet or unsweetened chocolate (60-70% cacao for balance), 1 teaspoon vanilla, and a pinch of salt. Cool to 90°F, stirring occasionally; cover with plastic wrap touching the surface to prevent skinning. Room temperature (around 75°F) is ideal before adding to butter.
Step 3: Cream Butter for Aeration
Beat 1 cup (9 tablespoons) softened unsalted butter (room temperature, not melted) on high with a paddle attachment for 2-5 minutes until pale and fluffy. Gradually add cooled chocolate mixture, beating 5 full minutes on high—the color lightens, and volume increases dramatically.
Add eggs gradually: 2 at a time, beating 2-5 minutes after each for maximum fluffiness. The mixture transforms into a light, mousse-like batter.
Step 4: Fold in Whipped Cream
Whip ¾ cup heavy cream to soft peaks, then fold one-third into the chocolate base to lighten it, followed by the rest gently. This preserves air bubbles for the signature texture. Pour into cooled crust and chill 3-6 hours or overnight.
- Pro Tip: Use a stand mixer for best results; hand mixers work but take longer.
- Chocolate Choice: Bittersweet prevents overly sweet filling.
- Common Mistake: Warm chocolate melts butter, deflating volume—always cool fully.
Whipped Cream Topping and Garnishes
Elevate with homemade whipped cream: beat 1 cup heavy cream, 1-2 tablespoons powdered sugar, and ½ teaspoon vanilla to stiff peaks. Spread or pipe over set filling.
Garnishes add flair:
- Shaved bittersweet chocolate for elegance.
- Chocolate curls made by scraping a bar with a vegetable peeler.
- Toasted nuts like hazelnuts or pecans for crunch.
- Dusted cocoa powder for a professional finish.
Chill pie fully before slicing with a hot knife for clean cuts.
Ingredient Breakdown and Substitutions
| Component | Key Ingredients | Substitutions |
|---|---|---|
| Crust | Flour, butter, salt, sugar, water | Store-bought or graham cracker |
| Filling | Eggs, sugar, chocolate, butter, vanilla | Dairy-free butter; semi-sweet chocolate |
| Topping | Heavy cream, powdered sugar, vanilla | Cool Whip for stability |
Total yield: 8-12 slices. Prep: 1 hour, Cook: 45 min, Chill: 4-6 hours.
Troubleshooting Common Issues
- Grainy Filling: Undercooked eggs or insufficient beating—ensure 160°F and 5+ minutes per egg addition.
- Runny Pie: Insufficient chilling or warm ingredients; refrigerate 6+ hours.
- Soggy Crust: Skip blind baking; always pre-bake fully.
- Too Dense: Overmixed whipped cream or melted butter—fold gently and cool chocolate properly.
Storage and Make-Ahead Tips
Store covered in fridge up to 3 days; freezes well (wrap tightly, up to 2 months). Thaw overnight. Make crust and filling separately; assemble day-of for freshest texture.
Variations to Personalize Your Pie
- Peanut Butter Silk: Swap half chocolate for peanut butter in filling.
- Mocha Twist: Add 1 tablespoon espresso powder to chocolate.
- White Chocolate: Use white chocolate for a milder version.
- Vegan Adaptation: Aquafaba for eggs, coconut cream for whipping.
Nutrition Snapshot (Per Slice, 12 servings)
Approx: 450 calories, 35g fat, 30g carbs, 5g protein. Indulgent but shareable.
Frequently Asked Questions
Can I use raw eggs?
No—cooking to 160°F ensures safety.
How do I achieve the lightest texture?
Beat butter and eggs extensively on high speed for aeration.
What’s the best chocolate?
Bittersweet (60%) for balance; avoid milk chocolate to prevent sweetness overload.
Can I make it gluten-free?
Yes, use GF flour blend for crust.
How long does it last?
3 days refrigerated; freezes 2 months.
Pairing Suggestions
Serve with coffee, red wine, or fresh berries to cut richness. Perfect for Thanksgiving, Christmas, or potlucks.
References
- French Silk Pie – Chef Lindsey Farr — Chef Lindsey Farr. 2023-10-15. https://cheflindseyfarr.com/french-silk-pie/
- French Silk Pie Recipe – Chef Billy Parisi — Chef Billy Parisi. 2024-05-20. https://www.billyparisi.com/french-silk-pie-recipe/
- French Silk Pie – Amanda’s Cookin’ — Amanda’s Cookin’. 2023-11-10. https://amandascookin.com/homemade-bakers-square-french-silk-pie/
- French Silk Pie (No Raw Eggs + Oreo Crust) — Handle the Heat. 2024-02-14. https://handletheheat.com/french-silk-pie/
- French Silk Pie Recipe — Sally’s Baking Addiction. 2023-12-01. https://www.sallysbakingaddiction.com/french-silk-pie/