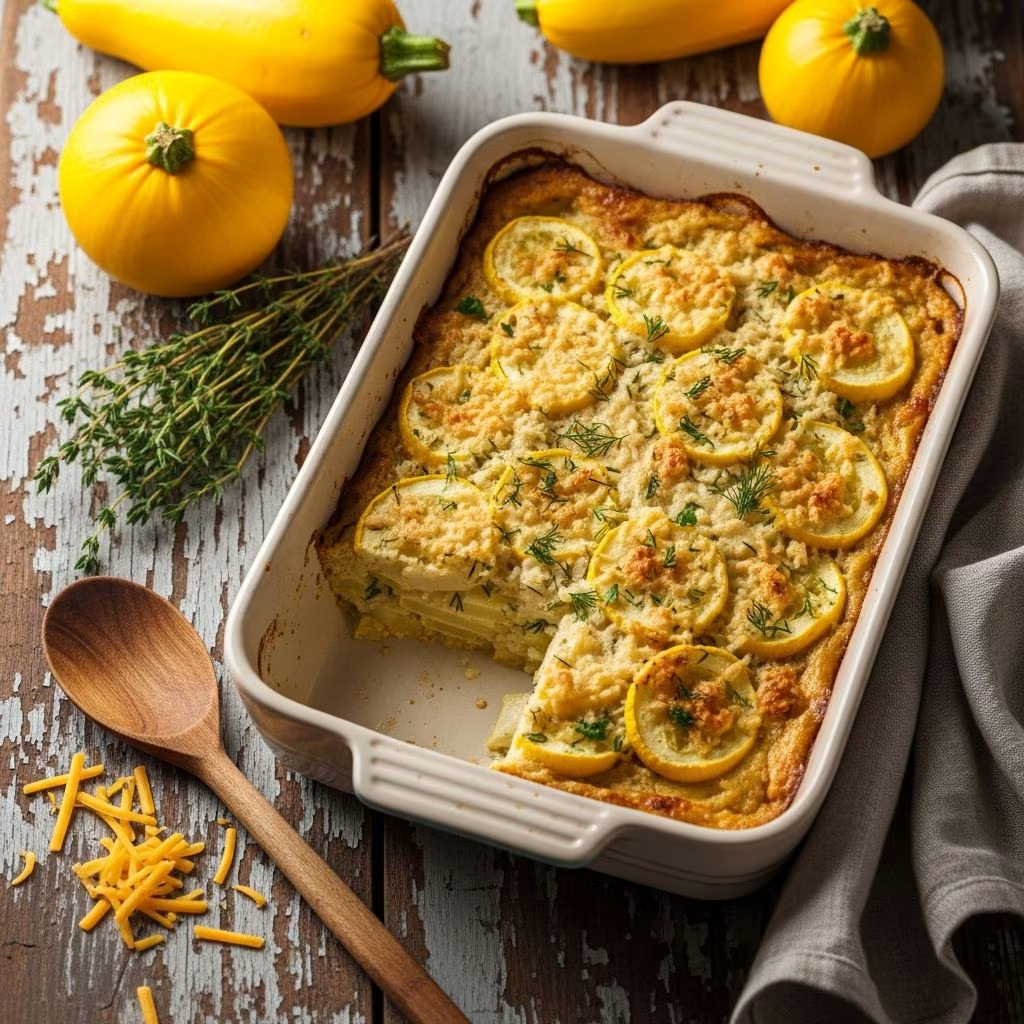
Summer vegetables offer wonderful opportunities to create satisfying side dishes that can elevate any meal. Among the most beloved of these preparations is the yellow squash casserole, a dish that combines tender vegetables with a creamy binding and a textured top layer. This versatile casserole brings together simple ingredients into a comforting dish that works equally well at family dinners, potlucks, or holiday gatherings.
Understanding Yellow Summer Squash as Your Base Ingredient
Yellow summer squash serves as the foundation for this classic casserole. Unlike winter varieties, summer squash has a thinner skin and a more delicate flesh that becomes wonderfully tender when cooked. The mild, slightly sweet flavor of yellow squash pairs beautifully with savory cheese and creamy binders, creating a balanced taste profile that appeals to most palates.
When selecting squash for your casserole, choose medium-sized specimens that feel firm to the touch. Smaller squash typically have thinner seeds and more tender flesh, making them ideal for this preparation. A standard casserole serving four to six people requires approximately six to seven medium squash, though the exact quantity depends on how densely you pack your baking dish.
Essential Ingredients for Your Casserole Creation
Building a successful squash casserole requires understanding how each ingredient contributes to the final dish. The combination of components creates layers of flavor and texture that make this dish memorable.
The Vegetable and Aromatics Component
- 6 to 7 medium yellow summer squash, peeled and sliced into quarter-inch rounds
- 1 small onion, preferably a sweet variety like Vidalia, finely chopped
- Optional additions: bacon, garlic, or fresh herbs like parsley or dill
The Binding and Flavor Layer
- 1 cup of shredded sharp cheddar cheese for bold flavor
- 1 large beaten egg to help set the casserole
- 1/4 cup sour cream or mayonnaise for richness
- Salt and black pepper to taste
The Topping Components
- 1 cup crushed butter-flavored crackers
- 1 stick of unsalted butter, divided for cooking and topping
Step-by-Step Preparation Process
Initial Squash Preparation
Begin by washing your yellow squash thoroughly under cool running water to remove any dirt or debris. Pat them dry with paper towels. Using a sharp vegetable peeler or knife, carefully remove the thin outer skin. Some cooks prefer to leave the skin intact for added nutrition and texture, so this step remains optional based on personal preference.
Once peeled, slice the squash into uniform quarter-inch thick rounds. Consistent sizing ensures even cooking throughout the casserole. Place all sliced squash into a large mixing bowl and set aside.
Cooking the Vegetables
In a large skillet with a lid, melt one-quarter of your butter over medium heat. Add the sliced squash and chopped onion to the hot butter. Cover the pan with the lid to create steam, which accelerates the cooking process. This covered cooking method softens the vegetables while preserving their delicate flavor.
After approximately five minutes, remove the lid and stir the vegetables gently, ensuring even heat distribution. Continue cooking for another five to ten minutes, stirring occasionally, until the squash becomes tender but not mushy. The total cooking time typically ranges from ten to fifteen minutes. You’ll know the vegetables are ready when a fork easily pierces the squash.
Once tender, pour the contents of the skillet through a colander or fine-mesh strainer to remove excess liquid. This critical step prevents your finished casserole from becoming watery. Transfer the drained vegetables back to your large mixing bowl.
Creating the Binding Mixture
In a separate small bowl, beat the egg thoroughly. Pour this beaten egg over the cooked squash and onion mixture. Add the shredded cheddar cheese, sour cream (or mayonnaise), salt, and black pepper. Using a sturdy spoon or rubber spatula, stir this combination thoroughly until all ingredients distribute evenly. The mixture should appear well-blended with no streaks of egg remaining visible.
Assembly and Baking
Spray a standard two-quart baking dish with non-stick cooking spray, or lightly butter it to prevent sticking. Carefully transfer the squash mixture into the prepared baking dish, spreading it into an even layer.
In a small bowl, combine the crushed butter-flavored crackers with the remaining melted butter, stirring until the crackers absorb the butter and take on a moistened, cohesive appearance. Distribute this cracker mixture evenly across the top of the squash filling, creating a golden, textured surface.
Place the casserole into a preheated 350-degree Fahrenheit oven. Bake uncovered for thirty to forty minutes, until the topping turns golden brown and the filling bubbles slightly around the edges. The exact baking time depends on your specific oven and the depth of your baking dish.
Variations and Creative Adaptations
While the classic preparation remains timeless, several variations can personalize your casserole to suit different preferences and available ingredients.
Protein Additions
Many cooks enhance their squash casserole by incorporating cooked bacon pieces or diced ham, adding smoky or salty notes that complement the mild squash beautifully. A handful of crispy bacon bits stirred into the squash mixture before baking creates an elevated version suitable for special occasions.
Cheese Variations
While sharp cheddar remains the traditional choice, experimenting with other cheeses produces interesting results. A combination of cheddar and parmesan creates a more complex flavor profile. Some cooks prefer the creaminess of Gruyère or the mild character of Monterey Jack.
Cream-Based Adaptations
For an even richer version, substitute some or all of the sour cream with heavy cream or a cream-based soup such as cream of mushroom or chicken soup. This adjustment yields a more luxurious texture and deeper flavor.
Topping Alternatives
Beyond traditional butter-flavored crackers, consider using panko breadcrumbs mixed with melted butter and grated Parmesan cheese for a different texture. Some preparations call for crushed cornflakes or crushed potato chips for added crunch and flavor complexity.
Timing and Make-Ahead Strategies
This casserole offers significant convenience advantages for meal planning. You can prepare the squash mixture up to two days in advance, covering it tightly and refrigerating until needed. When ready to bake, simply top with the cracker mixture and proceed with baking, though you may need to extend the baking time by five to ten minutes if the casserole starts from a cold state.
The casserole also freezes exceptionally well before baking. Assemble the complete dish in a freezer-safe baking vessel, cover tightly with plastic wrap and aluminum foil, and freeze for up to three months. Bake directly from frozen, adding approximately fifteen minutes to the standard baking time and watching carefully to ensure the topping doesn’t burn before the filling heats through.
Serving Suggestions and Complementary Dishes
This casserole functions beautifully as a supporting side dish for grilled meats, roasted chicken, or baked fish. Its creamy, vegetable-based character provides a satisfying contrast to lighter protein preparations. The dish remains substantial enough to serve as a vegetarian main course when paired with a crisp salad and crusty bread.
Consider serving your squash casserole alongside dishes with bright, acidic components, such as a tomato-based salad or vinegar-dressed vegetables. This pairing balances the casserole’s richness with fresh, zesty flavors.
Storage and Reheating Guidance
Leftover squash casserole keeps refrigerated in an airtight container for three to four days. Reheat individual portions in the microwave at fifty percent power for two to three minutes, or reheat the entire casserole covered in a 325-degree oven until warmed through, approximately fifteen to twenty minutes. Covering with foil during reheating prevents the topping from drying out excessively.
Frequently Asked Questions
Can I use canned squash instead of fresh?
Yes, canned yellow squash works as a substitute when fresh isn’t available. Drain canned squash thoroughly to remove excess liquid before using. You’ll need approximately three cans of squash to replace six to seven fresh squash. Since canned squash is already cooked, skip the stovetop cooking step and proceed directly to mixing with other ingredients.
What causes a watery casserole?
Inadequate draining of the cooked squash represents the primary cause. Ensure you drain thoroughly after cooking and again before final assembly. Additionally, avoid using very juicy squash or overfilled baking dishes, which can cause liquid to accumulate.
How do I prevent the cracker topping from burning?
If your topping browns too quickly before the filling cooks through, cover the casserole loosely with aluminum foil for the first twenty minutes of baking, then uncover for the remaining time. This technique allows the filling to cook while protecting the topping.
Can I double this recipe?
Doubling the recipe works well, though you’ll need two baking dishes or one very large dish. Increase all ingredients proportionally and bake in two standard-sized dishes side by side, or use a large rectangular roasting pan. Baking time may increase slightly depending on the depth of your dish.
What’s the best cheese to use?
Sharp cheddar provides the strongest flavor and creates the most traditional casserole. Mild cheddar produces a gentler cheese flavor. Mixing two cheeses, such as equal parts cheddar and Parmesan, creates depth and complexity in the final dish.
References
- Mom’s Squash Casserole Recipe — Intelligent Domestications. 2024. https://intelligentdomestications.com/moms-squash-casserole/
- Slap Your Mama It’s So Delicious Southern Squash Casserole — Just a Pinch. https://www.justapinch.com/recipes/side/vegetable/slap-your-mama-its-so-delicious-southern.html
- Creamy Squash Casserole Recipe — Simply Mamá Cooks. https://www.youtube.com/watch?v=UX83RN3uCBc
- Squash Casserole — Mama Sue’s Southern Kitchen. https://www.mamasuessouthernkitchen.com/post/squash-casserole