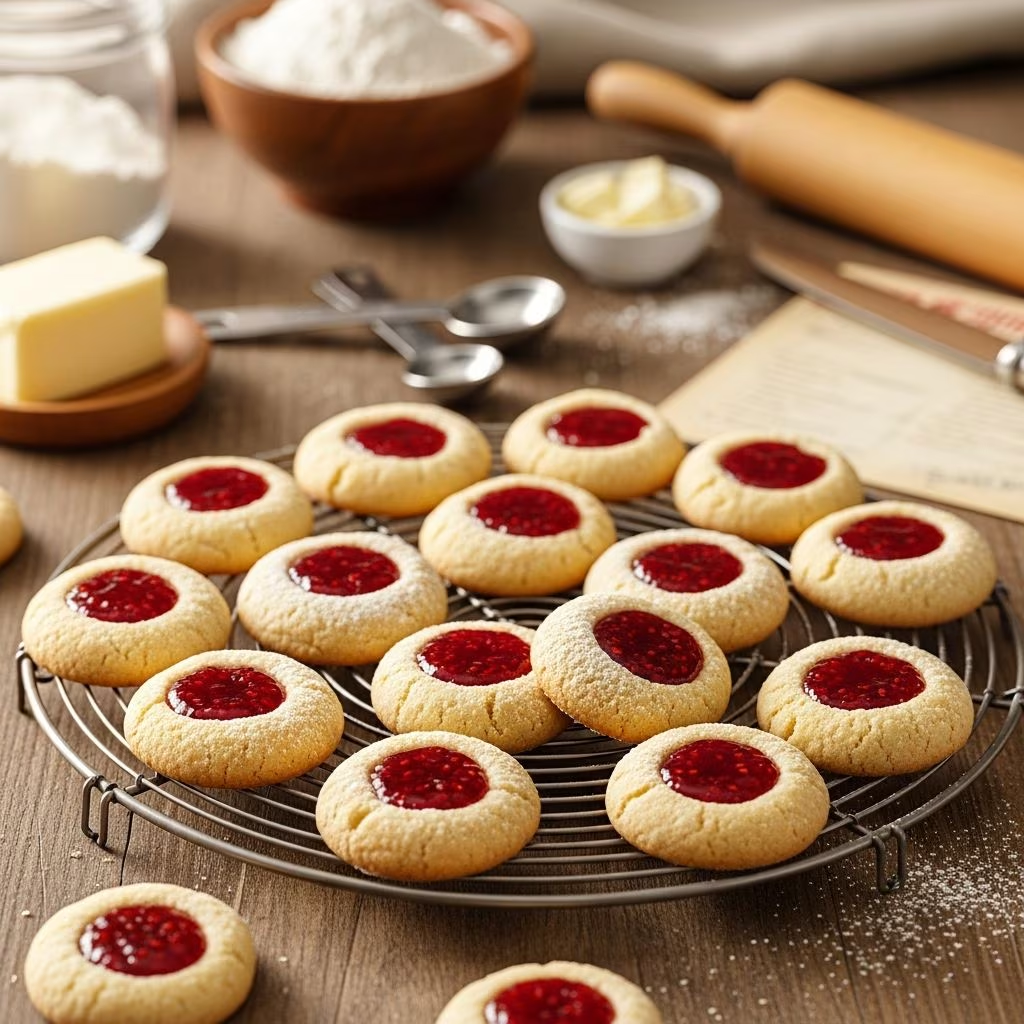
Thumbprint cookies represent one of the most approachable and charming desserts in the baking world. These petite, jewel-like confections feature a tender cookie base with a distinctive indentation filled with vibrant jam or preserves. Their simple elegance makes them equally suitable for casual family gatherings, formal holiday presentations, or homemade gift boxes. Whether you’re a novice baker or an experienced pastry enthusiast, thumbprint cookies offer a rewarding baking experience with impressive results.
Understanding the Foundation: Cookie Dough Essentials
The success of thumbprint cookies begins with creating the perfect dough foundation. The base typically consists of butter, sugar, eggs, and flour combined in specific proportions to achieve a tender yet structurally sound cookie. Unlike cookies that require extensive mixing, thumbprint cookie dough benefits from gentle handling to maintain its delicate crumb structure.
The primary ingredients work together to create distinct characteristics in the finished cookie. Butter provides richness and contributes to the characteristic melt-in-your-mouth texture reminiscent of shortbread. Granulated and brown sugar combine to deliver both sweetness and subtle caramel undertones. Egg yolks act as a binding agent while contributing to the dough’s luxurious mouthfeel. All-purpose flour provides the structural foundation that holds the cookie together while maintaining tenderness.
Creating Your Dough Base
Begin by creaming softened butter with your chosen sugar blend using a stand mixer or electric hand mixer on medium speed. This initial step should take approximately one minute and should result in a noticeably lighter, fluffier texture. The creaming process incorporates air into the butter, which helps create a tender cookie with a slight lift during baking.
After achieving the proper consistency, add egg yolks and vanilla extract to your creamed mixture. Vanilla extract enhances the cookie’s flavor profile, while egg yolks provide additional richness and binding power. Beat this combination until the ingredients are fully incorporated and the mixture appears well-blended.
The final step involves gradually adding your flour mixture to the wet ingredients while mixing on low speed. This careful incorporation prevents overworking the dough, which could result in tough, dense cookies. Continue mixing just until the flour is fully combined, stopping to scrape down the bowl sides as needed to ensure even distribution of ingredients.
Dough Preparation and Resting Techniques
Proper dough preparation significantly impacts your baking success. After combining all ingredients, the consistency should be soft and pliable to the touch. If the dough appears too crumbly or fails to hold together when tested, a tablespoon of milk or water can help achieve the desired texture.
Once mixed, shape the dough into a disc and wrap it tightly with plastic wrap before refrigerating. Chilling time requirements may vary depending on your recipe and kitchen temperature. Some recipes suggest a minimum of four hours, while others may work with shorter resting periods. The refrigeration phase allows the gluten to relax and the flavors to develop fully.
Before shaping your cookies, remove the chilled dough from the refrigerator and allow it to sit at room temperature for approximately ten minutes. This brief warming period prevents cracks from forming during the shaping process while maintaining enough firmness to hold defined shapes. You’ll recognize proper dough readiness when it becomes slightly pliable but remains hold enough to shape without excessive spreading.
Shaping and Creating the Signature Indentation
The distinctive thumbprint that gives these cookies their name requires a specific shaping technique. Begin by rolling dough into small balls approximately the size of walnuts. Consistency in sizing ensures even baking throughout your batch.
Creating the indentation at the cookie’s center demands a gentle yet confident technique. Using the back of a measuring spoon or your clean thumb, press firmly into the center of each dough ball. The goal is creating a deep well that will hold your filling without pressing completely through the cookie base. This indentation should be substantial enough to accommodate approximately one-half teaspoon of filling.
Proper spacing on your baking sheets is crucial for even heat circulation and cookie development. Position each cookie approximately two inches apart on parchment-lined baking sheets. This spacing allows for slight spreading during baking without cookies touching each other.
Filling Selection and Application
The filling choice dramatically influences both flavor profile and visual presentation of your finished cookies. Traditional fruit preserves remain the most popular option, offering bold color and natural sweetness. Raspberry, strawberry, apricot, and blueberry preserves each deliver distinctive flavors that complement the buttery cookie base.
Beyond traditional jam options, creative bakers experiment with alternative fillings to customize their creations. Caramel, chocolate ganache, lemon curd, and even leftover cranberry sauce from holiday meals can transform basic thumbprint cookies into unique flavor combinations. The versatility of this cookie format encourages culinary creativity while maintaining the essential thumbprint cookie structure.
When filling your cookies, use approximately one-half teaspoon of your chosen spread for each cookie. This amount should nearly fill the indentation without overflowing during baking. Overfilled cookies may lose filling during the baking process, while underfilled cookies appear incomplete and less visually appealing.
Optional Garnish and Finishing Touches
While not strictly necessary, additional garnishes can enhance both appearance and texture. Rolling shaped dough in sparkling sugar before creating the indentation adds crystalline crunch and visual appeal. Alternatively, finely chopped nuts sprinkled around the edge of each indentation provide textural contrast and subtle flavor complexity.
These optional additions transform basic thumbprint cookies into more sophisticated presentations suitable for gift-giving or formal occasions. However, purists often prefer the simplicity of an unadorned cookie showcasing the natural beauty of jam-filled indentations.
Baking Parameters and Temperature Management
Successful baking depends on accurate oven temperature and proper timing. Preheat your oven to 375°F before baking, allowing adequate time for the oven to reach full temperature. This preparation ensures consistent results across all batches.
Bake your prepared cookies for twelve to fourteen minutes, monitoring for visual cues indicating doneness. The cookies should develop light golden-brown edges while the centers remain slightly pale. The bottoms should exhibit light browning, indicating thorough baking without excessive darkening that suggests overbaking.
Baking time may vary slightly depending on your specific oven characteristics, cookie size, and oven rack position. Establishing familiarity with your oven’s unique heating patterns helps predict baking duration more accurately over time.
Cooling and Storage Instructions
Proper cooling techniques preserve the cookies’ delicate structure and ensure optimal texture development. Allow the baked cookies to cool on their baking sheet for several minutes after removing from the oven. This brief resting period allows the cookies to firm up slightly, making transfer to cooling racks safer and easier.
Transfer cooled cookies to wire cooling racks, allowing air circulation around each cookie. Complete cooling prevents condensation accumulation that could soften cookies or cause filling to seep into the cookie base.
Once completely cooled, store thumbprint cookies in airtight containers at room temperature. Properly stored cookies maintain optimal quality for up to one week. Layering cookies with parchment paper between layers prevents sticking and maintains pristine appearance.
Advanced Preparation: Freezing for Convenience
One advantage of thumbprint cookies involves their suitability for advance preparation through freezing. After shaping and creating indentations but before filling, freeze prepared dough on baking sheets until solid. Transfer frozen dough balls to freezer bags for convenient storage up to several months.
This advance preparation strategy proves invaluable during busy holiday seasons. Simply remove frozen dough from the freezer, add fillings, and bake as directed without additional thawing time. This flexibility allows creating fresh-baked cookies whenever needed throughout extended holiday gatherings.
Troubleshooting Common Issues
Understanding potential problems helps prevent disappointment and improves future baking attempts. Cracked dough during shaping typically indicates insufficient dough temperature or excessive dryness. Allowing dough to warm slightly at room temperature or adding a tablespoon of milk usually resolves this issue.
Cookies spreading excessively during baking suggests insufficient chilling time or dough that was too warm when placed in the oven. Ensuring adequate refrigeration and proper dough temperature prevents this problem. Conversely, dough that fails to spread adequately may be too cold or too dry, requiring slightly warmer dough or minimal liquid addition.
Filling that leaks from cookies during baking often results from overfilling or placing filling in the oven-bound cookies without sufficient support from the dough base. Using the recommended amount of filling and ensuring proper indentation depth typically prevents leakage issues.
Ingredient Variations and Recipe Adaptations
While classic thumbprint cookies follow traditional formulations, several adaptations maintain the essential cookie structure while introducing fresh variations. Adding almond extract alongside vanilla creates subtle flavor complexity. Incorporating cornstarch in the flour mixture produces exceptionally tender cookies with a delicate crumb.
Some bakers experiment with alternative sugars or incorporate brown sugar in varying proportions to achieve different flavor profiles. Light brown sugar contributes subtle molasses notes that complement fruit fillings, while white sugar provides cleaner sweetness highlighting jam flavors.
Ideal Occasions for Thumbprint Cookies
Thumbprint cookies excel at numerous occasions requiring elegant yet approachable desserts. Holiday cookie exchanges benefit from their impressive appearance and ease of transport. The individual cookie format allows recipients to select desired flavors when multiple jam varieties are presented together.
Gift-giving opportunities abound, as thumbprint cookies transport beautifully in decorative boxes or jars, creating memorable homemade presents. Their visual appeal photographs well, making them excellent candidates for social media sharing or inclusion in holiday newsletters.
Frequently Asked Questions
How far in advance can thumbprint cookies be prepared?
Thumbprint cookies can be baked up to one week in advance and stored in airtight containers at room temperature. Alternatively, shaped dough can be frozen for several months, then baked fresh as needed.
What jam consistency works best for filling?
Medium-thickness preserves work best, as they fill the indentation without running excessively during baking. Thicker jams maintain their position better, while thinner jams may seep into the cookie base.
Can I substitute butter with alternative fats?
Traditional thumbprint cookies rely on butter for their distinctive flavor and texture. Substituting with other fats alters the final product’s characteristics and may not produce satisfactory results.
How do I prevent dough from cracking when shaping?
Allowing chilled dough to warm at room temperature for approximately ten minutes before shaping prevents cracking caused by cold, brittle dough.
Can thumbprint cookies accommodate dietary restrictions?
While challenging, adapting thumbprint cookies for dietary restrictions requires careful ingredient substitution. However, fundamental alterations may compromise the cookies’ essential characteristics and appeal.
Conclusion: Mastering the Classic Thumbprint Cookie
Thumbprint cookies represent accessible baking excellence, combining straightforward techniques with impressive results suitable for various occasions. Their charm derives from combining simple ingredients through uncomplicated methods to create visually stunning individual treats. Whether preparing them for casual family enjoyment or formal gift-giving, thumbprint cookies reward attention to detail with delicious, beautiful results that leave lasting impressions on all who enjoy them.
References
- Easy Thumbprint Cookies Recipe (video) — Tatyanas Everyday Food. Accessed April 2026. https://tatyanaseverydayfood.com/thumbprint-cookies-recipe/
- Thumbprint Cookies — Sugar Spun Run. Accessed April 2026. https://sugarspunrun.com/thumbprint-cookies/
- Easy Thumbprint Cookies (Use Any Jam) — Preppy Kitchen. Accessed April 2026. https://preppykitchen.com/thumbprint-cookies/
- A Master Thumbprint Cookies Recipe — by Lauren Cermak. Accessed April 2026. https://www.bylaurencermak.com/a-master-thumbprint-cookies-recipe/