When it comes to effortless yet impressive desserts, few treats capture the imagination quite like dirt cake. This whimsical creation combines crushed cookie pieces with creamy filling to evoke the playful imagery of actual soil and earthworms. What makes this dessert particularly appealing is its simplicity—no baking required, minimal prep time, and ingredients that most home cooks already have on hand. Whether you’re planning a children’s birthday party, preparing for a summer gathering, or simply craving a nostalgic treat, understanding the fundamentals of dirt cake construction will set you up for success.
Understanding the Essence of Dirt Cake
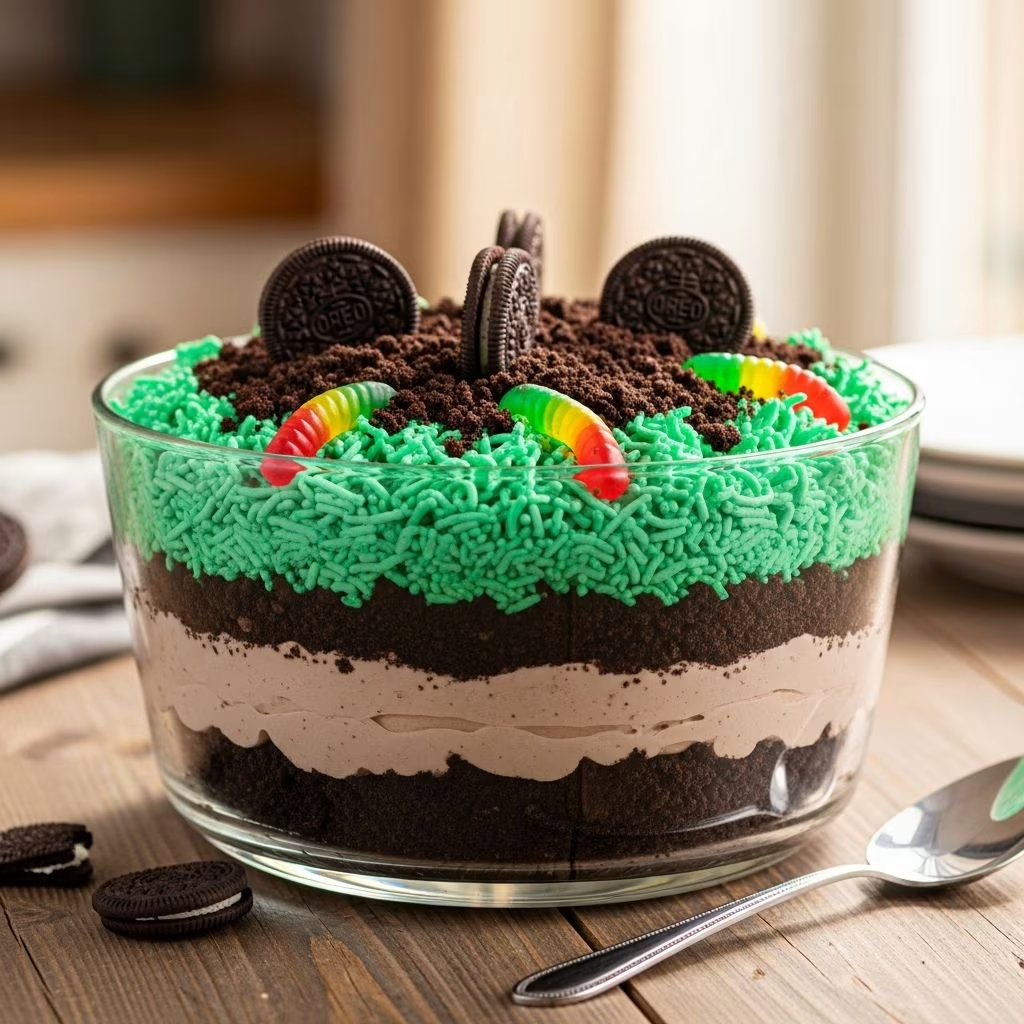
Dirt cake represents a perfect intersection of culinary creativity and playful presentation. The dessert plays on the contrast between appearance and reality, delivering something that looks unconventional but tastes absolutely delightful. The foundation of any dirt cake consists of three essential components: a base layer of crushed cookies that resembles soil, a middle filling that provides creamy richness, and a top layer of cookie crumbles that complete the “dirt” aesthetic.
This no-bake dessert has become a beloved classic, particularly in American households where it’s often associated with Midwestern traditions and summer celebrations. The beauty of dirt cake lies in its versatility—while traditional versions use vanilla pudding and Oreo cookies, countless variations allow home cooks to personalize the experience based on dietary preferences, flavor preferences, and available ingredients.
Essential Components and Their Functions
The Cookie Foundation
The crushed cookie layer serves as the structural base of your dirt cake. Oreo cookies are the traditional choice, offering a distinctive chocolate flavor and dark appearance that authentically resembles soil. When crushing cookies, the texture matters significantly. A rolling pin creates varied chunk sizes that add visual interest and prevent the layer from becoming too dense. For those preferring finer textures, a food processor delivers uniform crumb consistency that packs more tightly.
The cookie base typically requires approximately two-thirds of your total cookies, with the remaining third reserved for the top layer. This distribution ensures adequate coverage without overwhelming the filling layers. When pressing the cookie layer into your serving dish, use firm but gentle pressure to create a cohesive layer that holds together without compacting excessively.
The Creamy Filling Layer
The heart of any excellent dirt cake is the filling mixture, which combines pudding, whipped topping, cream cheese, and butter. This combination creates a texture that’s simultaneously light and substantial, preventing the dessert from feeling either too dense or too airy. The pudding provides structure and sweetness, while whipped topping contributes aeration that lightens the overall density. Cream cheese and butter add richness and create a more complex flavor profile than pudding alone would provide.
When combining these ingredients, proper technique ensures optimal results. Beating butter and cream cheese until smooth creates a homogeneous base before incorporating other elements. Folding rather than stirring prevents deflating the whipped topping, which is essential for maintaining the light, mousse-like texture that makes this dessert so appealing.
Pudding Selection and Preparation
Instant pudding offers convenience and consistent results, requiring only milk and whisking to reach the proper consistency. White chocolate or vanilla pudding varieties are most common, though chocolate pudding provides an alternative that intensifies the “dirt” appearance. The pudding mixture must reach the correct thickness before folding into other ingredients—too thin and your layers will become muddy, too thick and the mixture becomes difficult to spread evenly.
Step-by-Step Assembly Instructions
Preparation Phase
Begin by gathering all ingredients and equipment. This advance preparation prevents scrambling mid-recipe and ensures ingredients reach appropriate temperatures. Cream cheese and butter should be softened to room temperature, which facilitates smooth mixing and prevents lumps in your final filling. Cold cream cheese doesn’t incorporate properly, resulting in grainy texture that detracts from your final product.
Crush your cookies before beginning the filling mixture. This allows time for any dust to settle and gives you a clear sense of how finely or coarsely your cookies have been broken. Separate two-thirds for the base layer and reserve one-third for the top.
Building the Layers
Select an appropriate serving vessel—a 9×13-inch baking dish, a trifle bowl, or individual cups all work effectively. The choice depends on your serving style and the number of guests. Press your cookie base firmly but gently across the bottom of your vessel, creating an even layer approximately one-quarter inch thick.
Prepare your pudding mixture according to package directions, whisking vigorously for the recommended time. In a separate bowl, beat softened cream cheese and butter until completely smooth, then mix in powdered sugar. Fold in whipped topping gently until no white streaks remain. Finally, fold the pudding mixture into the cream cheese mixture using a rubber spatula and slow, deliberate motions.
Pour the filling mixture over your cookie base, spreading it into an even layer. This step determines the visual appeal of your cross-section when served, so take time to create level, uniform coverage. Top with reserved cookie crumbles, distributing them evenly across the entire surface.
Flavor Variations Worth Exploring
Chocolate-Forward Versions
Substituting chocolate pudding intensifies both the flavor and the visual “dirt” effect. This variation appeals particularly to chocolate enthusiasts and creates an even more authentic soil appearance. Some recipes incorporate finely chopped chocolate into the filling mixture, adding complexity and deepening the chocolate profile without requiring additional pudding.
Seasonal Adaptations
Easter-themed dirt cakes incorporate decorative elements including coconut “grass,” pastel-colored candies, and candy eggs. These presentations transform the basic recipe into a festive centerpiece while maintaining the core components. Summer versions might incorporate berry-flavored puddings or fresh fruit scattered among the layers, adding freshness and color contrast.
Texture Modifications
Some variations layer chopped cookies alongside crushed ones, creating varied texture throughout rather than relying solely on uniform crumbles. Others incorporate cookie pieces of different sizes, with larger chunks at the bottom providing structural integrity and finer crumbles at the top for a refined appearance.
Creative Presentation Strategies
Traditional Serving Methods
Serving directly from a 9×13-inch baking dish offers simplicity and elegance. This method works particularly well for casual gatherings where guests help themselves. Trifle bowls provide visual drama, allowing guests to see the distinct layers while maintaining the whimsical aesthetic.
Individual Portion Presentations
Assembling individual servings in clear cups or small containers creates portion control and sophisticated presentation. This approach works exceptionally well for catered events or formal gatherings. Layering ingredients carefully in transparent vessels allows the visual appeal to shine while providing contained servings.
Thematic Decorating Elements
Gummy worms arranged across the top amplify the whimsical theme and delight children. Candy insects and edible decorations add personality without compromising flavor. For more sophisticated presentations, restraint in decorative elements creates elegance—a simple dusting of cocoa powder or finely crushed cookies projects refinement.
Make-Ahead Strategies and Storage
Component Preparation
Crushing cookies several hours ahead prevents last-minute rush. Store prepared crumbles in sealed containers at room temperature, protecting them from moisture and air exposure. The filling mixture can be prepared up to 24 hours before assembly, allowing you to compress your preparation timeline dramatically.
Assembly Timing
While the dessert can be assembled in advance, flavors integrate and textures develop fully after refrigeration. Most recipes recommend chilling for 3-4 hours before serving, though overnight refrigeration enhances flavor development and stabilizes all components. The longer resting period allows cookies to soften slightly from moisture absorption, creating more unified texture.
Storage Considerations
Covered dirt cake maintains quality in standard refrigeration for up to three days. The high moisture content in pudding and whipped topping means the dessert gradually becomes softer and more custard-like as it sits. For maximum enjoyment, consume within the first two days. Freezing is not recommended due to the pudding component’s tendency to become grainy upon thawing.
Troubleshooting Common Issues
Watery or Separated Filling
This occurs when pudding is not fully set before folding, or when whipped topping is overstirred. Always allow pudding to reach proper thickness before combining with other ingredients. Fold gently, using minimum strokes to prevent deflating the whipped topping. If separation occurs, refrigeration often resolves the issue as ingredients re-stabilize.
Overly Dense Layers
Compressed cookie bases result from excessive pressure during pressing. Use firm, gentle pressure instead of aggressive pounding. If your base becomes too dense, your layered filling may appear compressed or muddy rather than distinct. Similarly, overstirring the filling mixture deflates whipped topping, contributing to density.
Insufficient Flavor
Balance sweetness and flavor intensity by adjusting pudding powder quantities or adding vanilla extract. Some recipes incorporate almond extract, which adds subtle complexity. If chocolate pudding seems insufficient, incorporate cocoa powder into the filling mixture for deeper chocolate flavor without altering texture significantly.
Frequently Asked Questions
Can I use dairy-free ingredients?
Dairy-free versions require substituting cream cheese and butter with plant-based alternatives and using non-dairy milk. Coconut or oat milk works better than almond milk for pudding preparation. Dairy-free whipped topping maintains similar texture and functionality as traditional varieties.
How far in advance can I prepare this dessert?
Component preparation can occur up to 24 hours ahead. Final assembly should occur 3-4 hours before serving to allow proper setting. The dessert maintains quality for three days when properly covered and refrigerated.
What serving dish size works best?
A 9×13-inch baking dish serves approximately 12 people. Trifle bowls accommodate 8-10 servings. Individual cups provide portion control for any guest count. Adjust ingredient quantities based on your selected serving vessel.
Can I substitute the pudding flavor?
Any instant pudding flavor works—chocolate, butterscotch, French vanilla, or pistachio create interesting variations. Consider flavor pairing with your cookie selection for harmonious results.
References
- Dirt Cake Recipe — Lil’ Luna. Accessed April 2026. https://lilluna.com/dirt-cake/
- Dirt Cake Recipe – Preppy Kitchen — Preppy Kitchen. Accessed April 2026. https://preppykitchen.com/dirt-cake/
- Dirt Cake Recipe – Fun and Whimsical — Iowa Girl Eats. Accessed April 2026. https://iowagirleats.com/yo-mamas-dirt-cake/
- The Best Oreo Dirt Cake — JoyFoodSunshine. Accessed April 2026. https://joyfoodsunshine.com/dirt-cake/
- Ten Minute Easter Dirt Cake — Best Friends For Frosting. Accessed April 2026. https://bestfriendsforfrosting.com/ten-minute-easter-dirt-cake/