Easter celebrations often center around family traditions and memorable desserts that bring joy to the table. One creative way to elevate your holiday spread involves crafting a whimsical bunny-shaped cake that serves as both an impressive centerpiece and a delicious treat. This design approach requires only two standard round cake layers and basic decorating supplies, making it an accessible project for bakers of varying skill levels.
The beauty of this particular cake design lies in its simplicity and the impressive visual impact it creates. By strategically cutting and positioning two baked rounds, you’ll achieve a recognizable bunny form that delights guests of all ages. The project combines fundamental baking skills with creative assembly, allowing home bakers to produce a professional-looking dessert without requiring specialized equipment or advanced techniques.
Essential Components and Materials You’ll Need
Before beginning this baking project, gather all necessary ingredients and supplies to ensure a smooth workflow. Having everything prepared and organized prevents mid-project scrambling and allows you to focus on the creative aspects of cake assembly and decoration.
Cake Base Ingredients
The foundation of your bunny cake consists of two round cake layers. You have complete flexibility in selecting your cake components. Store-bought cake mixes offer convenience and consistent results, while homemade recipes provide opportunities for customization and flavor personalization. Whether you prefer vanilla, chocolate, funfetti, or coconut varieties, the choice depends entirely on your taste preferences and dietary considerations.
Consider the flavors you plan to incorporate through frosting selections. Vanilla-based cakes pair beautifully with diverse frosting options, while chocolate cakes create stronger flavor statements that pair well with complementary frostings. Some bakers choose to add shredded coconut or coconut extract to their cake batter for enhanced texture and tropical notes.
Frosting and Decoration Supplies
- White frosting as your primary base layer (ready-made or homemade buttercream)
- Pink frosting for accent details (strawberry varieties work particularly well)
- Chocolate icing or melted chocolate for facial features and fine details
- Jellybeans or spherical candies for colorful embellishments
- Piping bags and tips for precise frosting application
- Food coloring if adjusting frosting tones
- Small candies, chocolate chips, or wafers for eyes and nose features
The Baking Process: Creating Your Foundation
Begin your bunny cake journey by preparing your oven and baking pans. Proper preparation ensures even baking and prevents sticking, which is crucial when you plan to cut and rearrange cake pieces.
Preparation and Baking Steps
Preheat your oven to the temperature specified in your cake recipe, typically around 350°F. Line your cake pans with parchment paper and apply nonstick cooking spray to create multiple layers of protection against sticking. This dual approach proves especially valuable when you’ll be cutting the baked cakes into specific shapes.
Prepare your cake batter according to your chosen recipe or package directions. Divide the batter evenly between the two prepared round pans, filling each approximately halfway to allow room for rising. Bake until a toothpick inserted in the center emerges clean or with just a few moist crumbs, typically between 25-30 minutes depending on your oven characteristics and cake thickness.
Allow the baked cakes to cool in their pans for approximately 15 minutes before carefully turning them out onto cooling racks. Complete cooling is essential before proceeding with cutting and assembly, as warm cakes become fragile and difficult to manipulate. Patient cooling prevents crumbling and ensures cleaner cuts when shaping your bunny components.
Strategic Cutting Techniques for Bunny Components
Creating a convincing bunny silhouette requires thoughtful cuts that transform simple rounds into distinctive features. The cutting process determines the overall success of your design, so approach this step with careful attention to proportions and placement.
Identifying Your Base and Accent Pieces
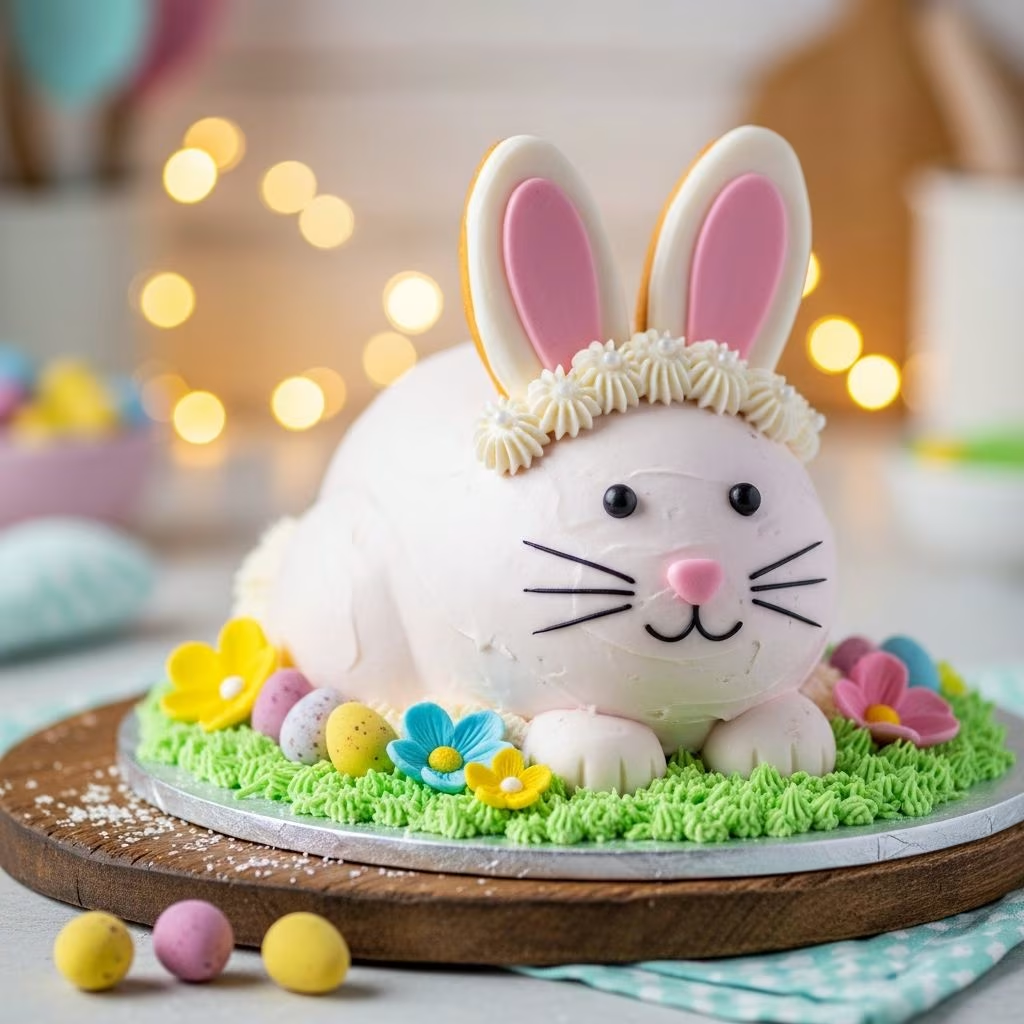
Designate one fully intact round cake as your bunny’s face. This becomes the central focal point that anchors your entire design. The second round cake undergoes strategic cutting to create the ears and decorative bow-tie element positioned at the bunny’s chin.
Using a sharp serrated knife, make two curved cuts into the second round to create ear-shaped pieces. The cuts should be substantial enough to produce recognizable ear forms while leaving sufficient cake for the decorative bow-tie component. Position these cuts symmetrically on opposite edges of the round to ensure balanced ears when assembled.
The remaining cake segments from the second round, after ear removal, form your bow-tie accent piece. Shape this component with slight curves to suggest a tied bow appearance. If the leftover piece requires trimming for aesthetic purposes, reserve those scraps for testing frosting colors or enjoying as a baker’s treat.
Assembly Strategy: Building Your Bunny Form
Thoughtful placement transforms individual cake pieces into a cohesive bunny character. Consider your serving surface before beginning assembly, as the entire structure will remain on your presentation platter throughout frosting and decoration.
Creating Structural Balance
Position your designated face cake slightly below center on your serving platter or baking pan. This placement leaves sufficient space above for ear positioning and creates proportional bunny proportions. Stability proves important, so ensure the round sits firmly without wobbling.
Place your two ear pieces symmetrically at the top corners of the face cake, angling them slightly outward for a more animated appearance. The bow-tie component attaches at the bottom center of the face cake, creating a charming accessory that breaks up the simple round silhouette.
Before applying frosting, verify that all pieces sit at desired angles and that your overall composition pleases you visually. Adjustments at this stage prove much simpler than repositioning after frosting application.
Frosting Application and Decoration
The frosting stage transforms your cake components into a polished finished product. Strategic color choices and decorative techniques elevate your creation from simple to spectacular.
Base Frosting Layer
Apply white frosting to cover the face and ear sections of your bunny cake. Use a spatula or frosting knife to create even coverage, smoothing the frosting for a clean, professional appearance. Work systematically from the center outward, ensuring no cake remains visible beneath the white frosting layer.
The white frosting serves as your neutral canvas, allowing accent colors and decorative elements to stand out prominently. Aim for frosting thickness of approximately 1/4 inch for adequate coverage and visual appeal.
Accent Color Application
Pink frosting creates distinctive inner ear details that add character and dimension to your bunny. Using a smaller spatula or piping bag, carefully apply pink frosting to the interior of each ear section. This two-tone effect immediately reads as “bunny ears” to viewers.
Apply your pink frosting to the bow-tie accent piece as well, creating visual harmony between the ear interiors and the bunny’s accessory. Consider creating subtle shading by using slightly darker pink around the edges of these components for added depth.
Facial Feature Details
Chocolate icing or melted chocolate allows precise creation of your bunny’s expressive face. Using a fine piping tip or small brush, carefully draw eyes positioned appropriately on the face cake. Slightly angled eyes create a more friendly, animated expression than perfectly straight eyes.
Add delicate whisker lines radiating from a central point on the face, creating the characteristic bunny whisker pattern. These details needn’t be perfectly symmetrical; slight variations enhance the whimsical quality of your creation.
Create a pink nose using small piping strokes or a small dollop of pink frosting positioned above the whisker area. A tiny pink nose provides an essential finishing detail that completes the bunny’s facial expression.
Festive Embellishments
Decorate your bow-tie with jellybeans or colorful spherical candies arranged in patterns that appeal to you. Create stripes, borders, or clustered groupings depending on your aesthetic preferences. These colorful additions provide visual interest and add a festive quality to your presentation.
Consider adding coconut shreds throughout the frosted surface to create a textured, fur-like appearance. Pressed gently into the white frosting, coconut transforms a smooth surface into one with dimension and tactile interest. This technique also disguises any frosting imperfections while adding visual complexity.
Troubleshooting Common Decorating Challenges
Even with careful planning, bakers occasionally encounter unexpected situations during the decorating process. Understanding solutions to common problems allows you to adapt and maintain your creative vision.
Addressing Structural Issues
If cake pieces shift during frosting application, small dowels inserted through multiple layers provide additional support. These dowels remain invisible once frosting covers them and significantly improve structural stability for elaborate designs.
Unstable ears may benefit from frosting “glue” applied generously where ears connect to the face cake. Allow this frosting to set slightly before continuing with additional decoration, ensuring secure attachment.
Managing Frosting Consistency
Frosting that’s too soft may cause sliding decorative elements. Refrigerate frosted cake for 15-20 minutes between decoration stages to allow frosting to firm up. This brief chill time prevents structural mishaps and provides more stable working surfaces for subsequent embellishments.
Overly stiff frosting becomes difficult to spread smoothly. If frosting hardens during your decorating process, microwave it in 5-second intervals while stirring until it reaches optimal consistency—soft enough to spread but still structured enough to hold its shape.
Storage and Serving Recommendations
Proper storage ensures your decorative bunny cake maintains its appearance and flavor quality until serving time.
Short-Term Storage
If serving within 24 hours, store your completed cake in a cool room away from direct sunlight and heat sources. Cover loosely with plastic wrap to prevent dust accumulation while allowing air circulation that prevents frosting from becoming excessively soft.
Refrigeration becomes necessary if your kitchen temperature exceeds 70°F or if serving extends beyond 12 hours. Refrigerated cakes maintain frosting integrity better and often improve in flavor as ingredients meld overnight. Remove from refrigeration 30 minutes before serving for optimal texture and taste.
Transportation and Display
Transport your bunny cake on a sturdy, level surface to prevent shifting during movement. If traveling significant distances, consider frosting and decorating at your destination rather than attempting to transport a fully decorated cake.
Display your finished cake on an appropriate serving platter or cake stand that complements your overall table aesthetic. Position the bunny face-forward toward your primary viewing angle for maximum visual impact. Ensure adequate space around your creation for convenient serving and photography.
Creative Variations and Personalization Options
The basic bunny cake design accommodates numerous creative interpretations and flavor variations, allowing you to customize your creation to suit specific preferences and celebrations.
Flavor Combinations to Explore
Vanilla cake with strawberry frosting creates a classic spring aesthetic perfect for Easter tables. Chocolate cake paired with chocolate frosting accented with pastel pink creates sophisticated charm. Lemon-flavored cakes with lavender-tinted frosting offer elegant, unexpected flavor combinations.
Decorative Enhancements
Incorporate your bunny cake into a themed table by selecting candies and embellishments that match your color scheme. Easter egg decorations, spring flowers, and coordinating linens create cohesive presentations that elevate the entire dining experience.
Add personalization by incorporating family initials or Easter messages written in chocolate or colored frosting on the bow-tie or base of the cake. These custom touches transform a generic cake into a celebration-specific creation.
Frequently Asked Questions
Can I make this cake in advance?
Yes, baked cake layers maintain quality for up to three days when stored in airtight containers. Assemble and decorate the cake no more than 24 hours before serving for optimal frosting appearance and texture.
What if I don’t have round pans?
Square or rectangular pans require different cutting approaches but can still produce bunny-shaped results with creative adjustments. Experiment with your specific pan shapes to develop personalized variations of this design.
How many servings does this cake provide?
A bunny cake made from two standard round layers typically serves 8-12 people depending on portion sizes and additional accompaniments offered.
Can I use store-bought frosting exclusively?
Absolutely. Store-bought frostings provide convenience and consistent results. Select varieties that complement your cake flavor and desired color scheme.
Is this cake suitable for children’s parties?
Definitely. The bunny design appeals strongly to young children, and the straightforward assembly process engages older children as a hands-on craft activity combined with baking.
References
- Easy Bunny Cake Recipe — Hello Yummy. Accessed April 2026. https://helloyummy.co/easy-bunny-cake/
- Easter Bunny Cake (with Video!) — Lauren’s Latest. Accessed April 2026. https://laurenslatest.com/easter-bunny-cake/
- Easter Bunny Cake Recipe — Pillsbury Baking. Accessed April 2026. https://www.pillsburybaking.com/recipes/easter-bunny-cake