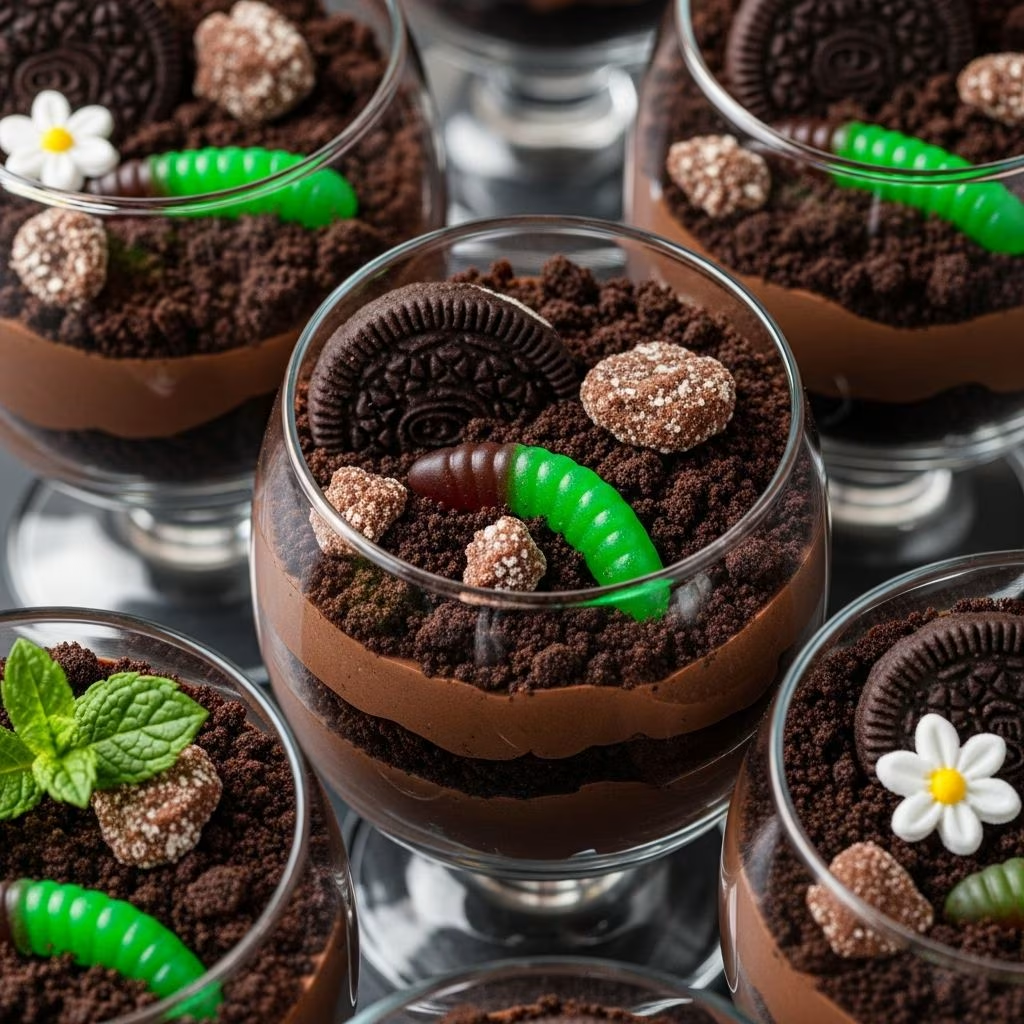
When looking for a dessert that combines simplicity with entertainment value, few options rival the appeal of dirt cups. This whimsical creation transforms basic pantry staples into an engaging treat that appeals to both children and adults. The layered composition of creamy pudding, crunchy cookie elements, and playful gummy worm decorations creates a dessert experience that is as enjoyable to assemble as it is to consume.
Understanding the Dirt Cup Concept
Dirt cups represent a creative approach to individual serving desserts that prioritizes accessibility and entertainment. The name derives from the visual presentation, which mimics the appearance of soil with embedded earthworms. This thematic approach makes the dessert particularly appealing for themed events, children’s gatherings, and occasions where presentation matters as much as taste.
The fundamental appeal of dirt cups lies in their versatility. The basic formula allows for numerous variations and customizations while maintaining the core concept of layered components that evoke a miniature landscape. Whether served at formal celebrations or casual family gatherings, these cups deliver consistent results with minimal effort.
Essential Components and Ingredient Selection
Creating dirt cups requires careful attention to ingredient quality and proportion. The recipe depends on five fundamental components that work together to achieve the desired texture and flavor profile.
Pudding Foundation
Instant chocolate pudding mix serves as the primary base for this dessert. The instant variety is essential, as it requires minimal preparation and achieves the correct consistency quickly. When combined with cold milk, instant pudding reaches proper thickness in approximately five minutes, making it ideal for efficient preparation. The pudding provides the creamy element that contrasts with the crumbly cookie texture.
Dairy Selection
Cold milk plays a crucial role in pudding preparation. While any milk variety will technically work, whole or two-percent milk delivers superior results in terms of richness and mouthfeel. The cold temperature is particularly important, as it helps the pudding set properly and maintains the desired consistency throughout assembly and storage.
Cookie Components
Chocolate sandwich cookies, typically Oreos, provide both the textural contrast and the “dirt” element essential to the concept. A standard recipe requires one to two packages of these cookies, which are crushed to varying degrees of fineness depending on the desired texture. Some cooks prefer uniform fine crumbs, while others leave some larger pieces intact for added texture.
Whipped Topping
Whipped topping, commonly found as frozen products in grocery stores, contributes airiness and smoothness to the pudding mixture. When folded rather than stirred into the pudding, the topping maintains its light texture while creating a mousse-like consistency that improves the overall mouthfeel of the finished dessert.
Decorative Elements
Gummy worms serve as the playful garnish that completes the visual presentation. These candies are positioned on the surface of each assembled cup to evoke the appearance of earthworms in soil. Some recipes suggest three to four worms per cup, though this can be adjusted based on personal preference and candy availability.
Preparation and Assembly Process
Initial Pudding Preparation
Begin by pouring cold milk into a medium mixing bowl. Sprinkle the instant chocolate pudding mix over the milk surface and vigorously whisk the combination for one to two minutes until no lumps remain and the mixture is well incorporated. Allow this mixture to rest undisturbed for approximately five minutes, during which time the pudding will thicken to the appropriate consistency.
Cookie Processing
While the pudding rests, prepare the cookie crumbs by processing chocolate sandwich cookies in a food processor or by hand crushing them in a sealed plastic bag. The texture of the crumbs can be adjusted based on preference—finer crumbs create a more uniform “dirt” appearance, while coarser pieces add textural interest.
Whipped Topping Integration
Once the pudding has thickened sufficiently, add the thawed whipped topping to the bowl. Using a gentle folding motion rather than vigorous stirring, combine the topping with the pudding until thoroughly incorporated. This technique preserves the light, airy quality of the whipped topping while distributing it evenly throughout the pudding.
Layering and Assembly
Prepare eight to ten clear plastic cups by arranging them on a flat surface for easy access. Begin assembly by spooning a layer of the pudding mixture into each cup, filling it approximately one-third to one-half of the way. Follow this with a layer of crushed cookies, spreading them to create an even coverage.
Repeat this layering process, adding another portion of pudding mixture followed by a second layer of cookie crumbs. The transparent cups allow the layered components to be visible, enhancing the visual appeal of the finished product.
Final Presentation
Complete the assembly by positioning gummy worms on the surface of each cup. Arrange them as desired to enhance the thematic presentation. At this stage, the dirt cups are ready for immediate consumption or can be refrigerated until serving time.
Timing and Preparation Efficiency
One of the primary advantages of dirt cups is the efficiency of preparation. The entire assembly process, from pudding preparation through final garnishing, typically requires only ten to twenty minutes of active work time. This rapid timeline makes the dessert suitable for last-minute entertaining or quick family treats.
Unlike baked desserts that require oven time and cooling periods, dirt cups are ready to serve immediately after assembly. While chilling improves the texture and allows flavors to meld, refrigeration is optional rather than mandatory, making these cups adaptable to various time constraints.
Serving Suggestions and Presentation Strategies
Individual Servings
The use of individual cups or small glasses allows for elegant plating without additional serving dishes. Each guest receives their own complete portion, eliminating the need for serving utensils and reducing cleanup requirements.
Display and Transportation
Clear plastic cups serve both functional and aesthetic purposes. The transparent walls showcase the layered construction, making the dessert visually interesting even before tasting. Additionally, individual cups are easy to transport to parties, picnics, and other events, as each portion remains contained and protected.
Quantity Planning
A basic recipe using a single box of pudding mix and two cups of milk yields approximately eight to ten servings, depending on cup size. This standard yield makes quantity planning straightforward for various gathering sizes.
Customization and Variation Possibilities
Flavor Modifications
While chocolate pudding represents the traditional choice, the recipe accommodates numerous flavor variations. Vanilla pudding provides a milder alternative that allows the cookie component to dominate. Chocolate-chocolate combinations can be achieved by selecting pudding flavors paired with complementary cookie varieties.
Cookie Alternatives
Though chocolate sandwich cookies remain standard, experimentation with other cookie varieties produces interesting results. Vanilla wafers, crushed brownies, or chocolate chip cookies create different textural profiles and flavor combinations while maintaining the fundamental concept.
Decorative Options
Beyond traditional gummy worms, various candies and toppings enhance the presentation. Gummy frogs, candy flowers, crushed nuts, or chocolate rocks provide alternative or supplementary garnishes that personalize the dessert.
Storage and Make-Ahead Preparation
Assembled dirt cups maintain quality when refrigerated for one to two days prior to serving. Cover the cups with plastic wrap or aluminum foil to prevent the pudding from absorbing odors from surrounding foods. The cookies may gradually soften during extended refrigeration, though this change in texture is often considered an improvement.
The pudding mixture itself can be prepared in advance and stored separately from the cookie and decorative components. This approach allows for last-minute assembly when needed, providing flexibility in meal planning and party preparation.
Nutritional Considerations and Ingredient Substitutions
Traditional dirt cups are decidedly indulgent desserts not intended as health-conscious options. However, modifications accommodate various dietary preferences and restrictions. Sugar-free pudding mixes provide options for those monitoring sugar consumption, while dairy-free whipped alternatives accommodate those with lactose sensitivity.
The fundamental recipe structure remains unchanged regardless of ingredient substitutions, meaning the basic assembly method works with modified ingredients while maintaining the appealing presentation and basic flavor profile.
Why Dirt Cups Appeal to Different Audiences
The dessert’s enduring popularity stems from multiple factors beyond basic taste. The playful presentation appeals to children, who enjoy the thematic element and participatory assembly process. Adults appreciate the efficiency and low skill requirements, making the dessert accessible to novice cooks. The individual serving format appeals to hosts seeking elegant presentations without complex plating requirements.
The no-bake nature eliminates concerns about oven space and timing coordination, making dirt cups suitable for gatherings where multiple dishes require oven access or where outdoor entertaining eliminates baking options entirely.
Frequently Asked Questions
Can I make dirt cups without whipped topping?
Yes, although the texture will be denser. Some cooks substitute eight ounces of softened cream cheese for a richer, more substantial consistency. The pudding-only version works but lacks the light, mousse-like quality that whipped topping provides.
How far in advance can I prepare dirt cups?
Fully assembled dirt cups maintain quality for one to two days when properly covered and refrigerated. The pudding mixture itself can be prepared several hours ahead and stored separately from cookie crumbs and garnishes for final assembly closer to serving time.
Are there alternatives to gummy worms for decoration?
Absolutely. Gummy frogs, candy flowers, crushed peanuts, chocolate rocks, or any preferred candy creates an appropriate garnish while maintaining the thematic presentation.
What type of milk works best for this recipe?
While any milk percentage functions adequately, whole or two-percent milk produces superior results in terms of creaminess and mouthfeel compared to skim milk options.
Can I use non-instant pudding mix?
Traditional pudding mixes requiring stovetop cooking are technically possible but eliminate the no-bake advantage and require cooling time before assembly, making the process significantly more time-consuming.
Conclusion
Dirt cups represent an ideal dessert option for situations requiring simple preparation, appealing presentation, and flexible timing. The combination of basic ingredients creates a finished product that entertains visually while satisfying culinary expectations. Whether prepared for children’s events, casual family gatherings, or formal celebrations, these no-bake cups deliver consistent results with minimal effort. The adaptability of the basic recipe to various ingredient modifications and presentation styles ensures that dirt cups remain a versatile addition to any cook’s repertoire.
References
- Dirt Cups – Dance Around the Kitchen — Dance Around the Kitchen. Accessed April 2026. https://dancearoundthekitchen.com/dirt-cups/
- Dirt Cups Recipe – Our Love Language is Food — Our Love Language is Food. Accessed April 2026. https://ourlovelanguageisfood.com/dirt-cups/
- Dirt Cups – Julie’s Eats & Treats — Julie’s Eats & Treats. Accessed April 2026. https://www.julieseatsandtreats.com/dirt-cups/
- Dirt Cups For Kids Recipe — Food.com. Accessed April 2026. https://www.food.com/recipe/dirt-cups-for-kids-20808