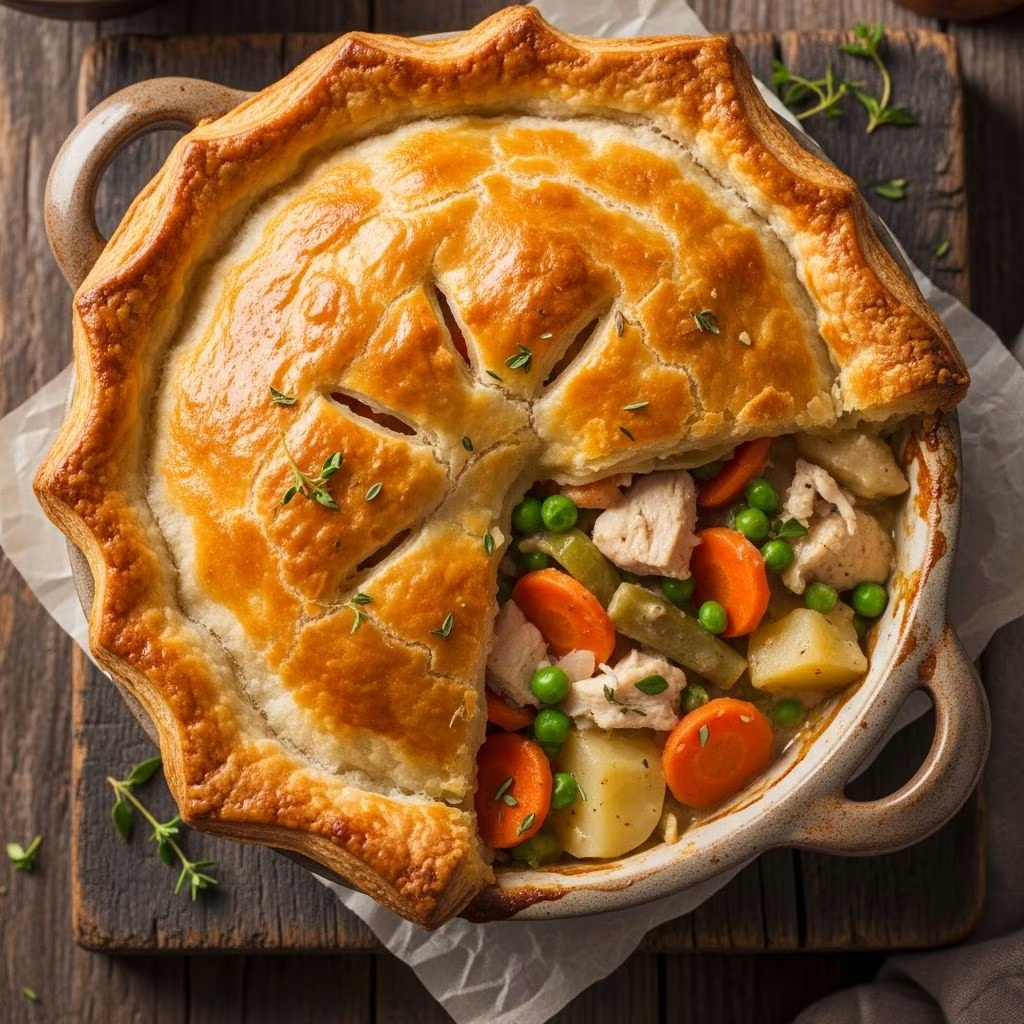
There’s something inherently comforting about a steaming bowl of chicken pot pie. The combination of tender chicken, vegetables suspended in a silky cream sauce, and a golden, flaky crust creates a dish that feels indulgent yet approachable. However, traditional pot pie recipes often demand hours of preparation, including making pastry dough from scratch and carefully orchestrating multiple cooking stages. For those seeking the same satisfaction without the time commitment, a streamlined approach using rotisserie chicken and frozen puff pastry delivers restaurant-quality results in a fraction of the time.
Why Rotisserie Chicken Changes Everything
The foundation of any exceptional pot pie lies in its protein. Rotisserie chicken eliminates the most time-consuming component of the cooking process—roasting and shredding chicken from raw. A store-bought rotisserie chicken provides fully cooked, seasoned meat that requires only minimal handling. This ingredient transforms what might be a three-hour project into something achievable on a busy Tuesday evening. Beyond convenience, rotisserie chicken brings a depth of flavor that surpasses what many home cooks achieve when cooking chicken at home, since commercial rotisseries often use carefully calibrated equipment and seasoning blends.
When selecting rotisserie chicken, choose one with intact skin that still shows moisture, indicating it hasn’t been sitting under heat lamps for extended periods. Remove the skin immediately upon arriving home, as this step makes shredding significantly easier. One standard rotisserie chicken yields approximately four cups of usable meat, which perfectly suits a pot pie serving six to eight people.
Building Layers of Flavor in the Sauce
The sauce represents the soul of any pot pie. Rather than rushing through this component, taking time to develop its flavor profile elevates the entire dish. Begin by melting unsalted butter over medium heat until it foams—this indicates the water content is evaporating and the milk solids are beginning to brown slightly, adding a subtle nutty dimension.
Adding aromatics at this stage creates an olfactory foundation. Diced shallots cook down gradually, their natural sugars caramelizing into a sweet, mellow flavor that’s more refined than raw onion. Fresh thyme leaves contribute an herbaceous earthiness that complements chicken without overpowering it. Allow these ingredients to sauté for several minutes until the shallot becomes translucent and takes on a golden hue.
The flour acts as a thickening agent, but when cooked properly, it also adds complexity. Rather than simply whisking it in and moving forward, let the flour cook in the fat for a minute or two, stirring constantly. This process, known as making a roux, allows the flour to lose its raw taste and develop a pale golden color. The resulting mixture should smell toasty and inviting—this is when you know the flour has undergone proper development.
Creating the Perfect Consistency
Gradually incorporate chicken stock into the roux, whisking constantly to prevent lumps from forming. Adding it slowly, perhaps a half cup at a time, allows the flour to fully hydrate before more liquid joins the mixture. This methodical approach prevents the grainy texture that results from rushing the process. Once all the stock has been incorporated, add whole milk for richness and creaminess.
As the sauce simmers, it will gradually thicken as the flour continues to absorb the liquid. This stage requires patience—rushing with high heat or overcooking can result in a sauce that breaks or becomes too thick. The ideal consistency should coat the back of a spoon, leaving a thin trail when you run your finger across it. If the sauce becomes too thick, thin it with additional stock; if too thin, let it simmer longer.
Vegetable Selection and Preparation
While rotisserie chicken and puff pastry handle the convenience factor, fresh vegetables elevate nutritional content and provide textural variety. Diced carrots bring natural sweetness and vibrant color. Celery adds subtle earthiness and tender texture when diced into small, even pieces. Frozen pearl onions, thawed before use, provide pockets of concentrated onion flavor without the sharp bite of raw onion.
Frozen peas, also thawed, contribute a pop of color and slightly sweet flavor. Their smaller size means they integrate seamlessly into the sauce without requiring additional cooking time. Fresh flat-leaf parsley, stirred in just before assembly, adds brightness and herbaceous notes that prevent the dish from tasting heavy.
The timing of vegetable addition matters significantly. Longer-cooking vegetables like carrots should enter the sauce first, allowing them to reach tenderness. Softer vegetables and frozen components should be added closer to assembly, preventing them from becoming mushy.
Seasoning Strategy and Flavor Development
Proper seasoning requires restraint and tasting at multiple points. Begin with salt and pepper added conservatively, then taste and adjust. Worcestershire sauce introduces umami, the savory fifth taste that deepens the overall flavor profile without tasting overtly “fishy” or salty. A small amount goes a long way—start with a teaspoon and increase gradually until the flavor feels complete.
For those who enjoy heat, a dash of hot sauce brightens the sauce and adds complexity. The heat should be barely perceptible, acting as a flavor amplifier rather than a dominant element. Fresh herbs like thyme marry well with all these elements, and chopped parsley stirred in before assembly provides a fresh finish.
Understanding Puff Pastry Advantages
Commercial puff pastry represents one of the most successful kitchen shortcuts available. Unlike pie crust or biscuit dough, puff pastry creates hundreds of delicate, flaky layers through a process requiring dozens of folds and turns—a technique demanding hours of skill and practice to execute at home. A single thawed sheet creates a golden, crispy crust that rises above the filling, looking far more professional than most home cooks could achieve from scratch.
Puff pastry should be thawed in the refrigerator overnight rather than at room temperature, which can cause the butter within it to become greasy or unevenly distributed. Room-temperature thawing risks compromising the delicate laminated structure that creates those prized flaky layers. Once thawed, handle the sheet minimally to preserve its integrity.
Assembly and Baking Fundamentals
Before assembly, allow the chicken mixture to cool slightly. Placing room-temperature filling directly into a pie dish and immediately topping it with cold pastry can result in a soggy crust, as steam from the warm filling softens the pastry before it has a chance to crisp. A cooling period of five to ten minutes solves this issue without requiring significant additional time.
Pour the filling into a baking dish or similar oven-safe vessel. Position the thawed puff pastry sheet over the top, allowing it to drape naturally over the edges. Rather than stretching the pastry aggressively, let it settle into place. Use a sharp knife to cut several small slits into the surface—these steam vents prevent the pastry from puffing up excessively and allow internal moisture to escape.
An egg wash, created by beating an egg with a small amount of water or milk, brushed across the pastry surface promotes even browning and creates an attractive sheen. A soft pastry brush distributes the wash evenly without damaging the delicate layers.
Oven Temperature and Baking Timeline
Begin baking at 400 degrees Fahrenheit, a temperature hot enough to rapidly set the pastry and encourage it to rise and brown. After twenty to twenty-five minutes, reduce the temperature to 350 degrees Fahrenheit. This two-stage approach ensures the pastry develops proper color and texture while the filling heats through completely without overcooking or drying out.
Watch for visual cues indicating doneness. The pastry should deepen to a rich golden brown, and the filling should bubble visibly at the edges where it meets the crust. Depending on the depth of your baking dish and ambient kitchen temperature, total baking time typically ranges from fifty to sixty minutes.
If the pastry browns too quickly, place a loose tent of aluminum foil over the top, which reduces direct heat exposure while allowing air circulation. This technique prevents burning while the filling continues cooking below.
Resting and Serving Considerations
Allowing the finished pot pie to rest for ten to fifteen minutes before serving serves multiple purposes. The internal temperature stabilizes, the filling sets slightly, and the pastry becomes less fragile, making portioning cleaner. This brief rest also allows the dish to cool enough for comfortable eating.
Serve portions directly from the baking dish for casual presentations, or use a pie server to transfer portions to individual plates for more formal settings. The rested filling should hold its shape while remaining creamy and satisfying.
Variations and Customization Options
While the core recipe provides excellent results, numerous variations suit different preferences and dietary needs. Turkey can replace chicken entirely, providing a slightly earthier flavor. Mushrooms, either fresh or dried, add umami and complexity to the filling. Some cooks incorporate a small amount of white wine into the sauce, though this is entirely optional and depends on personal preference.
For vegetable-forward versions, increase the proportion of vegetables or add others like turnips, potatoes, or green beans. The binding sauce remains consistent; only the vegetables within it change. Those avoiding dairy can substitute cream with additional stock or coconut milk, though this alters the final flavor profile.
Storage and Reheating Methods
Leftovers can be stored in an airtight container in the refrigerator for up to three days. Reheating directly in a 350-degree Fahrenheit oven for fifteen to twenty minutes restores the pastry’s crispness better than microwave reheating, which tends to soften the crust. For quicker reheating, microwaving is acceptable, though accepting some textural compromise. Alternatively, reheat the filling separately and pair it with freshly baked puff pastry sheets for a fresh-crust experience.
Frequently Asked Questions
Can I prepare this dish in advance? Yes, prepare the filling completely, then refrigerate it separately from the puff pastry. On serving day, assemble and bake as directed. This preparation method works well for entertaining or meal planning.
What if my puff pastry tears during assembly? Small tears are typically invisible once the pastry rises and browns. For larger tears, patch them with scraps of puff pastry, pressing gently to seal.
Is it necessary to use all-butter puff pastry? All-butter versions produce superior flavor and crispness compared to versions containing vegetable shortening, but either type works. All-butter pastry may be pricier but delivers noticeably better results.
Can I freeze unbaked pot pie? Yes, assemble the dish, freeze it uncovered until solid, then cover tightly and freeze for up to one month. Bake from frozen, adding 10-15 minutes to the baking time.
What’s the best way to prevent a soggy bottom crust? Place the baking dish on a preheated baking sheet before filling and baking. This promotes heat transfer from below, helping the bottom pastry crisp. Ensure your filling has cooled slightly before assembly.
References
- Food Safety Guidelines for Poultry — U.S. Department of Agriculture Food Safety and Inspection Service. 2024. https://www.fsis.usda.gov/food-safety/safe-food-handling-and-preparation/poultry
- Pastry and Dough Science — America’s Test Kitchen. 2023. https://www.americastestkitchen.com
- Professional Cooking Techniques and Food Preparation — The Culinary Institute of America. 2024. https://www.ciachef.edu