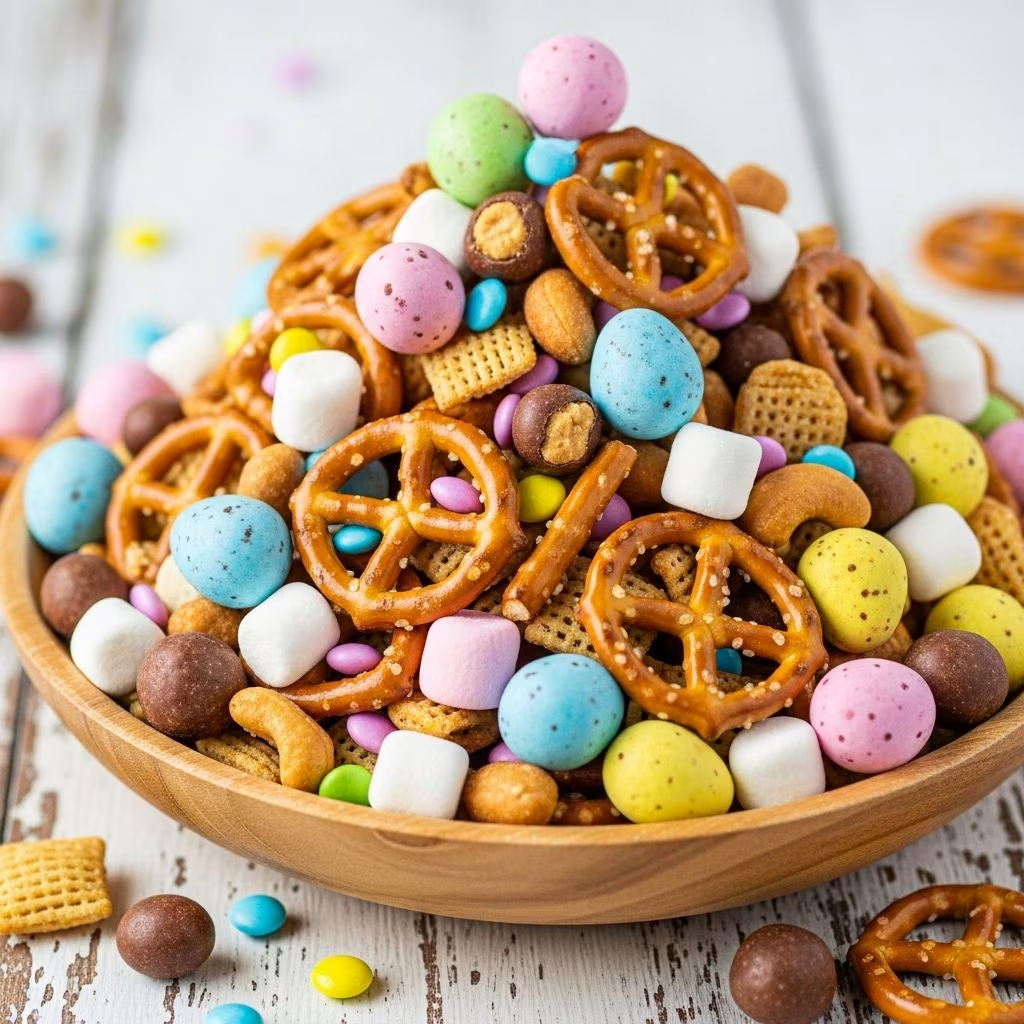
When the Easter season approaches, home cooks and party planners often seek simple yet impressive treats that don’t require oven time. One particularly delightful option is bunny bait, a versatile snack mix that combines crispy textures with sweet and salty flavors. This no-bake creation has become increasingly popular at Easter gatherings, school events, and spring parties, offering both ease of preparation and visual appeal through its pastel-colored components.
Understanding the Appeal of Seasonal Snack Mixes
Bunny bait represents a modern take on classic snack mix traditions that have been beloved in American cuisine for generations. Like other seasonal variations of sweet Chex mixes, this Easter version capitalizes on the festive nature of the holiday while maintaining the simplicity that makes quick snacks so appealing to busy households. The beauty of bunny bait lies in its adaptability—cooks can modify ingredients based on personal preferences, dietary needs, or what they have available in their pantries.
The inspiration for creating holiday-specific snack mixes often comes from the desire to celebrate seasons through food in meaningful ways. Just as reindeer chow appears during winter months and puppy chow serves as a year-round favorite, bunny bait has found its niche as the quintessential Easter snack. Its popularity continues to grow among families seeking festive treats that children can help prepare and enjoy together.
Essential Components and Ingredient Selection
Creating successful bunny bait begins with understanding each ingredient’s role in the final product. The foundation of this snack relies on combining components that offer contrasting textures and flavors, resulting in a snack that remains interesting bite after bite.
Base Cereals
The cereal components form the backbone of any quality bunny bait recipe. Most traditional versions incorporate a combination of two or three different cereals to create textural variety. Honey nut Cheerios bring a subtle sweetness and familiar ring shape, while Rice Chex provides a larger, flatter surface that holds coatings well. Some recipes include Corn Chex as an alternative or addition, offering slightly different flavor notes. The key consideration when selecting cereals is choosing options with similar size distributions—this ensures even coating when the white chocolate is applied and creates a more cohesive final texture throughout the snack.
Crunchy Mix-Ins
Pretzels and peanuts serve as the secondary textural elements that define bunny bait’s personality. Pretzel rods and snaps work particularly well because they maintain their crunch throughout storage and resist becoming stale quickly. These elements provide essential saltiness that balances the sweetness of the chocolate coating and candies. Roasted and salted peanuts enhance this savory dimension while contributing nutritional substance to the snack. The proportion of these ingredients can be adjusted based on whether you prefer your snack mix more pretzel-forward or nut-dominant.
Colorful Candies
Easter M&Ms in pastel shades represent the visual signature of traditional bunny bait. The spring color palette—soft pinks, lavenders, greens, and blues—immediately signals the holiday theme and appeals to the festive spirit of the season. Some recipes incorporate butterscotch chips alongside the M&Ms, adding another flavor dimension and interesting nuggets of sweetness throughout. The quantity of candy can be split between ingredients added during the initial mixing and those sprinkled on top after the white chocolate coating, creating concentrated pockets of color and flavor.
The Binding Agent
White chocolate serves as the primary binding element that holds all components together. Recipes typically call for 12 ounces to 16 ounces of white chocolate, depending on desired coating thickness and total ingredient volume. The addition of coconut oil or vegetable oil to white chocolate proves essential for achieving smooth, pourable consistency and preventing the chocolate from becoming grainy or burning during melting. White chocolate’s mild, creamy flavor complements rather than overwhelms the other ingredients, allowing each component to contribute to the overall taste experience.
Preparation Methods and Technique
Combining Dry Ingredients
The process begins by assembling all dry components in the largest mixing bowl available. Using a bowl substantially larger than seems necessary prevents spillage during the vigorous mixing that follows and provides adequate space for tossing ingredients with the melted chocolate. Combining cereals, peanuts, pretzels, and a portion of the M&Ms at this stage ensures relatively even distribution of each element before the chocolate coating is introduced.
Melting the White Chocolate
Achieving the ideal white chocolate consistency requires careful attention to temperature and timing. Microwave-based melting using 15 to 30-second intervals, with thorough stirring between each cycle, prevents overheating and the associated risk of scorched or separated chocolate. The coconut or vegetable oil should be combined with the chocolate before melting rather than added afterward, as this incorporation method ensures even distribution throughout. Testing the chocolate for smoothness before removing it from the microwave helps determine whether additional heating cycles are necessary or if the residual heat will complete the melting process.
Coating and Combination
Pouring the melted chocolate over the dry mixture requires methodical stirring and folding motions to ensure every piece receives adequate coating. This step benefits from using a sturdy spoon or spatula to fold the mixture repeatedly, rotating from the bottom of the bowl upward. The goal is complete chocolate distribution without crushing the cereal pieces or pretzels excessively. Some recipes call for pouring half the chocolate, tossing, and then adding the remaining chocolate to achieve more uniform coverage while minimizing breakage.
Setting and Storage
Once the mixture achieves complete chocolate coating, it spreads in an even layer across parchment paper-lined baking sheets. The setting time typically ranges from 30 minutes to one hour, depending on room temperature and chocolate thickness. Warmer environments require longer setting periods. Once fully hardened, the snack mix breaks into irregular pieces ranging from single cereal clusters to small chunks containing multiple ingredients, creating varied bite sizes that enhance the eating experience.
Customization Options and Creative Variations
The fundamental bunny bait formula provides an excellent foundation that welcomes creative modifications based on personal preference, dietary needs, or ingredient availability. Substituting Rice Chex with Corn Chex, or incorporating additional cereal varieties, alters the overall flavor profile while maintaining structural integrity. Gluten-free cereal options and pretzels accommodate those with gluten sensitivities, ensuring this recipe can be shared across various dietary requirements.
Adding mini marshmallows introduces additional textural variety and creates pockets of marshmallow sweetness throughout the snack. Some cooks incorporate sprinkles after the chocolate coating sets, adhering them to any remaining tacky chocolate surfaces for added festive flair. The specific combination of candies can shift based on availability—while Easter M&Ms provide traditional spring colors, any pastel-colored candy that maintains structural integrity during mixing works effectively. Substituting white chocolate chips for almond bark or candy melts offers flexibility based on what’s available or preferred in the kitchen.
Timing Considerations and Practical Guidance
From initial ingredient assembly through final setting, bunny bait typically requires approximately 15 minutes of active preparation time, followed by 30 to 60 minutes of passive waiting. This timing structure makes it ideal for last-minute entertaining or projects requiring quick execution. The recipe’s efficiency and straightforward process also make it an excellent choice for involving children in holiday cooking activities, as no heating of ovens or complicated techniques challenge developing cooking skills.
Preparation timing around Easter events matters less than with baked goods, as bunny bait actually benefits from advance preparation. Making this snack 1 to 2 days before serving allows the chocolate coating to fully harden and any residual moisture to evaporate, resulting in crispier final textures. Proper storage in airtight containers extends the snack’s shelf life, maintaining quality for up to one week when kept in cool conditions.
Serving and Presentation Ideas
Bunny bait’s festive appearance makes it naturally suited for celebratory presentation. Serving the snack mix in decorative bowls, glass jars, or paper cones transforms it from simple homemade treat into impressive party fare. The pastel colors visible throughout the mix provide inherent visual appeal without requiring additional garnishes or styling. Small gift bags or decorative containers filled with bunny bait serve as charming take-home favors for Easter gatherings or spring celebrations.
Consider pairing bunny bait with other spring-themed refreshments to create coordinated snack tables. Its sweet-salty profile complements both savory appetizers and fruity beverages, making it versatile for various entertaining scenarios. The portion size also makes bunny bait suitable for snacking throughout an event rather than requiring specific serving moments.
Frequently Asked Questions About Bunny Bait
Can bunny bait be made without white chocolate?
While white chocolate provides the signature coating, alternative confections can substitute depending on preference. Milk chocolate, dark chocolate, or chocolate candy melts offer different flavor profiles. Butterscotch chips, caramel coating, or even colored candy melts adapted to fit a spring theme work as viable replacements, though these options shift the flavor from the traditional sweet-salty balance.
How should bunny bait be stored for maximum freshness?
Airtight containers kept at room temperature preserve bunny bait’s texture and flavor for up to one week. Avoid storing in warm locations or direct sunlight, which can soften the chocolate coating. Some cooks successfully store bunny bait in refrigerated conditions for extended preservation, though this can alter the texture slightly by making it firmer and potentially causing condensation if containers are opened frequently.
Is this recipe suitable for individuals with nut allergies?
Traditional bunny bait recipes include peanuts, making them unsuitable for those with nut allergies. However, the recipe adapts well by substituting additional pretzels, cereal, or other allergen-free mix-ins. Always verify that all ingredients, including chocolate and add-ins like butterscotch chips, haven’t been processed in shared facilities with tree nuts or peanuts if severe allergies are present.
What’s the best way to prevent the white chocolate from seizing?
Adding oil to the white chocolate before melting and using short microwave intervals with thorough stirring prevents the grainy texture characteristic of seized chocolate. Avoiding water contamination and monitoring temperature carefully during melting ensures smooth consistency. If chocolate does seize despite precautions, adding additional coconut oil in small increments and gentle stirring sometimes restores usable consistency.
Can bunny bait be made in advance for holiday gifts?
Bunny bait makes excellent homemade gifts when properly packaged. Preparing it 1 to 2 days before gift-giving ensures the chocolate has fully set. Storing in decorative containers or bags with clear storage instructions provides thoughtful presentation. The recipe’s shelf life of approximately one week means recipients have adequate time to enjoy the snack after receiving it.
Why Bunny Bait Deserves a Place in Your Easter Traditions
This festive snack transcends being merely a quick no-bake option—it represents an accessible entry point into holiday cooking that welcomes participation from cooks of all skill levels. The combination of textures, flavors, and colors creates a memorable snacking experience that captures the essence of Easter celebration. Whether prepared for family gatherings, school events, or as gifts for neighbors and friends, bunny bait delivers impressive results from minimal effort.
The recipe’s flexibility encourages creativity and personalization, allowing each cook to develop their own signature version. This adaptability ensures that bunny bait remains relevant and exciting across different households and cooking styles. As spring approaches and Easter planning begins, considering bunny bait as part of your holiday menu offers both practical advantages and the satisfaction of serving a beloved seasonal treat.
References
- Bunny Bait No Baking! — Chelsea’s Messy Apron. Accessed April 2026. https://www.chelseasmessyapron.com/bunny-bait/
- Bunny Bait for the Easter Bunny! — Beaming Baker. Accessed April 2026. https://beamingbaker.com/bunny-bait/
- Bunny Bait (Easter Snack Mix) — Beyond Frosting. Accessed April 2026. https://beyondfrosting.com/bunny-bait/
- Bunny Bait (Easter Chex Mix) — Princess Pinky Girl. Accessed April 2026. https://princesspinkygirl.com/bunny-bait/
- Gluten-Free Bunny Bait (Easter Chex Mix!) — Sweets & Thank You. Accessed April 2026. https://sweetsandthankyou.com/bunny-bait/
- Easy Bunny Bait Snack Mix Recipe — Organized Island. Accessed April 2026. https://www.organizedisland.com/bunny-bait/