Pork tenderloin stands as one of the most versatile and elegant proteins available to home cooks, offering a lean, tender texture that responds beautifully to various cooking methods and flavor combinations. When prepared with a golden, seasoned breadcrumb crust, this cut transforms into a show-stopping centerpiece that appears far more complicated than its straightforward preparation actually requires. The magic lies not in complex techniques but in understanding how to seal moisture within the meat while creating an appealing exterior that delivers both visual appeal and satisfying texture.
Understanding Pork Tenderloin as Your Protein Foundation
Before diving into preparation, it helps to understand what makes pork tenderloin such an excellent choice for elegant entertaining. This cut comes from the loin section of the pig and represents one of the leanest available options. Its naturally mild flavor serves as an ideal canvas for various seasonings and crusts, while its inherent tenderness means that even slight variations in cooking time rarely result in dry or tough meat. A typical pork tenderloin weighs between one and two pounds, making it perfectly proportioned for serving four to six guests or providing leftovers for a small family.
The uniform thickness of most tenderloins means they cook evenly throughout, eliminating the frustration of managing varying doneness levels across different sections. This consistency has made pork tenderloin increasingly popular among home cooks seeking restaurant-quality results without requiring advanced culinary training.
Selecting and Preparing Your Tenderloin
Quality selection begins at the market. Look for tenderloins with a pale pink color and minimal marbling, as excessive fat deposits will render during cooking and potentially prevent crust adhesion. Many butchers offer pre-packaged tenderloins, but purchasing from the meat counter allows you to inspect the cut more carefully and request specific sizes. Avoid packages containing multiple larger tenderloins when recipes specify smaller cuts, as this often indicates different muscle sections that cook at varying rates.
Upon arriving home, remove the tenderloin from refrigeration and inspect for silver skin—a thin, silvery membrane that runs along the surface. Using a sharp knife held at a slight angle, carefully separate this membrane from the meat by making shallow cuts beneath it and pulling it away. Removing silver skin is essential because it won’t break down during cooking and creates an unpleasant texture when eating. Pat the prepared tenderloin dry with paper towels before seasoning, as surface moisture interferes with both seasoning adherence and crust formation.
Crafting Your Breadcrumb Crust Mixture
The foundation of this recipe rests on combining seasoned Italian breadcrumbs with olive oil to create a mixture with the consistency of damp sand. This texture ensures the crust adheres uniformly to the meat while baking. The proportion of oil to breadcrumbs is crucial—too little oil results in a dry, flaky crust that falls away during cooking, while excessive oil creates an overly dense coating that becomes soggy rather than crispy.
Begin by measuring two cups of seasoned Italian breadcrumbs into a medium mixing bowl. These pre-seasoned varieties typically contain herbs, garlic, and salt, reducing the need for additional seasoning adjustments. However, if using unseasoned breadcrumbs, incorporate dried Italian herbs, garlic powder, salt, and pepper to taste. Gradually add olive oil while working the mixture between your fingers, testing frequently until you reach the ideal consistency. When pressed firmly, the mixture should hold together momentarily before crumbling apart—imagine the texture of slightly moist sand on a beach.
The Crust Application Technique
Proper crust application determines both visual presentation and final texture. Place your prepared tenderloin on a shallow baking sheet lined with parchment paper or aluminum foil for easy cleanup. Begin by creating a bed of breadcrumb mixture directly on the baking sheet, spreading it to approximate the length and width of your tenderloin and about one-quarter inch in depth. This foundation prevents the bottom from remaining uncoated while also catching drippings.
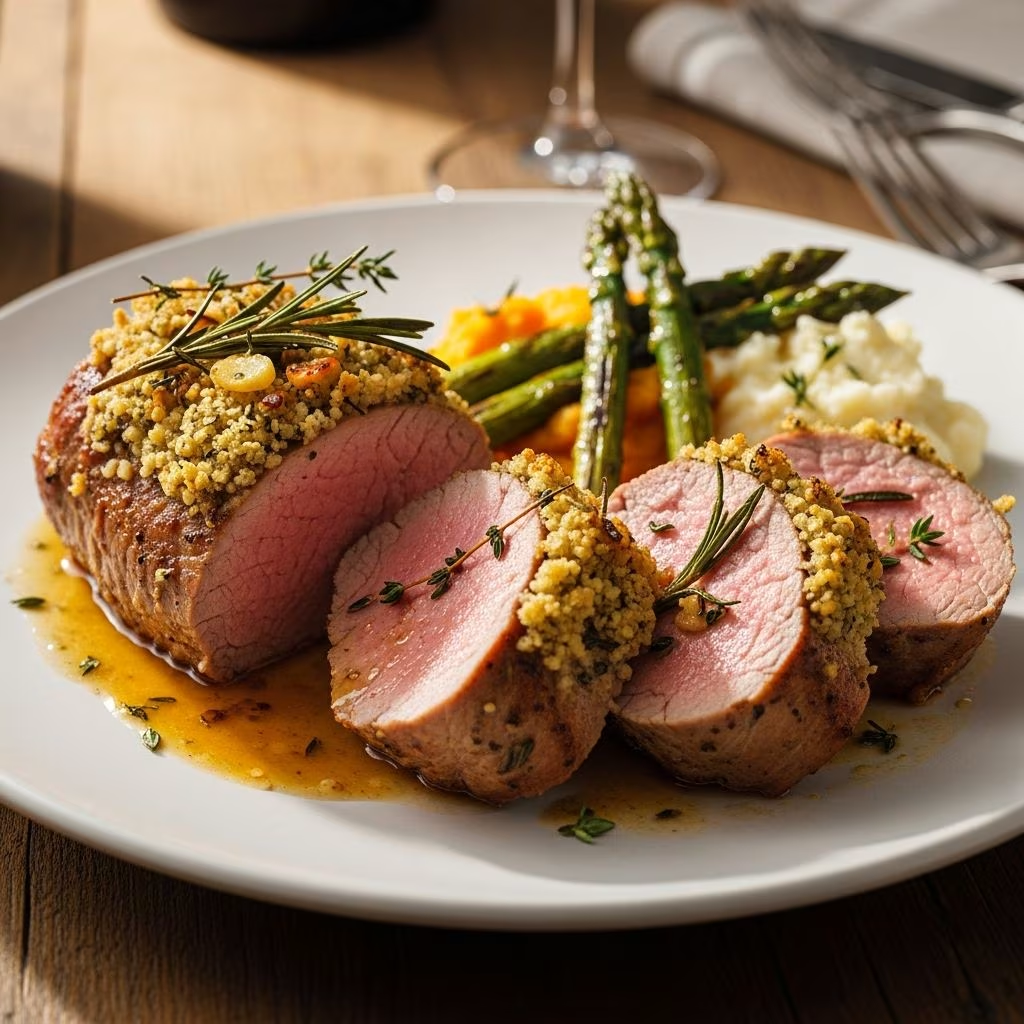
Press the tenderloin firmly into this base layer, applying enough pressure to ensure good contact without dislodging the crumbs. With your fingers or the back of a spoon, press additional crumb mixture onto the top and sides of the meat, working systematically around the entire surface. The coating should be approximately one-quarter inch thick and visible across all exposed surfaces. The goal is complete coverage with no pink meat visible underneath—this sealing action traps moisture within the meat during cooking, ensuring tender results.
Oven Preparation and Baking Parameters
Preheat your oven to 425 degrees Fahrenheit. This relatively high temperature facilitates rapid crust browning while cooking the interior to a safe temperature without excessive time in the oven. The high heat creates a gentle crust through the Maillard reaction, the chemical process responsible for the appetizing brown color and complex flavors that develop on food surfaces during cooking.
Place your prepared tenderloin in the preheated oven and bake for 35 to 40 minutes, depending on the thickness of your particular cut. Rather than relying solely on elapsed time, use an instant-read meat thermometer to determine doneness. Insert the thermometer into the thickest part of the meat, being careful not to touch bone if present. The USDA recommends cooking pork to an internal temperature of 145 degrees Fahrenheit, which results in meat that remains slightly pink in the center—this slight pinkness indicates maximum juiciness and tenderness. Some home cooks prefer cooking to 160 degrees Fahrenheit, which eliminates all pink color but may result in slightly less juicy meat.
Every oven behaves slightly differently due to variations in heating elements and air circulation, so checking temperature 5 to 10 minutes before anticipated completion prevents overcooking. The crust should develop a golden-brown color during baking, creating an appealing contrast with any exposed pink meat at the cut ends.
Resting and Serving Your Masterpiece
Upon removing the tenderloin from the oven, resist the urge to immediately slice into it. Allow the meat to rest for at least five to ten minutes, tented loosely with foil. During this resting period, residual heat continues gently cooking the interior while allowing muscle fibers to relax and reabsorb juices that migration toward the surface during cooking. Cutting immediately releases these juices onto the cutting board rather than keeping them within the meat, resulting in drier slices.
After resting, transfer the tenderloin to a cutting board and slice into half-inch thick rounds using a sharp knife. Each slice should reveal the tender, juicy interior surrounded by its protective crust. Arrange slices on a serving platter and optionally garnish with fresh chopped parsley or rosemary for added visual appeal and fresh herbaceous notes.
Flavor Enhancement Through Complementary Techniques
While the basic crusted tenderloin recipe stands beautifully on its own, several optional enhancements elevate the dish further. Some cooks prefer marinating the prepared tenderloin in Italian dressing for 12 to 24 hours before applying the crust, adding depth to the underlying meat flavor. This optional step requires advance planning but requires minimal additional effort.
Alternatively, quickly searing the tenderloin in a hot skillet with olive oil before crust application creates a caramelized exterior that adds complexity. After searing all sides until golden brown, apply your breadcrumb crust as directed and proceed with oven baking, reducing cooking time slightly since the meat has already begun cooking during the sear step.
Storage and Repurposing Leftovers
Properly stored leftovers extend the value of this elegant preparation. Place cooled, sliced pork tenderloin in an airtight container and refrigerate for up to three days. To reheat, wrap slices loosely in foil and warm in a 350-degree Fahrenheit oven for 15 to 20 minutes until heated through, preserving moisture and preventing drying.
Leftover tenderloin offers excellent options beyond simple reheating. Chop cooled meat and incorporate into grain bowls with roasted vegetables and vinaigrette, layer into sandwiches with arugula and aioli, or add to pasta dishes with cream sauce. The subtle pork flavor complements diverse ingredients, making leftovers surprisingly versatile.
Scaling the Recipe for Different Occasions
This recipe easily adapts to serve different numbers of guests. A single two-pound tenderloin typically serves four to six people with standard portions. For larger gatherings, prepare multiple tenderloins simultaneously, spacing them adequately on the baking sheet to ensure even heat circulation. Two tenderloins bake in approximately the same time as one, making this recipe practical for entertaining.
Conversely, the recipe halves cleanly for smaller households or intimate dinners. One pound of pork tenderloin serves two people generously, requiring approximately 25 to 30 minutes of baking time due to reduced thickness. Adjust crust quantity proportionally when reducing recipe size.
Flavor Customization and Variation
While Italian seasoning provides excellent foundational flavors, substituting alternative breadcrumb varieties or adding supplementary seasonings allows personalization. Panko breadcrumbs create a crispier, more rustic crust compared to traditional Italian breadcrumbs. Experiment with adding paprika, onion powder, or fresh herbs like thyme or rosemary to your crust mixture. These modifications maintain the recipe’s essential simplicity while expanding flavor possibilities.
Commonly Asked Questions About Crusted Pork Tenderloin
Can I prepare the tenderloin with crust several hours in advance?
Absolutely. Once you’ve applied the crust, cover the prepared tenderloin loosely with plastic wrap and refrigerate for up to eight hours. Remove from refrigeration approximately 15 minutes before baking to allow the meat to reach closer to room temperature, which promotes more even cooking throughout the interior.
What side dishes complement this elegant preparation?
Roasted asparagus, garlic mashed potatoes, and seasonal vegetables like Brussels sprouts or carrots provide traditional accompaniments. Lighter options include simple green salads with vinaigrette or grain-based sides like farro or quinoa pilaf.
Is it possible to cook pork tenderloin on the stovetop or grill instead of oven baking?
Yes, though oven baking best preserves the breadcrumb crust. Alternatively, sear the crusted tenderloin in a hot skillet on all sides, then transfer to a baking dish and finish in the oven. Grilling proves more challenging with a breadcrumb crust, as high direct heat tends to burn the coating before the interior reaches proper temperature.
How do I know if my pork tenderloin is fully cooked without cutting into it?
An instant-read meat thermometer remains the most reliable method. Insert it into the thickest portion of the meat, avoiding contact with bone or fat. The thermometer should read 145 degrees Fahrenheit for slightly pink, maximally juicy meat.
Can I substitute different types of oil in the crust mixture?
Absolutely. Vegetable oil, canola oil, or avocado oil work equally well. Some cooks prefer these alternatives for their neutral flavor or higher smoke points, though olive oil contributes pleasant herbaceous notes that complement the Italian seasoning already present in most pre-seasoned breadcrumbs.
References
- Pork Cooking Temperature and Food Safety Guidelines — United States Department of Agriculture Food Safety and Inspection Service. 2023. https://www.fsis.usda.gov/food-safety/safe-food-handling-and-preparation/meat
- The Maillard Reaction in Cooking and Food Science — Institute of Food Technologists. 2022. https://www.ift.org
- Pork Muscle Composition and Cooking Methods — National Pork Board. 2024. https://www.porkboard.org/cooking-pork