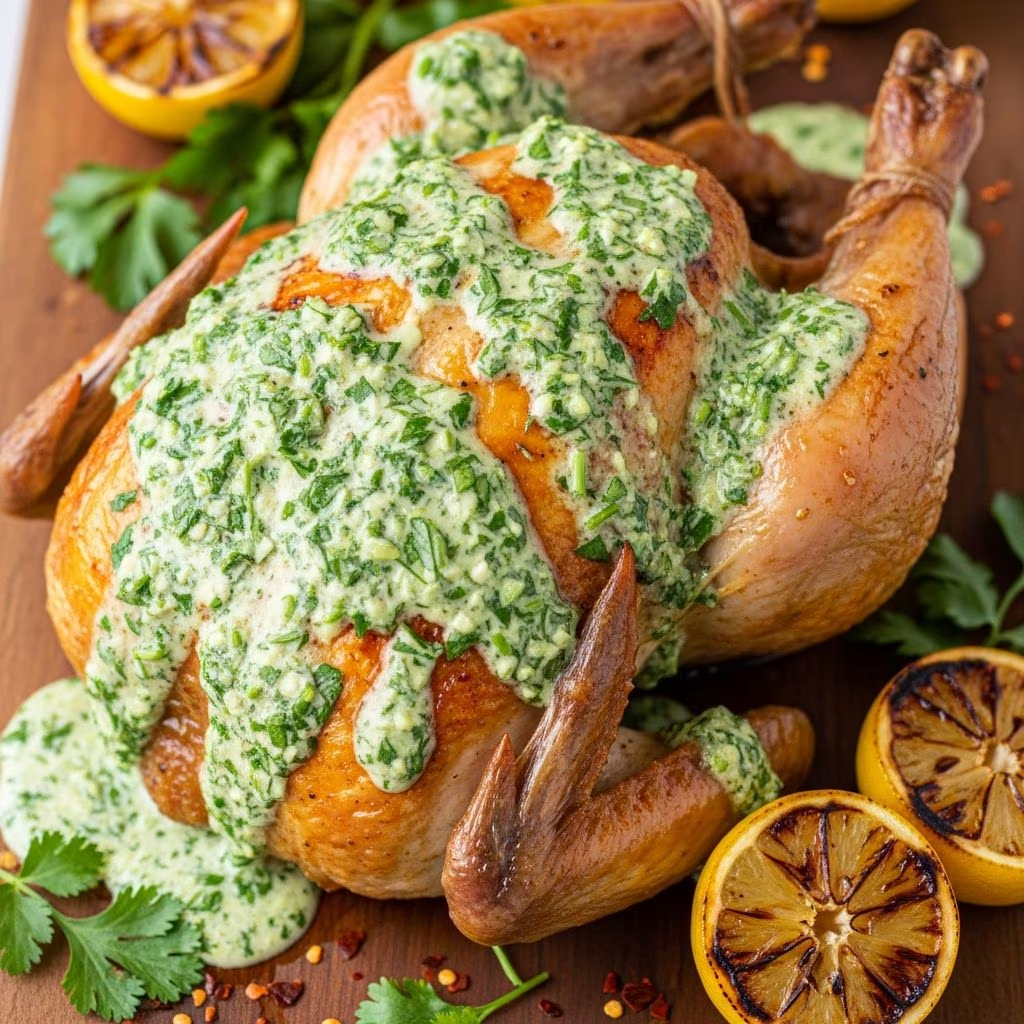
Roasted chicken remains one of the most versatile and satisfying meals you can prepare at home. When you combine the traditional flavors of chimichurri—a vibrant Argentine herb sauce—with a velvety yogurt base, you create something truly exceptional. This fusion transforms an ordinary roast chicken into an elegant centerpiece that impresses family and guests alike. The creamy chimichurri approach brings together herbaceous brightness with smooth, tangy richness that coats every bite.
Understanding Chimichurri and Its Creamy Evolution
Chimichurri has long been celebrated in Argentine and Latin American cuisines as a bold, peppery condiment that breathes life into grilled meats. Traditionally prepared with fresh herbs, garlic, vinegar, and oil, this vibrant sauce delivers complex flavor in every spoonful. However, the modern culinary trend toward creamy chimichurri represents a significant evolution in how we approach this classic preparation.
The integration of Greek yogurt or plain whole-milk yogurt into chimichurri creates a luxurious texture that clings beautifully to roasted chicken. This approach maintains the herbaceous punch and acidic brightness of traditional chimichurri while introducing a cooling, creamy element that balances richer poultry flavors. The result is neither purely traditional nor entirely modern, but rather a thoughtful bridge between two culinary traditions.
Selecting Your Ingredients for Maximum Flavor
The foundation of exceptional creamy chimichurri roast chicken begins with thoughtful ingredient selection. Each component contributes specific characteristics that build layers of flavor.
Choosing the Right Chicken
A whole four to five-pound chicken serves as your ideal canvas. Ensure the bird is patted completely dry before preparation, as moisture interferes with achieving that desirable golden-brown skin. Some cooks prefer removing the backbone beforehand to flatten the chicken, which promotes more even cooking and allows marinade to penetrate the meat more effectively. Look for fresh, high-quality poultry from reputable sources, as this directly impacts the final dish’s flavor and texture.
Fresh Herbs and Aromatics
Fresh herbs form the aromatic backbone of your chimichurri base. Plan to use generous quantities of:
- Cilantro leaves with tender stems (approximately two to two-and-a-half cups packed)
- Fresh parsley leaves with tender stems (approximately two cups packed)
- Fresh oregano or dried oregano as a backup option
- Nine to ten large garlic cloves, minced or crushed
The combination of these herbs creates complexity that simple herb blends cannot match. Cilantro brings brightness and a slightly citrusy note, while parsley provides earthiness and chlorophyll-driven color. Oregano contributes warmth and Mediterranean character. Together, they form an herbaceous foundation that distinguishes quality chimichurri from mediocre versions.
Acidic and Flavor-Building Components
Acid plays a critical role in chimichurri by cutting through the richness of chicken and yogurt. Use four tablespoons of high-quality red wine vinegar, which brings depth beyond simple distilled vinegar. Fresh lime or lemon juice adds brightness while reinforcing the acidic profile. These components work synergistically to awaken your palate and prevent the dish from becoming one-dimensional.
Fat and Emulsification
Extra-virgin olive oil binds all ingredients while contributing fruity, peppery notes. Allocate approximately three-quarters of a cup total, divided strategically throughout the recipe. The yogurt—specifically plain whole-milk Greek yogurt—serves dual purposes: it acts as an emulsifier that creates a stable, creamy suspension and contributes tangy flavor while reducing overall fat content compared to traditional chimichurri preparations.
Preparing Your Chimichurri Yogurt Base
The preparation method significantly impacts your sauce’s texture and flavor integration. Unlike simply mixing ingredients together, this technique ensures proper emulsification and herb breakdown.
The Food Processor Method
Begin by placing garlic cloves, cilantro, parsley, red wine vinegar, salt, dried oregano (if using), and red pepper flakes into a food processor. Pulse this mixture carefully until herbs are very finely chopped but not completely pureed. This distinction matters considerably—over-processing creates a paste-like texture that loses individual herb character, while under-processing leaves chunks that create uneven distribution.
Process until you achieve a texture resembling coarse breadcrumbs mixed with small herb fragments. This typically requires fifteen to twenty seconds of pulsing, with pauses to check consistency. Once you’ve reached this stage, transfer the mixture to a medium bowl.
Building the Creamy Emulsion
Add eight ounces (one cup) of plain whole-milk Greek yogurt and the remaining extra-virgin olive oil to your herb mixture. Here’s where technique becomes essential: whisk vigorously for approximately two to three minutes until the ingredients emulsify into a cohesive, velvety sauce.
Emulsification occurs when fat droplets suspend evenly throughout the yogurt, creating a creamy texture that appears to be a unified sauce rather than separated components. You’ll notice the mixture gradually lighten and thicken as whisking continues. This process distributes the acidic and herbal elements evenly while incorporating air that contributes to a lighter mouthfeel.
Advance Preparation
A significant advantage of this creamy chimichurri approach is its ability to be made well ahead of time. Prepare the complete sauce up to three days in advance, storing it in an airtight container in your refrigerator. Before using the sauce, whisk it briefly again—this re-emulsifies any components that may have separated during storage, restoring it to optimal consistency.
Marinating and Preparing Your Chicken
Proper marination elevates the final results by allowing flavors to penetrate the meat while tenderizing the proteins.
Initial Preparation Steps
Pat your whole chicken completely dry with paper towels. Moisture on the skin prevents browning and interferes with marinade adhesion. If your chicken includes the backbone, carefully remove it by cutting along either side with kitchen shears or a sharp knife—this step, while optional, allows you to flatten the bird and increase surface area exposed to both marinade and heat.
Place the prepared chicken in a large bowl. Pour three-quarters cup of your creamy chimichurri sauce over the bird, using your hands to rub it thoroughly over all surfaces, including under any lifted skin. The area between skin and meat is particularly important, as it protects the breast meat from drying while allowing the marinade to penetrate.
Marination Timeline
Cover the bowl and refrigerate for a minimum of two hours. However, marinating for eight to twelve hours produces noticeably superior results, as this extended time allows the acidic components to begin denaturing proteins while the herbs’ aromatic compounds permeate the meat. This longer marination renders the chicken notably more tender and flavorful than quick preparations.
There’s no need to bring the chicken to room temperature before roasting—many cooks successfully roast directly from refrigerated state, which actually helps the skin crisp before the interior becomes too warm.
Roasting Techniques for Perfect Results
Temperature control and timing represent the most critical factors in achieving golden, crispy skin alongside juicy, properly cooked meat.
Oven Setup
Position your oven rack to the middle position and preheat to 375 degrees Fahrenheit. Many home cooks report superior results using the convection roast setting if their oven offers this function, as circulating air promotes more even browning and crispier skin. However, standard roasting works perfectly well—simply extend cooking time by approximately five to ten minutes if using conventional heat.
Preparing Your Roasting Setup
Line a large rimmed baking sheet with parchment paper and position a wire rack inside. This elevated rack allows heat to circulate beneath the chicken, promoting even cooking and browning on the underside. Transfer your marinated chicken to this rack, breast-side up.
Spread any remaining marinade from the bowl over the chicken’s skin. This layer will develop into a flavorful crust as it roasts. If any vegetables are roasting alongside—potatoes, broccoli, or root vegetables—this timing allows them to cook simultaneously, creating a streamlined one-pan meal.
Cooking Duration and Doneness Determination
Roast for approximately fifty to sixty minutes, rotating the baking sheet halfway through if your oven has hot spots. The chicken is properly cooked when an instant-read thermometer inserted into the thickest part of a thigh registers 165 degrees Fahrenheit. Internal temperature rather than visual cues provides the most reliable cooking indicator, as some ovens brown skin faster than others heat the meat through.
Resist the urge to cut into the chicken to check doneness, as this releases valuable juices that keep the meat moist. An inexpensive instant-read thermometer—available at any kitchen supply store—eliminates guesswork and prevents both undercooking and the drying effect of overcooking.
Resting and Serving Your Masterpiece
The resting period following cooking cannot be overstated in importance, though many home cooks skip this step entirely.
The Resting Process
Once your chicken reaches the proper internal temperature, remove it from the oven and let it rest for ten minutes before carving. During this period, the proteins relax and reabsorb some of the juices that migrated toward the surface during heating. Skipping rest results in noticeably drier meat, as cutting immediately releases those reabsorbed juices onto the cutting board rather than retaining them in the meat fibers.
Presentation and Finishing Touches
Cut the rested chicken into serving pieces and transfer to a serving platter. If your creamy chimichurri sauce has separated during roasting, whisk it briefly to re-emulsify. Drizzle the finished chicken generously with this sauce, reserving additional sauce to pass at the table for guests who prefer extra.
Fresh Italian parsley and crushed red chili flakes make elegant garnishes that add visual interest while hinting at the bold flavors within. These finishing touches transform a delicious dish into something that appears restaurant-quality.
Complementary Side Dishes
Consider pairing your creamy chimichurri roast chicken with sides that either complement or contrast its bold herbaceous character:
- Roasted potatoes and broccoli finished with chimichurri-infused olive oil
- Simply dressed green salad with lemon vinaigrette
- Creamy polenta or mashed potatoes that balance the sauce’s acidity
- Crusty bread for soaking up every drop of chimichurri sauce
- Roasted root vegetables like carrots, parsnips, or beets
Storage and Reheating Guidelines
Properly stored creamy chimichurri roast chicken maintains excellent quality for three to four days refrigerated. Store carved chicken and sauce in separate airtight containers to maintain optimal texture. Reheat gently in a 325-degree oven until warmed through, approximately fifteen to twenty minutes. Reheating on the stovetop over gentle heat with a splash of water prevents drying.
Frequently Asked Questions
Can I substitute regular yogurt for Greek yogurt?
Yes, though results will differ slightly. Regular yogurt contains more water, so your sauce will be thinner and lighter. You may need to reduce the olive oil slightly or use Greek yogurt for at least half the recipe. The tanginess will be less pronounced, requiring a slight adjustment to vinegar quantities.
What if I don’t have fresh cilantro?
Increase the parsley quantity to four cups and add a tablespoon of fresh basil if available. The result will be slightly different but still delicious. Avoid substituting dried cilantro, as it lacks the fresh brightness that distinguishes quality chimichurri.
Can I use chicken parts instead of a whole bird?
Absolutely. Use four to five pounds of mixed parts (thighs, breasts, drumsticks) and follow identical marinade instructions. Reduce roasting time to thirty-five to forty-five minutes, checking internal temperature in the thickest parts. Dark meat will remain juicier than white meat, so consider grouping similar pieces on the same baking sheet.
Is convection roasting necessary?
No, it’s simply preferred. Standard roasting works perfectly—simply extend cooking time slightly and monitor skin color to prevent over-browning. Both methods produce excellent results.
How far ahead can I prepare this dish?
Prepare the sauce three days in advance. Marinate the chicken eight to twelve hours before roasting. Roast the chicken only when ready to serve for optimal skin texture, though reheating works well if necessary.
References
- Food Safety and Inspection Service — United States Department of Agriculture. 2024. https://www.fsis.usda.gov/food-safety/safe-food-handling-and-preparation/poultry
- Chimichurri Roast Chicken on Creamy Garlic Yoghurt Sauce — What’s for Dinner. https://www.whatsfordinner.co.za/r/chimichurri-roast-chicken-on-creamy-garlic-yoghurt-sauce.html
- Creamy Chimichurri Roast Chicken — The Brook Cook. 2023. https://thebrookcook.wordpress.com/2023/02/23/creamy-chimichurri-roast-chicken/
- Chimichurri Roasted Chicken – Garlic Herb Chicken — Laylita’s Recipes. https://www.laylita.com/recipes/chimichurri-roasted-chicken/