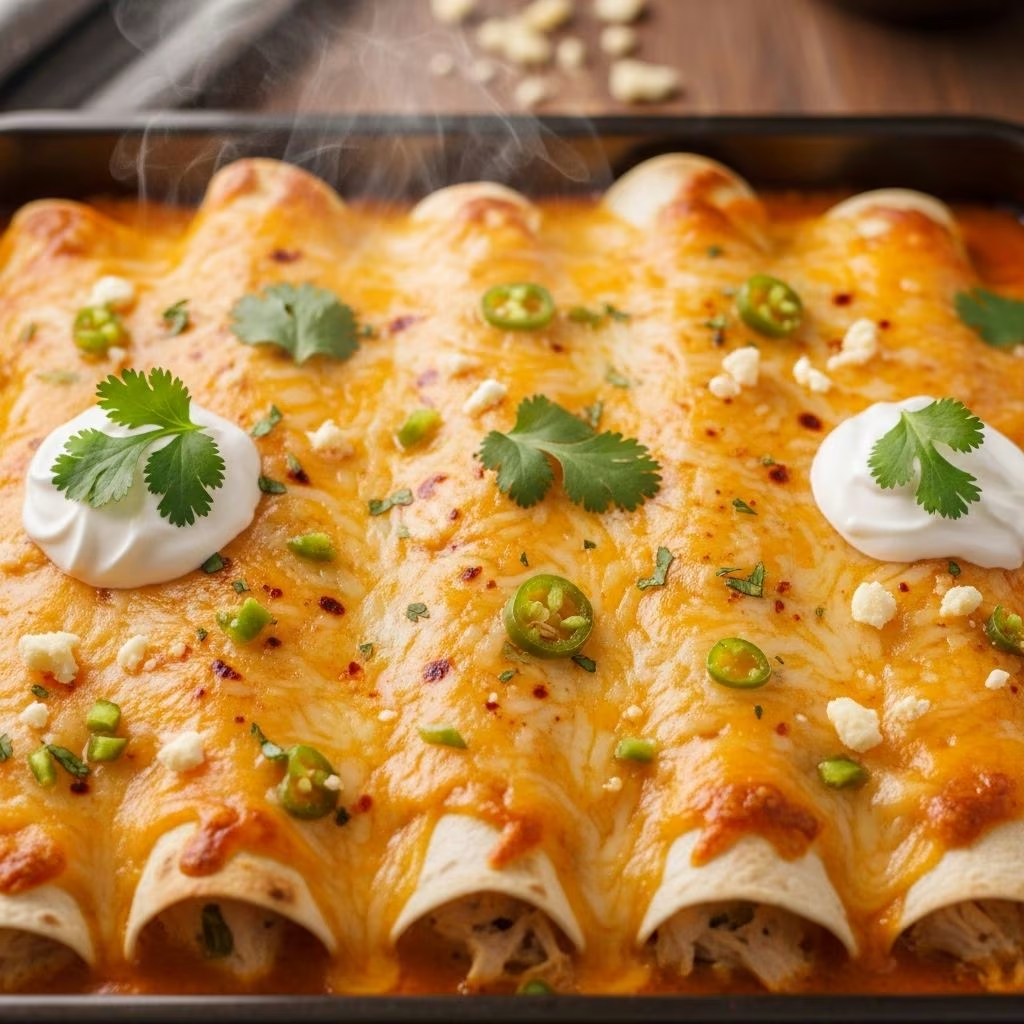
Chicken enchiladas represent one of the most beloved dishes in Mexican cuisine, and for good reason. The combination of tender poultry, rich creamy sauce, and melted cheese creates a satisfying meal that brings people to the dinner table. While many assume that making enchiladas requires extensive culinary experience or access to specialized ingredients, the reality is quite different. With straightforward preparation techniques and readily available components, anyone can create this restaurant-quality dish in their own kitchen within roughly an hour.
Understanding the Fundamentals of Enchilada Preparation
The beauty of cream cheese chicken enchiladas lies in their simplicity combined with impressive flavors. At its core, this dish comprises three essential elements: a protein filling, a creamy binding sauce, and a topping layer that adds texture and richness. The versatility of this recipe means you can customize components based on your preferences or what you have available in your pantry.
Unlike traditional red sauce enchiladas, the cream cheese variation offers a smoother, more indulgent experience. The dairy components blend together to create a cohesive filling that clings to every piece of poultry, ensuring each bite delivers consistent flavor throughout the dish.
Selecting and Preparing Your Ingredients
The Protein Foundation
The chicken component serves as the structural base of your enchiladas. You have several convenient options for obtaining shredded chicken without spending hours in the kitchen. Rotisserie chickens from the grocery store provide an excellent shortcut, requiring only a few minutes of shredding before use. Alternatively, you can cook chicken breasts using slow cooker methods, which allows you to prepare the protein hours in advance. Simply place 2-3 chicken breasts in a slow cooker on low heat for 3-4 hours, and the meat becomes tender enough to shred effortlessly while warm.
For those preferring stovetop cooking, boiling chicken breasts with onion for 15-20 minutes until fully cooked produces equally satisfactory results. The key consideration involves using approximately 2 cups of shredded chicken per batch of enchiladas, ensuring adequate filling without excess.
Dairy and Creamy Components
Cream cheese forms the backbone of your sauce, providing richness and helping bind ingredients together. Softening this ingredient before mixing ensures smooth incorporation without lumps. An 8-ounce package typically suffices for standard recipes. Sour cream adds tang and additional creaminess, typically requiring a quarter-cup per batch. Some recipes incorporate Greek yogurt as a lighter alternative that maintains similar consistency.
Aromatic and Spice Elements
Building layers of flavor requires attention to aromatics and seasoning. Diced onions and minced garlic form the aromatic foundation, sautéed together until fragrant before incorporation into the sauce. Ground cumin and chili powder contribute warmth and depth, while salt balances these elements. Green chilies, available canned or fresh, provide both heat and distinctive flavor that defines this particular enchilada variation.
Sauce Options and Variations
Your sauce choice significantly impacts the final dish. Salsa verde creates a lighter, brighter profile with its tomatillo base. Prepared red enchilada sauce offers convenience and consistency. Some cooks incorporate Rotel tomatoes, which combine diced tomatoes with green chilies in one ingredient. Regardless of choice, having approximately 1.5 cups of sauce ensures adequate coverage and moisture throughout the dish.
The Cooking Methodology: Step-by-Step Process
Creating Your Creamy Sauce Base
Begin by heating 2 tablespoons of olive oil in a large skillet over medium-high heat. Add your diced onion and cook for approximately 5 minutes until the pieces become translucent and soft. Add minced garlic and cook for just 30 seconds—timing matters here, as garlic burns quickly and develops bitter flavors if overcooked.
Introduce your softened cream cheese into the pan, stirring constantly until it melts completely and combines with the oil and aromatics. This mixing creates an emulsified base that prevents separation. Add your selected sauce (salsa verde, red enchilada sauce, or Rotel mixture), followed by sour cream and green chilies. Stir continuously until you achieve a smooth, homogeneous sauce without lumps.
Preparing the Filling
At this stage, remove approximately half of the sauce from the skillet and transfer it to a separate bowl—this becomes your topping layer. To the remaining sauce in the skillet, add your shredded chicken, mixing thoroughly until every piece receives coating. Some recipes recommend adding corn kernels, green onions, or additional cheese to this mixture for enhanced texture and flavor. Stir until all components combine evenly.
Assembly and Baking
Preheat your oven to 350 degrees Fahrenheit. Spray a 9×13-inch baking dish with cooking spray to prevent sticking. Pour a thin layer of the reserved sauce onto the bottom of the dish—this prevents direct contact between the tortillas and the baking vessel, which can cause sticking.
Warm your tortillas according to package instructions, as this makes them pliable and less prone to tearing during rolling. Place approximately one-quarter cup of the chicken filling down the center of each tortilla, adding a tablespoon or two of shredded cheese. Roll the tortilla tightly and place it seam-side down in the baking dish. Continue until all tortillas receive filling and arrangement.
Once assembled, pour the remaining reserved sauce over the top of all enchiladas, ensuring even coverage. Sprinkle your remaining cheese—typically a cup or more depending on preference—across the entire surface. Cover the dish with aluminum foil treated with cooking spray to prevent sticking, then bake for 20-25 minutes.
Remove the foil halfway through cooking to allow the cheese to begin browning. After removing the foil completely for the final portion of cooking, continue baking until the cheese becomes golden and bubbly. Some cooks prefer broiling for 1-2 minutes at the end to achieve deeper browning, though this requires careful monitoring to prevent burning.
Ingredient Flexibility and Substitutions
| Component | Original Option | Alternative Choices |
|---|---|---|
| Cheese Types | Cheddar or Monterey Jack | Pepper Jack for spice, Oaxaca for authenticity, mozzarella for mildness |
| Sauce Variety | Salsa Verde or Red Enchilada | Rotel tomatoes, homemade chili sauce, or mixed preparations |
| Protein Additions | Shredded Chicken | Turkey, ground beef, or vegetarian options like black beans and corn |
| Dairy Swap | Sour Cream | Greek yogurt, Mexican crema, or Mexican sour cream |
| Tortilla Selection | Flour Tortillas | Corn tortillas for gluten-free option |
Make-Ahead and Storage Strategies
One significant advantage of this enchilada recipe involves its compatibility with advance preparation. You can assemble the entire dish up to two days before baking. After arranging the rolled tortillas in the baking dish, cover with foil without adding the final sauce layer or cheese topping. Refrigerate until ready to cook. When you decide to bake, add the reserved sauce and cheese, then proceed with cooking. This requires extending the baking time by approximately 5-10 minutes since the dish starts cold.
For freezer storage, assemble the enchiladas in a freezer-safe baking dish, cover tightly with plastic wrap followed by foil, and freeze for up to three months. When ready to cook, thaw overnight in the refrigerator, then bake according to standard instructions. This makes the recipe ideal for batch cooking and future quick meals.
Complementary Side Dishes and Serving Suggestions
While enchiladas work as a complete meal, thoughtful side selections enhance the overall dining experience. Cilantro-lime rice provides a fresh counterpoint to the richness of the cream sauce. Black beans seasoned with cumin and garlic add protein and traditional Mexican flavor. Simple pico de gallo—composed of fresh tomatoes, onion, cilantro, and lime juice—offers brightness and textural contrast.
A fresh green salad with lime vinaigrette balances the heaviness of the cheese and cream components. Some serve enchiladas alongside Mexican street corn (elote) or simple steamed vegetables for added nutrition. For beverage pairings, light Mexican beers, horchata, or agua fresca complement the dish beautifully.
Common Questions About Cream Cheese Chicken Enchiladas
How can I prevent the sauce from becoming too thick?
If your sauce seems overly thick while cooking, gradually whisk in milk or chicken broth one tablespoon at a time until achieving desired consistency. The sauce should flow but still coat the back of a spoon.
Can I use canned chicken instead of fresh?
Yes, canned chicken offers convenience and works well in this recipe. Simply drain and shred the canned chicken, then proceed with filling preparation. Be mindful that canned chicken may be saltier, so adjust seasoning accordingly.
What temperature should the oven reach for optimal results?
A standard 350-degree Fahrenheit setting ensures even cooking without excessive browning. Avoid temperatures higher than 375 degrees, which can brown the cheese too quickly while leaving the interior insufficiently heated.
How do I know when the enchiladas are completely cooked?
The enchiladas are ready when the cheese on top becomes bubbly and golden, and the sauce bubbles slightly around the dish edges. This typically occurs after 25-30 minutes of baking at 350 degrees.
Can I double this recipe for larger gatherings?
Absolutely. Simply double all ingredients and use two 9×13-inch baking dishes, or prepare a larger rectangular dish if available. Baking time may extend slightly—start checking at the 25-minute mark.
Is this recipe suitable for freezing?
Yes, this recipe freezes exceptionally well for up to three months when properly stored in freezer-safe containers covered with plastic wrap and foil.
Perfecting Your Technique Through Practice
Creating exceptional cream cheese chicken enchiladas becomes easier with each attempt. The first time you prepare this dish, follow measurements precisely to understand flavor proportions. Subsequent preparations allow for personalization—increasing spice levels, experimenting with cheese combinations, or incorporating additional ingredients like corn or black beans.
The forgiving nature of this recipe means minor variations rarely result in failure. Too much sauce? The enchiladas simply become creamier. Less cheese? They remain delicious, though slightly less decadent. This adaptability makes the dish perfect for weeknight dinners when you’re working with available ingredients.
Once you master the basic technique, you’ll find yourself preparing this recipe regularly for family meals, potluck gatherings, and meal prep sessions. The combination of creamy sauce, tender chicken, melted cheese, and convenient preparation time makes cream cheese chicken enchiladas a perpetual favorite that never feels like you’re repeating yourself.
References
- Cream Cheese Chicken Enchiladas — Isabel Eats. 2024. https://www.isabeleats.com/cream-cheese-chicken-enchiladas/
- Cream Cheese Chicken Enchiladas Recipe — Mom’s Dinner. 2024. https://momsdinner.net/cream-cheese-chicken-enchiladas/
- Cream Cheese Chicken Enchiladas — Taste and Tell Blog. 2024. https://www.tasteandtellblog.com/cream-cheese-chicken-enchiladas/
- Creamy Chicken Enchiladas — The Girl Who Ate Everything. 2024. https://www.the-girl-who-ate-everything.com/creamy-chicken-enchiladas/
- Cream Cheese Chicken Enchiladas — Family Food on the Table. 2024. https://www.familyfoodonthetable.com/cream-cheese-chicken-enchiladas/
- Creamy Chicken Enchiladas — Southern Bite. 2024. https://southernbite.com/creamy-chicken-enchiladas/