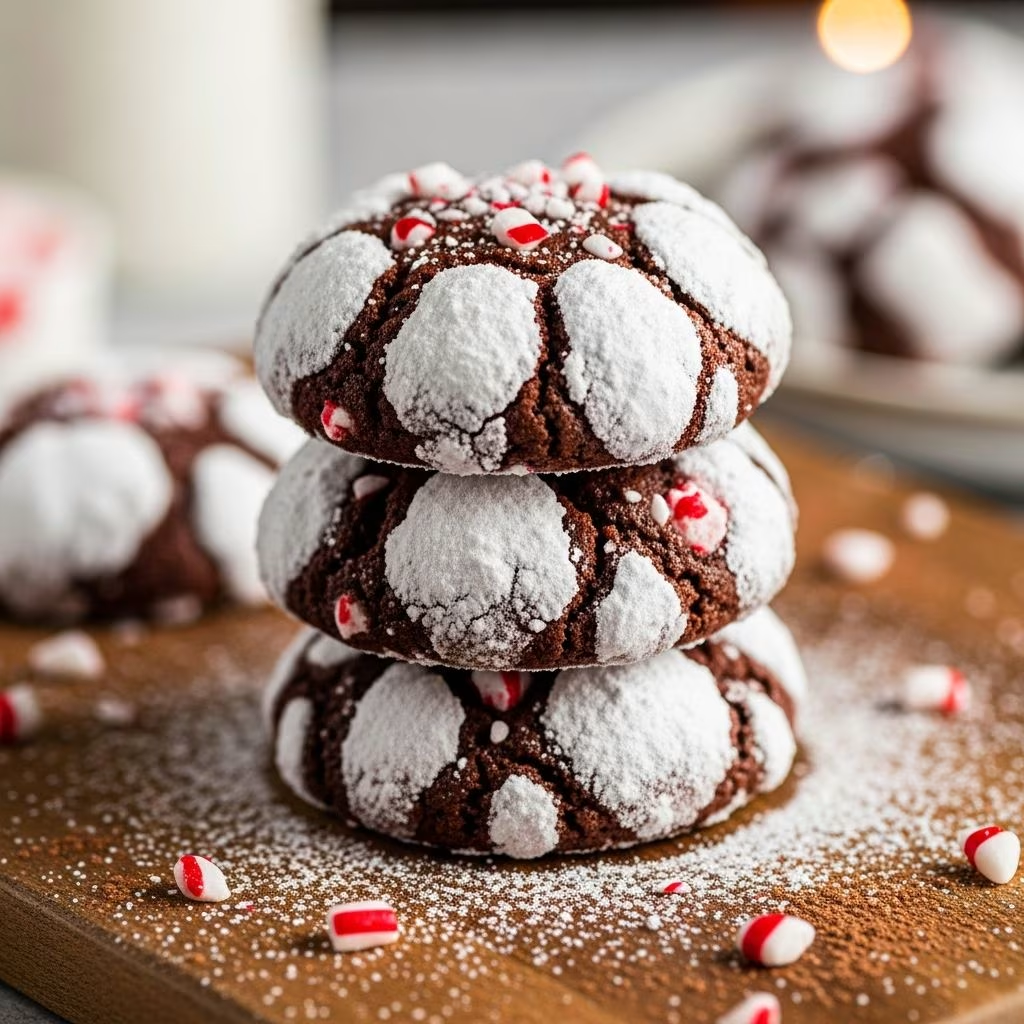
Chocolate peppermint crinkle cookies represent a delightful fusion of deep cocoa richness and refreshing mint flavor, making them an ideal choice for holiday celebrations, special occasions, or any time you crave a sophisticated cookie. The distinctive characteristic of these cookies lies in their beautiful crackled surface, which forms when the exterior powdered sugar coating breaks during baking while the interior remains fudgy and soft. This textural contrast, combined with the festive peppermint element, creates a cookie that appeals to both traditional bakers and adventurous palates seeking something beyond standard chocolate treats.
Understanding the Science Behind Crinkle Cookies
The crinkle effect that defines these cookies is not merely aesthetic—it represents a carefully balanced chemical reaction during baking. When cookie dough containing chocolate and cocoa powder is rolled in powdered sugar and placed in the oven, the heat causes the dough to expand while the sugar coating remains relatively rigid. This difference in expansion rates creates the characteristic cracks and crevices that give crinkle cookies their name and distinctive appearance. The key to achieving this effect involves proper dough consistency, accurate oven temperature, and precise baking time. Too much moisture in the dough can prevent proper cracking, while insufficient baking time leaves the cookies undercooked and overly soft.
Gathering Your Essential Ingredients
Creating authentic chocolate peppermint crinkle cookies requires a thoughtful selection of both standard baking ingredients and specialty items that define the flavor profile.
Chocolate Foundation Components
- Unsweetened chocolate or cocoa powder – Forms the primary flavor base and provides deep chocolate notes without excess sweetness
- Butter – Contributes richness and helps achieve the proper dough texture
- All-purpose flour – Provides structure and helps bind the ingredients together
- Baking powder and baking soda – These leavening agents create the characteristic rise and slightly cake-like texture that allows for proper cracking
Sweeteners and Flavor Elements
- Granulated sugar – Creates a crispy outer coating when the dough is rolled in it before baking
- Brown sugar – Adds moisture and deeper molasses notes that complement the chocolate
- Powdered sugar – The primary coating that creates the crinkle effect
- Peppermint extract – Delivers concentrated mint flavor that balances the chocolate richness
- Crushed peppermint candy canes – Provides texture and visible peppermint pieces distributed throughout the cookies
Step-by-Step Preparation Process
Phase One: Preparing Your Chocolate Base
Begin by chopping unsweetened chocolate into uniform, small pieces to ensure even melting. In a heat-safe bowl, combine the chopped chocolate with cubed butter. Using a microwave approach, heat the mixture in 30-second intervals, stirring thoroughly between each burst to promote even melting and prevent scorching. This controlled heating method prevents the chocolate from seizing or becoming grainy. Once the mixture achieves a smooth, glossy consistency with no visible chocolate chunks, remove it from the heat and allow it to cool to room temperature. The cooling step is crucial—if you proceed with warm chocolate, the egg proteins will partially cook, compromising the dough’s texture and rise.
Phase Two: Combining Dry Ingredients
In a separate medium-sized bowl, whisk together flour, unsweetened cocoa powder, baking powder, baking soda, and salt. The whisking action distributes the leavening agents and salt uniformly throughout the flour, preventing concentrated pockets of these ingredients in the finished cookies. This step ensures consistent texture and rise throughout each cookie. Set this mixture aside temporarily while you prepare the wet ingredients.
Phase Three: Creating the Dough Base
In a large mixing bowl, whisk together both granulated sugar and light brown sugar with room-temperature eggs and peppermint extract. The room-temperature eggs incorporate more effectively into the sugar, creating a lighter, airier mixture than cold eggs would produce. The combination of both sugar types creates a more complex flavor profile than using either alone. Once this mixture is thoroughly combined, add your cooled chocolate mixture and whisk until completely smooth. The mixing should continue until no cocoa-colored streaks remain visible, indicating complete incorporation. Gently fold in the dry ingredient mixture just until the flour disappears—overmixing at this stage can develop excessive gluten, resulting in tough cookies rather than the desired tender, fudgy texture.
Phase Four: Adding Peppermint Elements
Fold in the crushed candy canes, distributing them evenly throughout the dough. Some pieces will be fine powder while others will remain as larger chunks—this variation creates interesting texture and flavor elements in the finished cookies. Allow the dough to rest at room temperature for approximately 10 minutes. This resting period allows the flour to fully hydrate and helps the dough firm up slightly, making it easier to scoop and shape.
The Coating and Shaping Process
The coating stage represents one of the most crucial steps for achieving those signature crinkles. Prepare two shallow bowls containing granulated sugar and powdered sugar respectively. Using a cookie scoop sprayed with nonstick spray, portion the dough into uniform balls, typically 1½ inches in diameter. Consistency in sizing ensures even baking and a uniform appearance on your finished cookie sheet.
Roll each dough ball first in the granulated sugar bowl, then transfer it directly to the powdered sugar and roll it generously until completely coated with a thick layer. This double-coating technique—granulated sugar for crispness followed by powdered sugar for the crinkle effect—is essential for achieving the distinctive appearance. Place coated dough balls on parchment-lined baking sheets, spacing them approximately 2 inches apart to allow for expansion during baking without cookies touching or merging.
Baking and Cooling Guidelines
Preheat your oven to 325°F, which is slightly lower than many cookie recipes call for. This gentler heat allows the cookies to spread and set properly while the exterior cracks develop. Bake for 14 to 15 minutes, rotating the baking sheets halfway through the baking process to ensure even browning. The cookies are ready when they appear puffed and have visible cracks across the surface, with the edges showing signs of setting while the centers still appear slightly underbaked—this creates the ideal soft, fudgy interior.
Remove the baking sheets from the oven and allow the cookies to rest on the sheets for 15 minutes before transferring them to a wire cooling rack. This crucial resting period allows the cookies to firm up enough to handle without breaking while still being malleable enough to transfer without cracking. Once completely cooled on the wire rack, store the cookies in an airtight container at room temperature, where they will maintain their texture for up to 5 days.
Ingredient Variations and Adaptations
While the traditional recipe offers excellent results, several variations allow you to customize the cookies to your preferences or dietary needs.
| Variation Type | Ingredients to Modify | Expected Results |
|---|---|---|
| Enhanced Mint Flavor | Increase peppermint extract to ¾ teaspoon and add ½ cup Andes mint baking chips | More pronounced peppermint taste with melted chocolate chips for richness |
| Simplified Version | Substitute brownie mix for homemade chocolate ingredients and reduce flour to 1¼ cups | Faster preparation while maintaining quality and appearance |
| Double Chocolate | Add chocolate chips and use both dark cocoa powder and melted chocolate | More intense chocolate flavor with added textural interest |
| Topping Addition | Immediately after baking, dust with crushed peppermint candy pieces | Increased peppermint presentation and crunch factor |
Troubleshooting Common Baking Challenges
Issue: Cookies Spread Too Much or Remain Too Flat
Excessive spreading indicates insufficient leavening or overly warm dough. Ensure your baking powder and baking soda are fresh—these agents lose potency over time. Chill the dough for 30 minutes before scooping if your kitchen is warm, and verify that your oven temperature is accurate using an oven thermometer rather than relying solely on the oven’s built-in display.
Issue: Insufficient Crackle Formation
Without visible cracks, the cookies may have been underbaked or the powdered sugar coating wasn’t thick enough. Bake for an additional 1-2 minutes and ensure you’re generously coating each dough ball in powdered sugar. Additionally, verify that your dough isn’t too soft—if it seems overly moist, add 2 tablespoons of flour and mix thoroughly.
Issue: Cookies Are Too Cake-Like Rather Than Fudgy
Overbaking creates dry, cake-textured cookies. Reduce baking time by 1-2 minutes and look for the specific visual cues of puffed appearance with slight underbaking visible in the center. The cookies will continue to set slightly as they cool on the sheet.
Storage and Make-Ahead Strategies
These cookies offer excellent make-ahead potential for busy bakers. The dough can be prepared up to 2 days in advance and stored in an airtight container in the refrigerator. When ready to bake, allow the dough to return to room temperature for approximately 15 minutes before scooping and shaping. Alternatively, you can freeze unbaked dough balls for up to one month. Bake frozen dough balls directly from the freezer, adding 2-3 minutes to the standard baking time. Fully baked and cooled cookies maintain their texture in an airtight container for 5 days at room temperature.
Frequently Asked Questions
Can I substitute peppermint extract with other flavorings?
Yes, while peppermint extract delivers the traditional flavor, you can experiment with spearmint extract, wintergreen extract, or even crushed fresh mint leaves. Adjust quantities based on the intensity of your chosen flavoring, starting with ½ teaspoon and increasing as desired.
Are these cookies suitable for dietary restrictions?
The base recipe contains eggs and traditional flour, making it unsuitable for vegan diets without significant modifications. However, you can create gluten-free versions by substituting all-purpose flour with certified gluten-free flour blends in a 1:1 ratio. For dairy-free versions, use plant-based butter instead of conventional butter.
How can I achieve darker, more prominent crackles?
Use Dutch-process cocoa powder rather than natural cocoa powder, as it creates darker cookies with more dramatic crackle contrast. Additionally, slightly reduce the powdered sugar coating thickness so the chocolate color shows through more prominently.
What is the ideal serving method for these cookies?
These cookies shine when served at room temperature with hot beverages like coffee or hot chocolate. The chocolate becomes more pronounced as it warms slightly in your mouth, and the peppermint provides a refreshing contrast. For special presentations, consider pairing them with milk chocolate ganache or peppermint-flavored whipped cream.
Conclusion
Mastering chocolate peppermint crinkle cookies opens doors to creating sophisticated homemade treats that rival bakery offerings. The combination of technical precision, quality ingredients, and attention to detail throughout the preparation and baking process results in cookies that feature beautiful crackled exteriors, fudgy interiors, and the perfect balance of chocolate and peppermint flavors. Whether you’re preparing these cookies for holiday gift-giving, festive gatherings, or personal enjoyment, this comprehensive guide provides the knowledge and techniques necessary to succeed consistently.
References
- Chocolate Peppermint Crinkle Cookies — Tutti Dolci Baking Recipes. https://tutti-dolci.com/chocolate-peppermint-crinkle-cookies/
- Chocolate Peppermint Crinkle Cookie Recipe — Cooking With Karli. https://cookingwithkarli.com/chocolate-peppermint-crinkle-cookie/
- Chocolate Peppermint Crinkle Cookies — Williams Sonoma. https://www.williams-sonoma.com/recipe/chocolate-peppermint-crinkle-cookies.html