Understanding This Timeless Comfort Dish
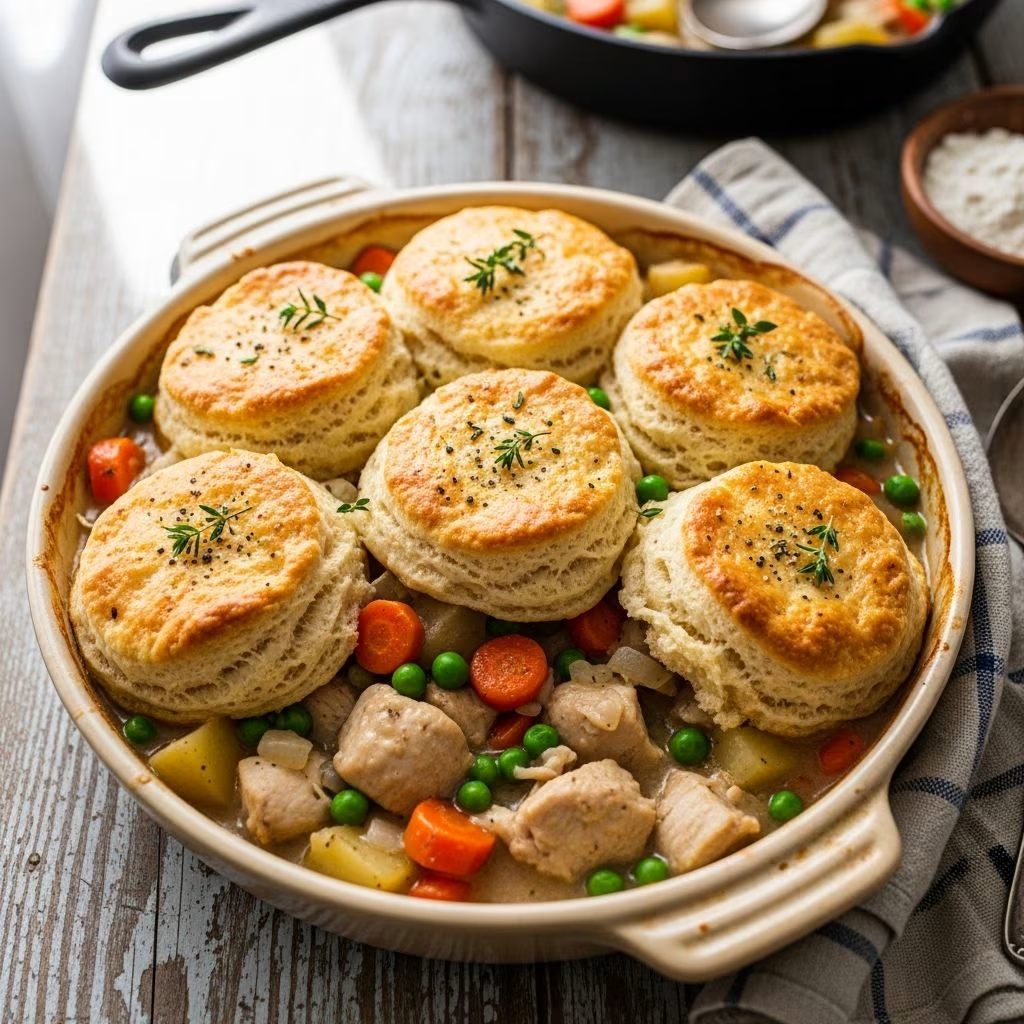
Few dishes evoke the warmth and nostalgia of home-cooked meals quite like chicken pot pie topped with golden, flaky biscuits. This beloved classic combines tender poultry, fresh seasonal vegetables, and a creamy sauce all encased beneath a buttery crust that shatters delightfully with each spoonful. The beauty of this dish lies not only in its satisfying flavors but also in its versatility—it can be prepared for weeknight family dinners or elegant entertaining occasions.
The combination of hearty ingredients makes this dish particularly appealing during cooler months, though its comforting nature means it can be enjoyed year-round. What distinguishes an exceptional pot pie from an ordinary one is the quality of its components and the care taken in their preparation. Understanding how each element contributes to the final dish elevates your cooking experience.
Essential Ingredients and Their Roles
The Foundation: Butter and Aromatics
Every great pot pie begins with butter as its flavor base. Using quality butter—approximately one-quarter cup—creates the foundation for your filling. This fat is combined with chopped aromatics including onion, celery, and carrots. These vegetables, traditionally known as the “holy trinity” in culinary traditions, provide layers of flavor through their natural sugars and aromatic compounds. When gently sautéed in butter, they become softer and sweeter, creating a deeply flavorful base for your sauce.
- Butter: Provides richness and serves as cooking medium
- Onion: Adds sweetness and pungent depth when cooked
- Celery: Contributes subtle earthiness and body
- Carrots: Introduce natural sweetness and nutritional value
Proteins and Vegetables
The protein component typically consists of cooked chicken, which can be rotisserie chicken, poached breasts, or leftover roasted chicken. The advantage of using pre-cooked chicken is both convenience and time efficiency. Incorporating frozen peas adds color, texture, and nutritional balance to your filling. Fresh parsley, chopped just before use, brightens the dish with herbal notes and visual appeal.
Creating the Creamy Sauce
The sauce that binds all ingredients together requires flour for thickening, chicken broth for moisture, and cream or milk for richness. This combination creates a béchamel-based sauce that coats the vegetables and protein, binding them into cohesive bites. Seasonings such as salt, pepper, and perhaps a touch of thyme or poultry seasoning enhance the savory profile without overwhelming the delicate chicken flavor.
Preparing the Filling: Step-by-Step Technique
Building Flavor Through Proper Sautéing
The initial cooking step sets the tone for your entire pot pie. Begin by melting butter in a large saucepan or Dutch oven over medium heat. Once the butter foams and froths, add your chopped onions first, allowing them several minutes to begin releasing their moisture before introducing the harder vegetables like celery and carrots. This staggered approach ensures even cooking and prevents the onions from becoming too soft before the other vegetables have begun to soften.
Continue cooking these aromatics for approximately five to seven minutes, stirring occasionally, until they become translucent and fragrant. This patience-requiring step develops the caramelized sugars within the vegetables, creating the flavor foundation that distinguishes homemade pot pie from rushed versions.
Thickening and Building the Sauce
Once your aromatics have developed sufficient color and aroma, sprinkle flour over them and stir continuously for one to two minutes. This process, known as making a roux, cooks out the raw flour taste while allowing the flour to absorb the butter. Next, gradually add chicken broth while stirring constantly to prevent lumps from forming. The gradual incorporation of liquid ensures a smooth, silky sauce rather than a lumpy one.
Pour in cream or milk once the broth has been incorporated, continuing to stir as the mixture heats. Watch for the sauce to thicken noticeably—it should coat the back of a spoon but remain pourable. This gradual thickening indicates proper starch gelatinization, which creates the ideal consistency for binding your filling ingredients.
Final Assembly of Filling Components
Once your sauce reaches proper consistency, reduce the heat and fold in your cooked chicken, frozen peas, and fresh parsley. The residual heat will gently warm the peas and chicken without cooking them further or causing the cream to break or separate. Taste your filling and adjust seasonings as needed, remembering that the biscuit topping will add its own subtle salt component.
Crafting the Perfect Biscuit Crust
Biscuit Dough Fundamentals
The biscuit topping represents the crown jewel of this dish. Quality biscuits require flour, butter, buttermilk or milk, and baking powder or soda as primary ingredients. The key to exceptional biscuits lies in maintaining cold butter throughout the dough-making process. Cold butter creates small pockets within the dough; as these pockets heat in the oven, they create steam that leavens the biscuits, resulting in their characteristic flaky, layered texture.
To achieve this desired texture, cut cold butter into small cubes and incorporate them into the flour mixture using a pastry cutter or your fingertips. Work quickly to prevent the butter from warming, creating a mixture that resembles coarse breadcrumbs. This seemingly simple step is absolutely critical to biscuit success.
Bringing Dough Together
Add buttermilk or milk gradually to the flour-butter mixture, stirring just until a shaggy dough forms. Overmixing develops gluten, which results in tough, dense biscuits rather than light, tender ones. Your dough should hold together but still appear somewhat rough and unfinished. This apparent lack of refinement is precisely what produces superior results.
Shaping and Topping
Turn your dough out onto a lightly floured surface and gently pat it to approximately one-half inch thickness. Using a biscuit cutter or even a drinking glass, cut out individual biscuits or create a single large topping piece. Arrange these atop your prepared filling in the baking dish, leaving minimal gaps for filling to escape but not so crowded that steam cannot circulate.
For enhanced visual appeal and richness, brush the biscuit tops with a mixture of egg and water before baking. This egg wash creates that signature golden-brown finish while also binding the biscuit surface to seal in moisture.
Baking and Serving Your Pot Pie
Oven Temperature and Timing
Preheat your oven to 400°F (200°C), a temperature that allows the biscuit topping to bake through and brown while the filling heats thoroughly. Bake your assembled pot pie for approximately twenty-five to thirty minutes, until the biscuits achieve a deep golden-brown color and a toothpick inserted into the center of a biscuit comes out clean.
The filling should bubble slightly at the edges—this visual cue indicates that the sauce has reheated properly. If you notice the biscuits browning too quickly before the filling heats through, reduce oven temperature slightly and extend the baking time.
Resting and Presentation
Allow your pot pie to rest for five to ten minutes after removing from the oven. This crucial waiting period allows the filling to set slightly, making serving neater and the flavors more cohesive. This brief rest also brings the internal temperature down to a safer eating temperature, preventing mouth-burning bites.
Serve directly from the baking dish for family-style dining, or carefully portion into individual bowls for more formal presentations. A simple green salad or steamed vegetable on the side complements the richness of pot pie perfectly.
Variations and Adaptations
Protein Alternatives
While chicken is traditional, this dish adapts beautifully to other proteins. Turkey provides a slightly different flavor profile while maintaining similar cooking properties. Combination fillings incorporating both chicken and turkey create interesting textural contrasts. Some cooks incorporate diced ham or bacon for additional smokiness.
Vegetable Modifications
Seasonal availability and personal preference allow for vegetable substitutions. Spring versions might incorporate asparagus or fresh peas, while autumn preparations benefit from mushrooms, corn, or roasted root vegetables. Maintaining some combination of onion, celery, and carrots preserves the traditional flavor base while allowing creative additions.
Dietary Accommodations
Cooks with dietary restrictions can adapt this recipe through thoughtful substitutions. Gluten-free flour blends work well for biscuits and sauce thickening when combined with xanthan gum. Dairy-free versions utilize plant-based butter and milk alternatives while maintaining excellent results.
Storage and Make-Ahead Options
Advance Preparation
The filling can be prepared up to two days in advance and stored in an airtight container in the refrigerator. The biscuit dough can be cut and frozen on a baking sheet before transferring to a freezer bag, then placed directly on the filling and baked from frozen, adding only a few minutes to the baking time.
Leftovers and Reheating
Covered pot pie stores in the refrigerator for up to three days. Reheat gently in a 325°F oven, covered with foil, until warmed through. Microwave reheating can soften the biscuits excessively, so oven reheating is preferred.
Frequently Asked Questions
Why are my biscuits turning out dense and hard?
Dense biscuits typically result from overmixing the dough, which develops excessive gluten. Mix just until ingredients combine, and avoid kneading. Additionally, ensure your butter remains cold throughout preparation.
Can I make this pot pie without cream?
Yes, you can use all chicken broth with cornstarch for thickening instead of cream. The result will be lighter but slightly less rich. A combination of broth and milk provides a middle ground.
What’s the best way to prevent a soggy bottom crust?
Ensure your filling has cooled slightly before adding the biscuit topping, and avoid overly thin biscuits that allow filling liquid to soak through. Some cooks prefer baking the pot pie in a preheated baking dish for additional bottom heat.
How do I know when the filling is properly thickened?
The sauce should coat a spoon and slowly drip off when tilted. It will continue thickening slightly as it cools, so avoid over-thickening during cooking.
Can frozen vegetables be used instead of fresh?
Absolutely. Frozen vegetables are often processed at peak ripeness and work excellently in pot pie. Thaw them before adding to prevent excess moisture in your filling.
References
- Baking Science and Technology — American Association of Cereal Chemists. 2020. https://www.aaccnet.org/
- Food Safety Guidelines for Home Cooking — U.S. Department of Agriculture Food Safety and Inspection Service. 2024. https://www.fsis.usda.gov/
- Culinary Techniques: Classical and Modern Approaches — Culinary Institute of America. 2021. https://www.ciachef.edu/
- Vegetable Composition and Nutritional Values — USDA Agricultural Research Service. 2023. https://www.ars.usda.gov/
- Dairy Product Applications in Cooking — International Dairy Federation. 2022. https://www.idf-dairy.org/