Artisan bread baking has long been perceived as a complex craft requiring specialized equipment, advanced techniques, and countless hours of kneading and monitoring. However, modern baking science has revolutionized home bread production, making it possible for anyone to create restaurant-quality loaves with virtually no kneading involved. The cheddar jalapeño no-knead bread represents a perfect entry point into this simplified baking methodology, combining bold flavors with straightforward preparation methods that require minimal active work.
Understanding the No-Knead Bread Philosophy
The no-knead bread movement emerged from the principle that time can substitute for physical manipulation. Traditional bread recipes rely on intensive kneading to develop gluten networks—the protein structures that give bread its characteristic texture and structure. In the no-knead approach, an extended resting period replaces this mechanical work. Over 12 to 18 hours, hydration and fermentation naturally develop gluten strands without requiring any hands-on effort beyond initial mixing.
This extended fermentation period also enhances flavor development significantly. Yeast and natural enzymes work gradually to break down flour components, creating complex taste profiles that rival slow-fermented artisan breads. The minimal yeast quantity—typically just half a teaspoon—contributes to this slow, flavor-building process rather than creating rapid rising like conventional recipes.
Essential Ingredients for Your Savory Loaf
Creating exceptional cheddar jalapeño bread begins with understanding each ingredient’s role in the final product.
- All-purpose flour (390 grams): Provides the structural foundation for your bread. Some bakers prefer unbleached varieties for their higher protein content, which strengthens gluten development during the long fermentation.
- Coarse sea salt (2 teaspoons): Enhances flavor and controls fermentation rates. Sea salt offers superior taste compared to table salt, making it worth the investment.
- Instant or active-dry yeast (½ teaspoon): The small quantity is deliberate, as it supports slow fermentation over 12 to 18 hours.
- Fresh jalapeño (1 pepper, diced): Provides heat and brightness. Removing seeds reduces intensity if you prefer milder results.
- Cheddar cheese (1 cup shredded): Creates creamy pockets of flavor throughout. Aged cheddar varieties intensify savory notes.
- Warm water (1½ cups): At approximately 95°F, warm water activates yeast while the temperature should remain below 100°F to prevent killing beneficial microorganisms.
The Initial Mixing Process
Despite the hands-off reputation of no-knead breads, the initial combining stage is crucial. Begin by stirring together your dry ingredients—flour, salt, and yeast—in a substantial mixing bowl. This distributes leavening agents evenly throughout the flour, preventing concentrated areas of yeast activity.
Add your diced jalapeño and shredded cheddar to the dry mixture, stirring thoroughly to coat each cheese piece and pepper fragment with flour. This coating prevents the ingredients from settling during fermentation and ensures even distribution throughout your final loaf. Pour in your warm water gradually while stirring, continuing until a shaggy, sticky dough forms. The dough should remain moist but not soupy—if it appears extremely wet, incorporate additional flour one tablespoon at a time.
Avoid using an electric mixer at this stage. The dough’s stickiness makes it difficult for mechanical equipment to handle effectively, and hand-mixing takes only a few minutes. The goal is uniform ingredient distribution, not gluten development.
Extended Fermentation: The Magic Waiting Period
Once your dough comes together, cover your bowl with plastic wrap and drape a kitchen towel over it for additional moisture retention. Set it aside at room temperature—ideally between 65 and 75 degrees Fahrenheit—and let it rest undisturbed for 12 to 18 hours.
During this extended period, fermentation dramatically transforms your mixture. Yeast cells multiply slowly, creating gases that aerate the dough. Enzyme activity breaks down starches into simpler sugars, which both feed yeast and develop complex flavors. The long timeline allows gluten strands to strengthen naturally through hydration and enzymatic action, creating an open crumb structure with larger holes characteristic of artisan breads.
Longer fermentation generally produces superior flavor and texture, so extending toward the 18-hour maximum typically yields better results than stopping at the 12-hour minimum. However, if your kitchen runs warm, monitor your dough and reduce timing if it appears to be rising excessively before you’re ready to shape it.
Shaping Your Dough
After fermentation completes, your dough will have roughly doubled in volume and developed an airy, bubbly appearance. Lightly flour your work surface and your hands, then gently turn your dough out onto the prepared area. Avoid aggressive handling—you want to maintain the gas bubbles developed during fermentation.
Using a bowl scraper or bench knife, gently fold the corners of the dough toward the center, then flip it over so the folded side faces down. With light pressure, pull the dough toward yourself several times, creating tension on the surface. This gentle shaping creates a taut exterior that helps trap steam during baking while preserving interior airiness. Form the dough into a roughly spherical ball, being careful not to compress it excessively.
Place your shaped dough on parchment paper, dust the top lightly with flour, and cover it loosely with plastic wrap or a clean towel. Allow it to rest for approximately one hour while you prepare your baking vessel.
Dutch Oven Preparation and Baking Setup
The Dutch oven plays a critical role in developing your bread’s characteristic crust. Place your Dutch oven, including its lid, in a cold oven and preheat everything to 475°F (245°C). Allowing the vessel to preheat thoroughly ensures even heat distribution and efficient steam generation. Preheating typically requires 30 to 45 minutes once your oven reaches target temperature.
The Dutch oven’s enclosed environment traps steam released by your dough during the first phase of baking. This steam keeps the crust flexible, allowing your bread to expand fully before the exterior dries and sets. Without this steam retention, your bread develops a thick, tough crust rather than the thin, crispy surface that makes artisan bread distinctive.
Baking Phases for Optimal Results
Carefully remove your preheated Dutch oven from the oven using heavy-duty oven mitts—it will be extremely hot. Set it on a trivet or the stovetop. Quickly transfer your dough, parchment paper included, into the Dutch oven. Immediately replace the lid and return it to the oven. The speed of this transfer prevents excessive heat loss and helps trap steam effectively.
Bake covered for the first 25 minutes. During this phase, steam fills the enclosed space, preventing crust formation and allowing maximum oven spring—the rapid expansion that occurs as heat penetrates the dough and yeast produces final gas bursts before dying off.
After 25 minutes, carefully remove the lid and continue baking for an additional 20 to 25 minutes. With the lid off, the exterior dries and develops color, progressing from pale golden to deep brown. The exact timing depends on your oven’s characteristics, but you’re aiming for a deeply golden-brown crust with subtle crackling visible on the surface.
Testing for Doneness
Several methods indicate when your bread reaches completion. The hollow tap test—gently tapping the bottom of the loaf—produces a resonant, hollow sound when baking is complete. More reliably, an instant-read thermometer inserted into the bread’s center should register 195°F (90°C). This internal temperature indicates that yeast has died, enzyme activity has ceased, and starches have gelatinized sufficiently to maintain the loaf’s structure.
Cooling and Serving
Remove your finished bread from the Dutch oven and place it on a baking rack, allowing air circulation around the entire loaf. While the aroma is enticing, resist slicing for at least two hours. During cooling, moisture redistribution continues, and the crumb structure sets. Cutting too early releases steam and results in a gummy interior.
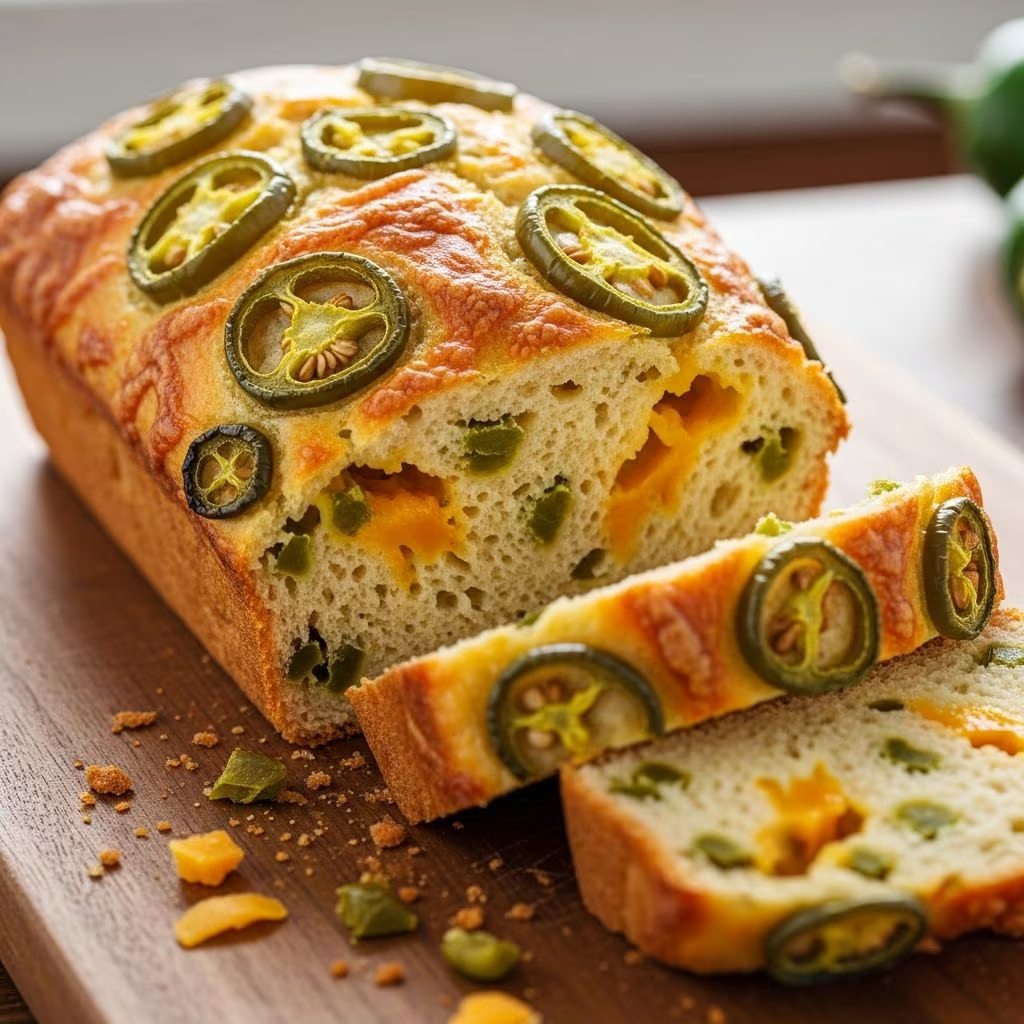
Once fully cooled, your bread boasts a crispy, crackling crust surrounding a soft, open crumb studded with melted cheddar and bright jalapeño pieces. The flavor profile combines savory cheese, peppery heat, and subtle tanginess from extended fermentation.
Customization and Variations
This basic formula accommodates numerous modifications based on personal preferences. For reduced spice, remove jalapeño seeds and white ribs before dicing. For increased heat, add additional peppers or substitute habaneros. Cheese varieties can shift the flavor profile dramatically—aged cheddar intensifies savory notes, while younger varieties provide creamier texture.
Some bakers add crispy bacon pieces, fresh herbs like rosemary or thyme, or seeds such as sesame or pumpkin. Since the no-knead method relies on extended fermentation rather than rapid yeast activity, it tolerates various add-ins well. However, additions should comprise no more than one cup total, maintaining the balance between flour hydration and structural integrity.
Storage and Longevity
Properly stored cheddar jalapeño bread maintains quality for several days. Keep it in a paper bag or cloth bread bag at room temperature to preserve the crispy exterior while allowing the crumb to soften slightly. Avoid plastic bags, which trap moisture and soften the crust rapidly.
For extended storage, freeze cooled bread in an airtight container for up to three months. To revive frozen bread, thaw at room temperature for several hours, then briefly warm in a 350°F oven for five to ten minutes to refresh the crust.
Troubleshooting Common Issues
If your bread fails to rise adequately during fermentation, your yeast may be expired or your kitchen may be too cold. Ensure your yeast is fresh and store it in the refrigerator between uses. If your kitchen temperature drops below 65°F, fermentation slows dramatically. Move your dough to a warmer location or extend fermentation time accordingly.
An overly dense crumb with minimal large holes suggests insufficient fermentation time or collapsed gas from aggressive handling during shaping. Extend fermentation toward the 18-hour maximum and handle the dough more gently when shaping.
A thick, tough crust indicates insufficient steam retention during early baking. Ensure your Dutch oven is thoroughly preheated and that you work quickly when transferring dough, minimizing the time the lid remains off. Some ovens leak steam more than others—if problems persist, place a baking sheet on the rack above your Dutch oven to reflect heat and concentrate steam.
The Broader Appeal of Extended-Fermentation Baking
The cheddar jalapeño no-knead bread exemplifies a larger shift in home baking toward methods prioritizing simplicity and flavor over technical skill. By replacing intensive kneading with patient fermentation, these breads become accessible to beginners while producing results that rival professional bakeries. The minimal hands-on work transforms bread baking from a time-intensive project into a genuinely convenient option for producing fresh, flavorful loaves regularly.
As more home bakers discover these techniques, the mystique surrounding artisan bread-making diminishes. What once seemed like specialized knowledge becomes recognized as straightforward application of fermentation science. For anyone seeking to expand their baking repertoire with minimal stress, this foolproof method offers immediate success and genuine satisfaction.
Frequently Asked Questions
Can I prepare the dough and bake it later?
Yes. After the extended fermentation, shaped dough can be refrigerated for up to 48 hours before baking. This retards fermentation, actually improving flavor through extended cold fermentation. Remove the dough from refrigeration 30 minutes before baking and bake as normal, possibly adding a few extra minutes if the dough is still quite cold.
What happens if I forget about my dough beyond 18 hours?
Extended fermentation can continue indefinitely, but the dough will eventually over-ferment, becoming excessively sour and potentially collapsing. If you forget your dough for 24+ hours, proceed with shaping and baking—the results will be more sour-forward but generally still acceptable.
Can I use fresh jalapeños that aren’t quite ripe?
Yes. Less-ripe jalapeños tend toward sharper, more peppery notes rather than the fruity sweetness of fully ripe peppers. Both produce excellent results; it’s largely a matter of personal preference.
Is instant yeast truly interchangeable with active-dry yeast?
Both work, though instant yeast (also called bread machine yeast) is slightly more active and has finer particles. If using active-dry, you might add an extra quarter-teaspoon to ensure adequate fermentation, though the extended timeline makes the difference minimal.
What flour types work best?
All-purpose flour is the standard choice, but bread flour (higher protein content) produces chewier crumb, while pastry flour (lower protein) yields more tender results. Unbleached varieties often deliver better flavor than bleached alternatives.
References
- No Knead Jalapeño Cheddar Bread — Sally’s Baking Addiction. 2018. https://sallysbakingaddiction.com/jalapeno-cheddar-bread/
- No Knead Cheddar Jalapeño Artisan Bread — Lion’s Bread Blog. https://www.lionsbread.com/no-knead-jalapeno-cheddar-artisan-bread/
- Cheddar Jalapeño No-Knead Bread (Dutch Oven) — The Practical Kitchen. https://thepracticalkitchen.com/cheddar-jalapeno-no-knead-bread/
- Bread Science and Fermentation — King Arthur Baking Company. https://www.kingarthurbaking.com/learn