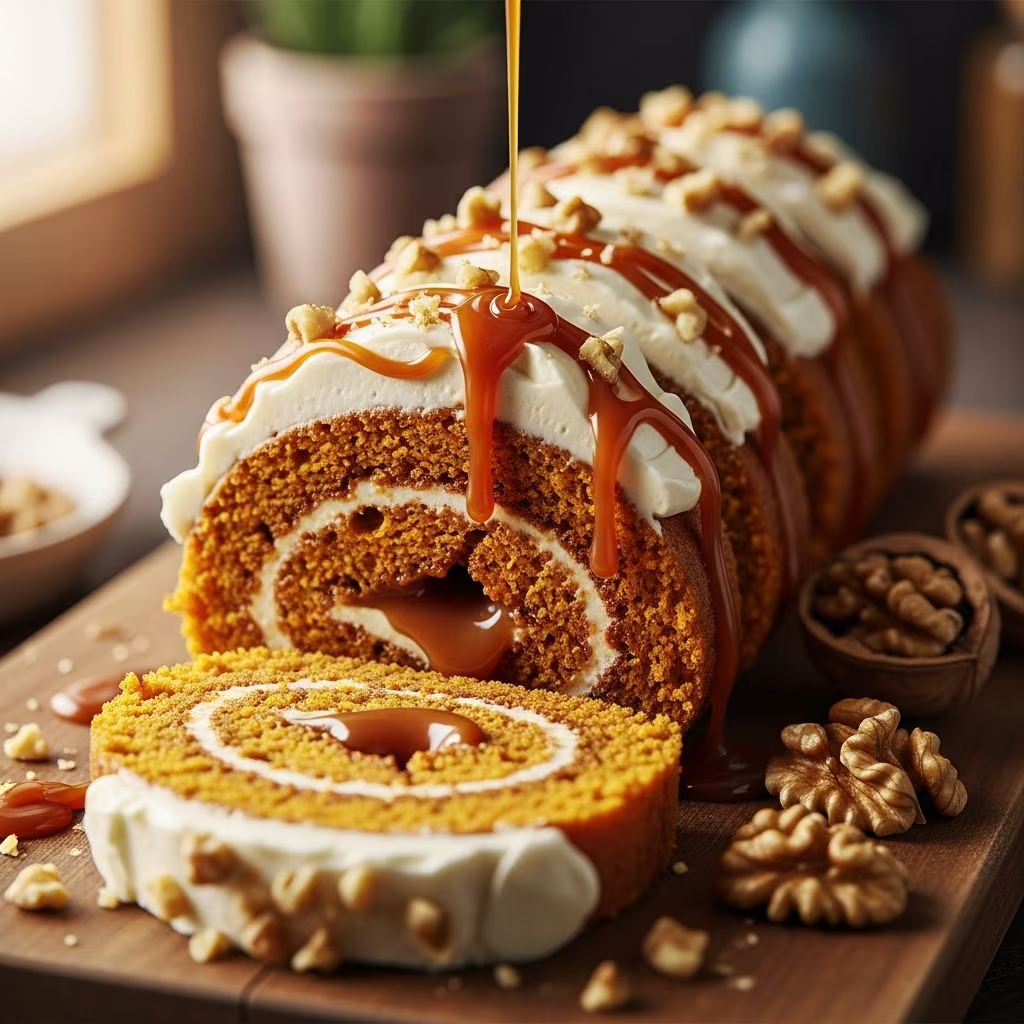
A caramel-filled carrot cake roll stands as one of the most impressive desserts you can present at a dinner table. This elegant creation combines the warmth of spiced carrot cake with the indulgence of smooth caramel and cream cheese frosting, all wrapped into a visually stunning spiral. While it may seem intimidating, understanding the fundamentals of cake rolling and layering techniques makes this dessert completely achievable for home bakers of all skill levels.
Understanding the Components of This Dessert
The caramel-filled carrot cake roll consists of three essential elements working in harmony. First, there’s the thin, flexible carrot cake layer that serves as the foundation. This sponge must be tender enough to roll without cracking, yet sturdy enough to hold its spiral shape. Second, the caramel component adds richness and sweetness, distinguishing this version from standard cream cheese-filled rolls. Finally, the frosting layer binds everything together while adding creaminess and structure to the final presentation.
Selecting and Preparing Your Ingredients
Success with this recipe begins before you turn on the oven. Each ingredient plays a specific role in creating the perfect texture and flavor profile.
The Dry Components
Your dry ingredient mixture forms the backbone of the cake structure. All-purpose flour provides the necessary gluten development, while baking powder and baking soda work together to create lift and a tender crumb. The leavening agents deserve careful attention—too much creates a cake that rises dramatically then collapses, while too little yields a dense, heavy result. Ground cinnamon, nutmeg, and sometimes ginger contribute the traditional warm spices associated with carrot cakes. Salt enhances all the other flavors, making each bite more pronounced.
Fresh Carrot Preparation
The quality of your carrots directly impacts the final flavor. Fresh carrots should be firm and vibrant in color. Avoid using pre-shredded carrots from packages, as they often contain additives that prevent clumping and can affect the cake’s moisture content and texture. Instead, use a box grater or food processor to shred carrots finely just before mixing your batter. This ensures maximum moisture and a more delicate crumb in your finished cake. Aim for very fine, almost hair-like strands rather than larger chunks.
Wet Ingredients and Binding Agents
Eggs at room temperature incorporate more smoothly into your batter, creating a more cohesive mixture. Vegetable oil keeps the cake moist and tender—butter would create a denser result unsuitable for rolling. Some variations include applesauce or sour cream to add moisture and subtle flavor complexity. Vanilla extract brightens the overall taste, preventing the spices from becoming overwhelming.
Preparing Your Baking Equipment
Proper preparation of your jelly roll pan prevents frustration during the baking and rolling process. Line the bottom of a 17-by-11-inch jelly roll pan with parchment paper, allowing it to extend slightly beyond the edges. Grease both the parchment and the sides of the pan generously with cooking spray or softened butter. This dual approach prevents the delicate cake from sticking during removal.
Prepare a clean kitchen towel by lightly dusting it with flour or powdered sugar. This towel will catch the hot cake as you invert it, preventing it from tearing. Place the towel on a flat, stable surface before removing the cake from the oven.
Mixing the Batter with Precision
The order and method of combining ingredients significantly impact your results. Begin by whisking together all dry ingredients in a medium bowl, ensuring even distribution of leavening agents and spices. This prevents pockets of baking soda from creating off-flavors or uneven rising.
In a separate large bowl, whisk together eggs, sugar, and vanilla until light and slightly foamy—this typically takes about one minute. Drizzle in the vegetable oil slowly while mixing, which helps create an emulsion that results in a more tender crumb. The mixture should look slightly pale and well-combined.
Pour the dry mixture into the wet ingredients and stir gently with a wooden spoon or spatula until just combined. The batter should appear slightly streaky rather than completely homogeneous. This prevents overdevelopment of gluten, which would create a tough, chewy cake unsuitable for rolling. Finally, fold in the shredded carrots by hand, using a rubber spatula to gently combine without deflating the mixture.
Baking the Thin Cake Layer
Spread the batter evenly across your prepared jelly roll pan, extending it all the way to the edges. Use an offset spatula or the back of a spoon to create an even, consistent thickness throughout. Uneven thickness leads to some areas baking faster than others, potentially creating dry spots.
Bake at 375 degrees Fahrenheit for 13 to 15 minutes. The cake bakes quickly at this temperature, so begin checking at the 12-minute mark. Insert a toothpick in the center—it should emerge with a few moist crumbs clinging to it, not completely clean and dry. The cake should spring back lightly when touched and appear set but still tender.
Immediately upon removal from the oven, run a thin knife around the edges of the pan to loosen the cake. This prevents it from sticking as it cools slightly. Working quickly while the cake remains warm, invert it onto your prepared towel, parchment paper side up. Gently peel away the parchment paper, exposing the cake’s bottom. This is the moment many bakers hold their breath—if done carefully, the cake should release cleanly.
The Rolling Process and Initial Cooling
With the cake now resting on the towel, fold the short sides of the towel over the cake, then carefully roll the cake up inside the towel. This rolling-while-warm technique allows the cake to set into its spiral shape as it cools, making it more likely to hold together when you unroll it for filling. The towel provides structure and prevents the cake from cracking.
Place the rolled cake seam-side down on a wire rack or plate and refrigerate for at least 45 minutes to an hour, or until completely cooled. This resting period is non-negotiable—attempting to unroll and fill a warm cake will result in cracking and structural failure.
Creating the Frosting Foundation
While the cake cools, prepare the cream cheese frosting that will anchor your filling. Using an electric mixer on medium speed, beat softened cream cheese and butter together until the mixture is completely smooth and creamy, about two minutes. Scrape down the bowl frequently to ensure all ingredients combine evenly.
Add powdered sugar gradually while mixing on low speed. Too fast mixing can incorporate excess air, creating an unstable frosting prone to weeping. Mix just until the sugar disappears and the frosting reaches a spreadable consistency. If you’re whipping the cream cheese frosting to incorporate whipped cream, continue beating on medium-high speed until soft peaks form—don’t overbeat, or you’ll develop butter texture.
Assembling with Caramel Elegance
Once your cake has chilled thoroughly, carefully unroll it from the towel. The cake should unfurl without resistance; if it seems resistant, return it to the refrigerator for additional time. Gently place the unrolled cake on a clean work surface or directly on your serving platter.
Drizzle caramel sauce across the interior surface of the cake. The amount is entirely to your preference—start conservatively, as you can always add more. Spread the caramel gently across the surface using a spatula or the back of a spoon, distributing it evenly. This prevents pooling that could make your cake soggy during storage.
Dollop the cream cheese frosting onto the caramel-drizzled cake, then spread it in an even layer across the entire surface. Again, consistency matters—aim for a layer thick enough to taste but not so thick that it squishes out when you roll the cake.
Now comes the critical moment: carefully roll the cake back up using the same spiral motion. Work slowly and deliberately, using your hands or a large offset spatula to guide the cake as it rolls. The seam should end up on the bottom of the finished roll.
Final Preparation and Storage
Transfer your completed roll to a serving platter or cutting board, seam-side down. Wrap it tightly in plastic wrap and refrigerate for at least three to four hours, or preferably overnight. This final resting period allows all the layers to set, making the cake much easier to slice cleanly.
Just before serving, dust the top generously with powdered sugar for a professional appearance. You can also drizzle additional caramel sauce decoratively along the top and sides if desired. Use a sharp, warm knife (dip it in hot water and wipe dry between cuts) to achieve clean slices that showcase your beautiful spiral.
Troubleshooting Common Issues
Cake cracks when rolling: This typically indicates either overbaking (which dries the cake) or attempting to roll while still too warm. Ensure your oven temperature is accurate and allow sufficient cooling time.
Frosting seems thin or runny: Your cream cheese may have been too warm, or you may have added too much liquid. Refrigerate the frosting briefly before spreading, or whip in a bit more powdered sugar.
Caramel leaks during storage: This happens when too much caramel sauce is used or when the frosting layer doesn’t fully seal it. Use less caramel or apply frosting more generously.
Serving Suggestions and Variations
This dessert shines on special occasions, particularly spring celebrations like Easter. Serve chilled slices with coffee or tea, or pair with vanilla ice cream for an indulgent presentation. The roll can be made up to two days ahead, making it perfect for entertaining when you’d prefer to prepare dessert in advance.
Consider variations such as adding crushed pecans or walnuts to the cake batter, incorporating pineapple juice into the frosting, or using salted caramel sauce for a sophisticated twist. Each addition plays well with the fundamental carrot and caramel combination.
Frequently Asked Questions
Can I make this cake roll in advance?
Yes, the completed roll stores beautifully in the refrigerator for up to three days when wrapped tightly in plastic wrap. You can also freeze it for up to two weeks; thaw overnight in the refrigerator before serving.
What if I don’t have a jelly roll pan?
A rimmed baking sheet of similar dimensions works as an adequate substitute. Ensure your pan has sides at least half an inch high to contain the batter.
Can I use canned pumpkin instead of shredded carrots?
While possible, this creates a different flavor profile and changes the cake’s structure. If substituting, use approximately the same volume but understand the result will be noticeably different.
How do I prevent the caramel from making my cake soggy?
Spread the caramel thinly rather than generously, and ensure it’s applied just before rolling and serving. The refrigeration time allows the frosting to somewhat seal the caramel, preventing excessive moisture migration.
References
- The Science of Baking: How Different Ingredients Affect Cake Structure — King Arthur Baking Company. 2024. https://www.kingarthurbaking.com/learn/video/ingredients-cake-structure
- Oven Temperature Accuracy and Its Impact on Baking Success — University of California Division of Agriculture and Natural Resources. 2023. https://ucanr.edu/sites/anrstaff/files/251308.pdf
- Emulsification in Baking: Understanding Oil and Egg Interactions — American Society of Baking. 2024. https://www.asbe.org/baking-research-and-education
- Gluten Development and Mixing Techniques for Tender Cake Crumb — Cook’s Science (America’s Test Kitchen). 2023. https://www.cooksscience.com/articles/how-mixing-affects-cake-texture
- Food Storage Best Practices: Refrigeration and Freezing Guidelines — U.S. Food and Drug Administration. 2023. https://www.fda.gov/food/foodborne-illnesscontaminants/safe-food-handling