Understanding the Foundation of This Classic Dessert
Apple pie remains one of America’s most beloved desserts, and for good reason. The combination of tender, spiced apples nestled within a flaky pastry crust creates comfort in every bite. However, when you add a rich caramel element to this traditional favorite, you elevate it into something truly extraordinary. This particular approach to apple pie baking focuses on creating a clean, pure flavor profile by incorporating a homemade caramel sauce that coats the filling rather than relying on starches to thicken the interior.
The beauty of this recipe lies in its simplicity and the way each ingredient contributes to the final result. Unlike many traditional apple pies that use cornstarch or flour to thicken the fruit filling, this method celebrates the natural juices of the apples combined with a sweet caramel glaze. This creates a more refined texture and allows the apple flavor to shine without being masked by added thickeners.
Gathering Your Ingredients and Equipment
Before you begin your baking journey, assembling all necessary components ensures a smooth workflow. Here’s what you’ll need:
For the Caramel Sauce
- One-half cup of granulated sugar
- One-half cup of packed brown sugar
- Six tablespoons of unsalted butter
- One-quarter cup of water
- One-quarter teaspoon of ground cinnamon
- A pinch of salt
For the Pie Assembly
- Four to six large red apples (Gala or similar varieties work well)
- One package of refrigerated pie crust or homemade double-crust dough for a nine-inch pie
- Flour for rolling out dough
Equipment You’ll Need
- One saucepan for creating the caramel
- A nine-inch pie dish
- Rolling pin for dough preparation
- Pizza cutter or knife for cutting lattice strips
- Baking sheet for catching any drips
- Pastry brush or spoon for applying caramel
Preparing Your Caramel Base
The caramel sauce serves as the heart of this dessert, providing depth and complexity to the straightforward apple filling. Creating this sauce requires attention and precision, though the process remains relatively quick and uncomplicated.
Begin by combining your granulated sugar, brown sugar, butter, water, cinnamon, and salt in a medium saucepan. The combination of two sugars creates a more nuanced flavor than using one type alone. Brown sugar contributes molasses notes, while granulated sugar provides sweetness and helps achieve the proper caramel consistency.
Place the saucepan over medium heat and allow the mixture to come to a gentle boil. As the ingredients heat, they will meld together, and the liquid will begin to thicken slightly. The water acts as a hydrating agent, preventing the sugar from crystallizing and ensuring a smooth, silky texture. Once the mixture reaches a boil, remove it from the heat immediately and set it aside to cool for several minutes before use.
This quick caramel technique differs from traditional caramelization methods because you’re not cooking the sugar until it turns amber-colored. Instead, you’re creating a sweetened syrup infused with caramel flavor through the combination of sugars and heat. This approach yields a more forgiving result for home bakers while still delivering the rich, complex taste that defines caramel.
Preparing and Arranging the Apples
Selecting the right apples significantly impacts your final pie. Red varieties such as Gala apples provide a good balance of sweetness and tartness. Avoid overly soft apples, which will break down during baking and create a mushy texture. Firm apples maintain their structure while releasing their natural juices during cooking.
Wash your apples thoroughly and peel them using a vegetable peeler or knife. Once peeled, slice them into thin, uniform pieces, removing the core as you work. You’ll need approximately four to six large apples depending on your preference for crust-to-filling ratio. Some bakers prefer a higher proportion of crust to filling, while others favor a generous apple quantity.
Once your pie crust is in place on the bottom of your nine-inch pie dish, add your sliced apples, arranging them in an even layer. The apples don’t require pre-cooking or marinating in spices for this particular method. They’ll cook thoroughly in the oven and absorb the caramel flavor as the pie bakes.
Creating and Securing the Lattice Crust
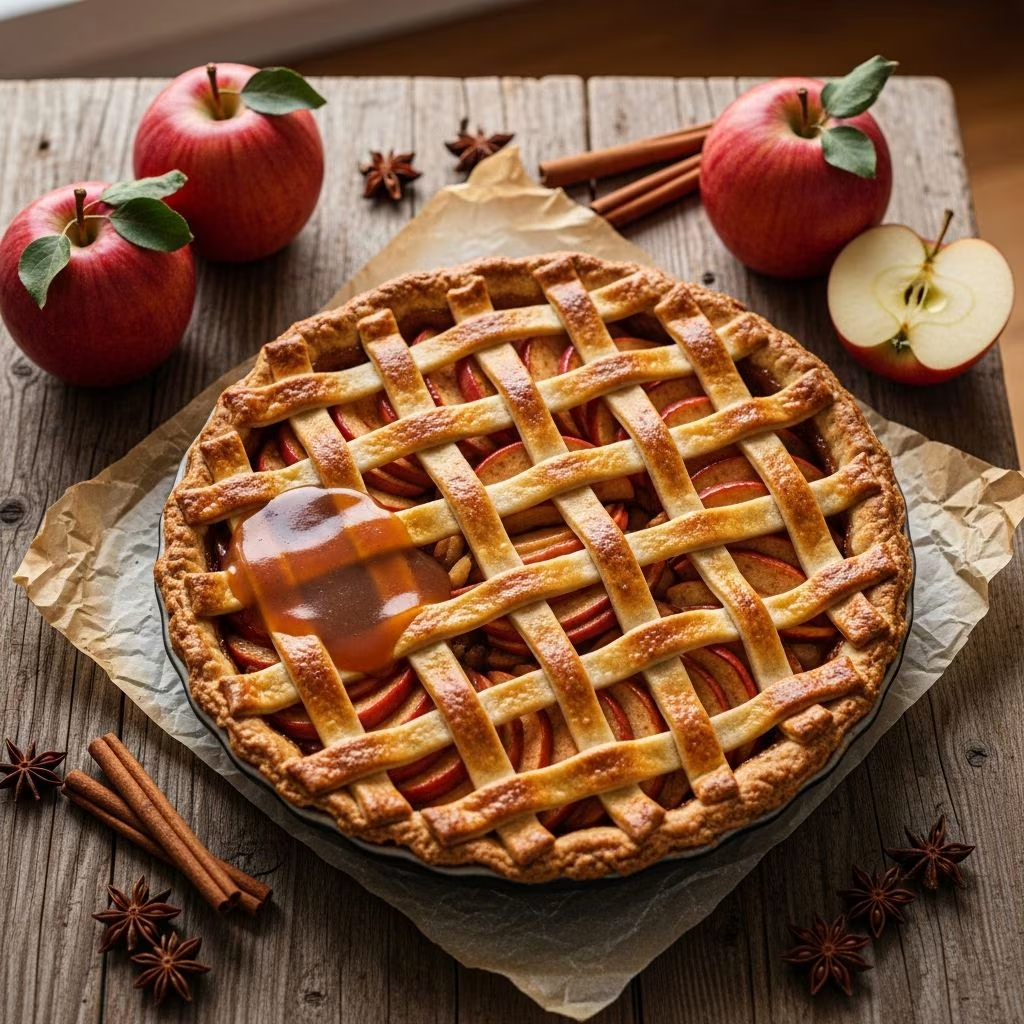
The lattice crust transforms your pie into an elegant presentation while also serving a functional purpose. The openings allow steam to escape during baking, promoting even cooking throughout the filling. Additionally, the lattice provides maximum surface area for caramel coating, which will caramelize during the initial high-temperature bake.
Remove your second sheet of pie dough and place it on a clean, lightly floured surface. Using a pizza cutter or sharp knife, cut the dough into eight equal strips of approximately three-quarters of an inch width. Pizza cutters work particularly well for this task because they create clean cuts without dragging or tearing the dough.
Arrange four strips vertically across your pie, spacing them evenly. Then lay the remaining four strips diagonally across the first set, creating the classic diamond lattice pattern. You don’t need to spend excessive time perfecting the appearance—the lattice simply needs to be functional and reasonably attractive.
Fold the edges of both the bottom and top crusts over and inward, creating a slight lip around the perimeter of the pie. This sealed edge prevents moisture from escaping and creates a finished appearance. If desired, you can crimp the edge using your fingers to create a decorative scalloped pattern, though this remains entirely optional and purely aesthetic.
The Crucial Caramel Application Technique
This step distinguishes this pie from conventional recipes and creates its signature characteristics. Before baking, spoon your cooled caramel sauce over the lattice crust, allowing it to drizzle down through the openings. Ensure that the caramel coats not just the apples but also thoroughly covers all the exposed dough strips of the lattice.
This caramel coating will undergo significant transformation during baking. As the oven heats to extremely high temperatures initially, the sugar in the caramel will begin to crystallize and harden, creating a sweetened, crisped crust. This effect, combined with the natural browning that occurs from baking, produces a remarkably caramelized exterior that looks and tastes sophisticated.
The caramel also seeps down between the lattice strips, coating the apples thoroughly and infusing them with additional sweetness and caramel flavor. This creates a more uniform flavor distribution than traditional recipes where the filling ingredients are mixed together before baking.
Managing Oven Temperature and Baking Time
Temperature control is essential for achieving the ideal texture and appearance. Preheat your oven to 425 degrees Fahrenheit before your pie is ready to enter. This extremely high temperature serves a specific purpose in the first phase of baking.
Place your prepared pie in the preheated 425-degree oven for exactly 15 minutes. During this brief but intense period, the crust will begin to brown rapidly, and the caramel coating will crystallize and set. The high heat essentially candies the sugar, creating that signature caramelized crust that makes this pie visually distinctive.
After this initial 15 minutes, reduce your oven temperature to 350 degrees Fahrenheit and continue baking for an additional 35 to 40 minutes. At this lower temperature, the apples will cook through gently, releasing their juices and becoming tender without becoming mushy. The reduced heat also prevents the crust from burning while allowing it to achieve a deep golden-brown color throughout.
The total baking time of approximately 50 to 55 minutes creates a pie where the filling is properly cooked but not overcooked. You’ll notice the edges of the crust may brown more quickly than the center, which is completely normal and desirable.
Cooling and Serving Considerations
Patience becomes your greatest asset after removing your pie from the oven. Allow the pie to cool completely at room temperature before attempting to slice it. This cooling period typically requires at least two to three hours, though longer is acceptable.
The reason for this extended cooling period relates to the structure of the filling. Because this recipe contains no starch to bind the filling, the apple juices and caramel syrup remain relatively liquid while the pie is warm. As the pie cools, the mixture thickens naturally through the cooling process, allowing you to cut clean slices rather than serving runny portions.
If you’re serving the pie warm and prefer a more traditional texture, you have the option of adding one to two tablespoons of all-purpose flour to your sliced apples before placing them in the crust. This starch will absorb some of the liquid, creating a thicker filling that holds together better. However, this modification does slightly alter the pure apple and caramel flavor that makes this version distinctive.
Flavor Profile and Ingredient Considerations
One of the defining characteristics of this apple pie recipe is the purity of its flavors. The caramel sauce contains only basic ingredients—sugar, butter, cinnamon, and salt—with no vanilla, nutmeg, or other common apple pie spices. This simplicity allows the natural apple flavor to remain the star of the dessert while the caramel adds sophisticated sweetness and depth.
The cinnamon quantity is modest, providing a subtle warmth without overwhelming the palate. If you prefer more pronounced spice flavors, you can increase the cinnamon to one-half teaspoon, though this might slightly mask the apple flavor that this recipe celebrates.
Some bakers prefer using a combination of apple varieties, blending tart Granny Smith apples with sweeter varieties. This combination creates complexity and prevents the pie from becoming overly sweet. Experiment with proportions to discover your preferred balance.
Storage and Make-Ahead Instructions
Your finished caramel apple pie stores well for several days when kept properly. Once cooled completely, cover the pie loosely with plastic wrap or aluminum foil and store at room temperature for up to two days, or refrigerate for up to four days. The crust may soften slightly during refrigeration, but the flavor will remain excellent.
You can also freeze an unbaked pie for up to three months. Assemble the entire pie through the caramel application step, then wrap it carefully in plastic wrap and then aluminum foil. Bake from frozen, adding approximately 10 to 15 minutes to the total baking time.
Troubleshooting Common Issues
Crust browning too quickly: If your crust appears to be browning excessively during the initial 425-degree phase, you can place a pie shield or aluminum foil tent over the top. Remove it after the temperature reduction.
Soggy bottom crust: Placing your pie dish on the lowest oven rack or using a preheated baking sheet can help the bottom crust bake more thoroughly.
Filling too runny when serving: Remember to allow complete cooling before slicing. If you still prefer a thicker filling, incorporate the optional flour into your apple slices.
Caramel hardening before application: If your caramel sauce hardens as it cools, gently reheat it over low heat with a splash of water to restore its drizzling consistency.
Variations and Creative Adaptations
Once you’ve mastered the basic recipe, several modifications can yield interesting variations. Consider adding a tablespoon of bourbon or brandy to your caramel sauce for an adult version. A pinch of nutmeg or cardamom can introduce additional warmth to the flavor profile.
Some bakers enjoy adding a streusel topping in place of the lattice crust, or combining both elements. Others use a crumb crust for the bottom layer, creating textural contrast. These modifications allow you to personalize the recipe while maintaining its core identity.
References
- Food Wishes — Chef John. 2008. My Favorite Apple Pie Recipe – Getting Down with the Pillsbury
- YouTube – Caramel Apple Pie — Food Wishes. Caramel Apple Pie – The Best Apple Pie Ever!