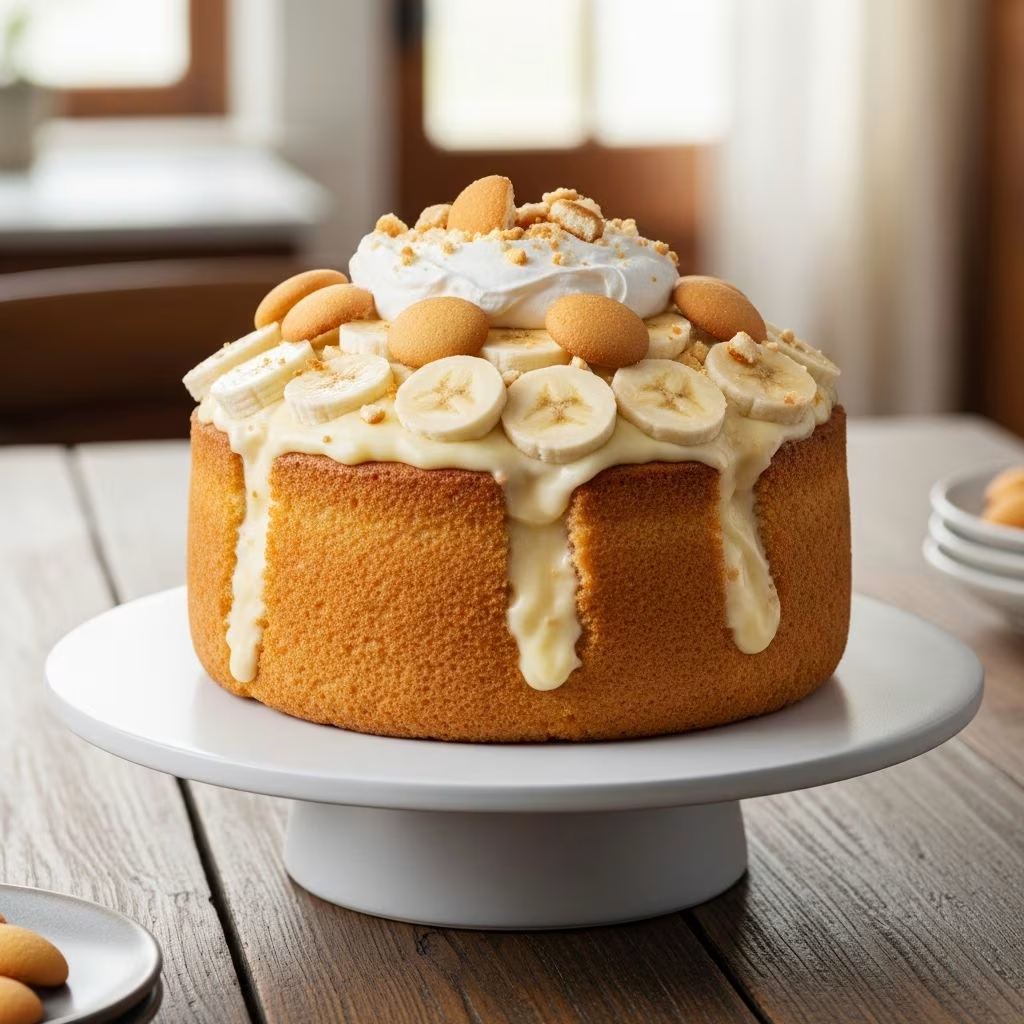
Banana pudding poke cake represents one of the most straightforward yet impressive desserts you can prepare in your home kitchen. This layered creation combines the convenience of boxed cake mix with the sophisticated flavors of creamy banana pudding and fresh fruit. The distinctive technique of piercing the cake allows the pudding filling to penetrate deeply, creating pockets of flavor throughout each slice. Whether you’re preparing dessert for a family gathering or a casual weeknight treat, this recipe delivers consistent results with minimal effort.
Understanding the Poke Cake Concept
The poke cake method emerged as a popular baking technique that transforms ordinary sheet cakes into extraordinary desserts. The fundamental principle involves baking a standard cake, then systematically creating holes throughout the entire structure. These perforations serve as channels for a liquid filling—in this case, instant banana pudding—to soak into the cake layers. This approach infuses moisture and flavor directly into the cake rather than simply topping it, resulting in a more cohesive and flavorful dessert experience.
The beauty of poke cakes lies in their versatility and foolproof nature. Even beginning bakers achieve impressive results because the technique forgives minor imperfections. The pudding filling masks any surface irregularities while adding the desired moisture and taste profile.
Essential Ingredients for Your Cake Base
Creating a successful banana pudding poke cake begins with gathering quality ingredients. The foundation starts with a yellow cake mix, which provides reliability and consistent texture. Using a prepared yellow cake mix eliminates guesswork about measurements and baking times.
- Yellow cake mix (1 box): Serves as your primary cake base
- Water (1 cup): Activates the cake mix dry ingredients
- Vegetable oil (1/2 cup): Provides moisture and tenderness to the finished cake
- Eggs (3 large): Binds ingredients and creates structure
- Fresh bananas (2-3 medium): Optional but recommended addition for enhanced banana flavor
Some recipes incorporate mashed banana directly into the cake batter, intensifying the banana flavor throughout the entire cake. This optional enhancement works particularly well when you prefer pronounced banana notes in every bite. Mashing approximately 1 cup of ripe bananas and incorporating them into the wet ingredients creates a more complex flavor profile than cake mix alone.
Pudding Filling Components
The pudding component distinguishes your poke cake from standard sheet cakes. Instant banana pudding provides the creamy filling that sets this dessert apart.
- Instant banana pudding mix (2 small boxes, 3.4 ounces each): Creates the signature pudding filling
- Cold whole milk (3-4 cups): Hydrates pudding mix to proper consistency
The choice between whole, two-percent, and skim milk affects the final pudding texture and richness. Whole milk produces the creamiest result, two-percent offers a balanced option, and skim milk creates a lighter but less luxurious filling. Cold milk is essential because it helps the pudding set to the ideal consistency for distribution across your poked cake.
Topping and Garnish Elements
The finishing layers transform your poke cake from ordinary to presentation-worthy. These components add textural contrast and visual appeal.
- Cool Whip or homemade whipped cream (8 ounces): Creates a light, fluffy top layer
- Fresh bananas (2-3 sliced): Adds color and fresh fruit flavor
- Vanilla wafer cookies (approximately 1 cup crushed): Provides crispy texture and classic pudding cake appearance
Timing matters when adding toppings. Applying whipped cream and fresh banana slices immediately before serving prevents the bananas from browning and keeps wafer cookies crispy. If you must prepare the cake ahead, cover it and refrigerate until just before serving, then add these finishing touches.
Step-by-Step Cake Preparation
Oven Setup and Pan Preparation
Begin by preheating your oven to 350 degrees Fahrenheit. Prepare a 9-by-13-inch baking pan by lightly greasing all interior surfaces with butter or non-stick cooking spray. A light dusting of flour after greasing further prevents sticking and ensures easy removal after baking.
Batter Mixing and Baking
Follow the cake mix package directions precisely, combining the dry mix with required water, oil, and eggs. If incorporating mashed banana, add it to the wet ingredients before mixing with dry components. Mix on low speed for approximately one minute to incorporate dry ingredients without overdeveloping gluten, which can result in a tough texture. Increase speed to medium and continue mixing for another minute, scraping the bowl as needed to ensure even distribution of all ingredients.
Pour the prepared batter into your greased pan and place in the preheated oven. Bake for 38 to 42 minutes, monitoring for doneness by inserting a toothpick into the cake’s center. The toothpick should emerge clean or with only a few moist crumbs—not wet batter—indicating proper baking.
Creating the Perfect Poke Pattern
Timing and technique significantly impact your poke cake’s final result. Remove the baked cake from the oven and allow it to cool in the pan for exactly 5 minutes. This brief cooling period sets the cake’s exterior structure slightly while leaving the interior warm and pliable enough to accept holes without crumbling excessively.
Using the wooden handle of a spoon or skewer, begin systematically poking holes throughout the entire cake surface. Space holes approximately half an inch to one inch apart, ensuring they penetrate nearly to the pan’s bottom. The goal involves creating channels that allow pudding to travel downward while avoiding complete separation of cake layers. If the wooden spoon handle sticks while poking, briefly wipe it between insertions to prevent pulling cake pieces out along with the spoon.
Preparing and Distributing the Pudding
While your cake cools, prepare the instant pudding filling. Pour cold milk into a medium mixing bowl and add both packages of instant banana pudding mix. Using a whisk, beat vigorously for approximately two minutes. The pudding will transform from a liquid to a soft, thick consistency during this time. Mixing too briefly leaves lumps that create an undesirable texture, while over-mixing can cause the pudding to become overly thick and difficult to distribute.
The timing of pudding preparation matters crucially. Pudding begins setting after approximately one to two minutes, so you want the pudding at the ideal consistency—firm enough to hold shape yet pourable—when you distribute it across your cake. Immediately after achieving proper consistency, pour the pudding over the entire surface of your poked cake.
Spread the pudding evenly across the cake’s surface, taking care to direct pudding into the holes you created. Use the back of a spoon to gently guide pudding downward and ensure even coverage. Some pudding will naturally remain on top of the cake, creating a pudding layer between the cake and your final topping.
Chilling and Setting
Transfer your pudding-topped cake to the refrigerator immediately after distribution. Allow the cake to chill for a minimum of two hours, though overnight refrigeration is even better. This resting period allows the pudding to fully set and firm enough to support the whipped cream topping without deflating. The cool temperature also melds the flavors together and improves the overall eating experience.
Adding Final Toppings
Shortly before serving, remove your cake from the refrigerator. Spread a layer of thawed Cool Whip or homemade whipped cream evenly across the pudding surface. Arrange sliced fresh bananas in an attractive pattern across the whipped cream layer. Finally, sprinkle crushed vanilla wafer cookies across the entire top surface. This final garnish adds authentic poke cake appearance and provides appealing textural contrast.
Storage and Make-Ahead Strategies
Banana pudding poke cake stores well when handled properly. Cover the completed cake with plastic wrap and refrigerate for up to three days. The flavors continue melding during storage, often improving over the first 24 hours. For best results, add whipped cream topping and banana slices only shortly before serving to maintain visual appeal and texture.
Prepare-ahead flexibility makes this recipe particularly convenient for entertaining. You can complete the cake through the pudding-soaking stage one full day before serving, then add toppings just before presentation. This approach ensures fresh-looking garnishes while minimizing last-minute preparation pressure.
Troubleshooting Common Issues
| Problem | Potential Cause | Solution |
|---|---|---|
| Cake too dry | Over-baking or inadequate pudding distribution | Reduce baking time by 2 minutes; ensure pudding reaches all holes |
| Pudding too thin | Insufficient mixing time or warm milk | Whisk for full two minutes; use cold milk fresh from refrigerator |
| Pudding too thick | Over-mixing or delay between preparation and pouring | Mix only until proper consistency achieved; pour immediately |
| Wafers become soggy | Applied too far in advance | Add wafer topping within 15 minutes of serving |
| Cake crumbles when poking | Over-cooled cake or insufficient care while poking | Poke cake while still slightly warm; use gentle downward pressure |
Variations and Flavor Modifications
While the classic recipe provides outstanding results, creative variations allow personalization based on preferences. Consider substituting vanilla pudding mix for banana pudding to create a different flavor profile. Some bakers incorporate crushed pineapple into the pudding mixture, adding tropical complexity. Others layer fresh banana slices between the cake and pudding before refrigeration, intensifying fruit flavors throughout.
For chocolate lovers, a vanilla or chocolate pudding variation can replace the banana pudding component entirely. The fundamental poke cake technique remains unchanged while flavors adapt to personal preferences or seasonal ingredients.
Frequently Asked Questions
Can I use homemade pudding instead of instant mix?
Yes, though instant pudding offers greater convenience and consistency. Homemade pudding works but requires cooking and cooling before distribution, extending preparation time. Ensure any homemade pudding reaches proper consistency—thick enough to pour but not so thick that distribution becomes difficult.
What’s the ideal serving temperature?
Banana pudding poke cake is best served cold directly from the refrigerator. The cool temperature enhances the pudding’s creaminess and prevents whipped cream from melting. Serve within 15 minutes of removing from cold storage for optimal texture and appearance.
How many servings does this recipe yield?
A standard 9-by-13-inch cake typically yields 12 to 15 servings depending on portion size. Cutting into 3-by-3-inch squares produces 12 generous portions, while 2-by-3-inch pieces create 18 smaller servings.
Can I freeze banana pudding poke cake?
Freezing is not recommended for this recipe. The pudding’s texture becomes grainy after thawing, and whipped cream toppings separate and become watery. Fresh consumption within three days of preparation produces optimal results.
Should I use ripe or green bananas?
For the best flavor, use bananas that are ripe but still firm—yellow with minimal brown spots. Over-ripe bananas become mushy and lose structural integrity during mixing or slicing. Yellow bananas with slight browning provide ideal sweetness and flavor without textural compromise.
References
- Yellow Cake Mix Product Information — General Mills. Accessed via product packaging standards. https://www.generalmills.com/
- Instant Pudding Mix Preparation Guidelines — Jell-O Brand Official Instructions. Product preparation guidelines. https://www.jello.com/
- Food Safety: Proper Refrigeration Temperatures — U.S. Food and Drug Administration. Safe Food Storage Guidelines. https://www.fda.gov/
- Baking Science: Gluten Development in Cake Mixing — The Culinary Institute of America Educational Materials. Baking fundamentals and technique. Accessed via professional culinary resources.
- Dairy Cream Product Characteristics — International Dairy Foods Association. Product quality and storage information. https://www.idfa.org/