Banana pudding stands as one of America’s most cherished desserts, combining simplicity with elegance in a way few other sweets can achieve. Unlike elaborate cakes or intricate pastries, this beloved treat relies on straightforward components—fresh fruit, crispy wafers, smooth pudding, and whipped cream—layered together to create something genuinely special. What makes banana pudding so remarkable is its versatility; whether you’re preparing it for a casual weeknight dinner or an important gathering, this dessert adapts beautifully to any occasion while maintaining its charm and comfort-food appeal.
Understanding the Foundation: Core Ingredients and Their Purpose
Creating an exceptional banana pudding begins with understanding what each ingredient contributes to the final product. The foundation of any quality banana pudding consists of five primary components that work in harmony.
Cream cheese serves as the richness anchor in this dessert, adding depth and body to the pudding mixture. When softened to room temperature and beaten until fluffy, it creates a luxurious base that prevents the pudding from becoming one-dimensional or overly sweet. The cream cheese also provides structural integrity, helping the entire dessert maintain its form as it sits in the refrigerator.
Sweetened condensed milk functions as both a sweetener and a texture enhancer. This ingredient adds concentrated creaminess that distinguishes homemade versions from those made entirely with instant pudding mixes. The condensed milk creates a velvety mouthfeel while maintaining the dessert’s ability to stay firm enough for clean serving.
Instant pudding mix provides the vanilla flavor backbone and helps achieve the proper consistency. Rather than serving as the sole component, it works alongside the cream cheese and condensed milk to build a more nuanced, less overly-sweet flavor profile than pudding mix alone would produce.
Fresh bananas contribute natural sweetness, subtle complexity, and visual appeal. Selecting bananas at the right ripeness level—firm but not green, with perhaps just a few brown speckles—ensures they maintain their structural integrity during layering and don’t release excessive moisture that could compromise the pudding’s texture.
Nilla wafers provide essential textural contrast. Their mild vanilla flavor complements rather than competes with the pudding, while their crispy exterior yields just enough to create satisfying eating without becoming soggy too quickly. These cookies also serve a structural function, helping distribute and support the pudding and banana layers.
The Science Behind Proper Layering Techniques
The way you assemble banana pudding significantly impacts both appearance and eating experience. Understanding layering principles transforms this dessert from ordinary to extraordinary.
Begin with a foundation layer of wafers arranged across the bottom of your chosen vessel. Whether using a 9×13-inch baking dish, a traditional trifle bowl, or a large serving bowl, ensure the wafers create complete coverage with minimal gaps. This base layer prevents the pudding from directly contacting the dish while establishing the structural skeleton for all layers above.
The banana layer should consist of coins cut approximately half a centimeter thick—thin enough to integrate throughout the dessert yet substantial enough to deliver genuine banana flavor and texture in each spoonful. Many experienced dessert makers slice bananas immediately before layering rather than preparing them in advance, preventing oxidation that would cause browning and off-flavors.
When distributing the pudding mixture, apply enough to thoroughly coat the bananas while maintaining distinct layers. Attempting to spread too thin compromises the structure, while overapplication creates an unbalanced ratio that diminishes the wafer’s textural contribution. One-third of the pudding mixture per layer typically provides optimal balance in a three-layer construction.
Professional dessert makers recognize that the top layer should always be pudding, not wafers or bananas. This creates a clean presentation and establishes the foundation for the final whipped cream topping. The pudding layer also protects the fruit below from oxidation during refrigeration.
Assembling Your Banana Pudding: Step-by-Step Process
Preparing Your Pudding Base
Start by combining softened cream cheese with your electric mixer on medium speed, beating for approximately 30 seconds to one minute until it becomes completely smooth and fluffy. This step, though brief, is crucial—proper incorporation of the cream cheese prevents lumps that would persist throughout the mixing process.
Add the sweetened condensed milk next, continuing to beat until the mixture reaches complete smoothness. Scrape the bowl’s bottom and sides regularly to ensure no cream cheese pockets remain unmixed. Add your instant pudding mix, regular milk, and vanilla extract simultaneously, mixing on low speed initially, then gradually increasing to high speed.
Allow this mixture to beat for 4-5 minutes, during which time the pudding mix fully hydrates and the entire base thickens to proper consistency. This extended beating period cannot be rushed—the pudding requires adequate time to develop its full body and texture.
Incorporating Whipped Cream
Once your pudding base reaches the correct thickness, gently fold in approximately two-thirds of your whipped cream. This technique—folding rather than stirring—preserves the airy lightness that characterizes an exceptional banana pudding. Reserve the remaining whipped cream for topping after assembly.
Building Your Layers
In your prepared dish, arrange your first wafer layer, followed by banana slices, then one-third of your pudding mixture. Repeat this sequence twice more, ensuring your final layer consists of pudding. Top the entire assembly with your reserved whipped cream, spreading it evenly across the surface.
Selecting the Ideal Serving Vessel
Your choice of serving dish influences both the visual presentation and eating experience. A 9×13-inch rectangular baking dish offers practical advantages for slicing and serving, making it ideal for family-style service. This format also photographs well, making it a photographer’s choice for food presentations.
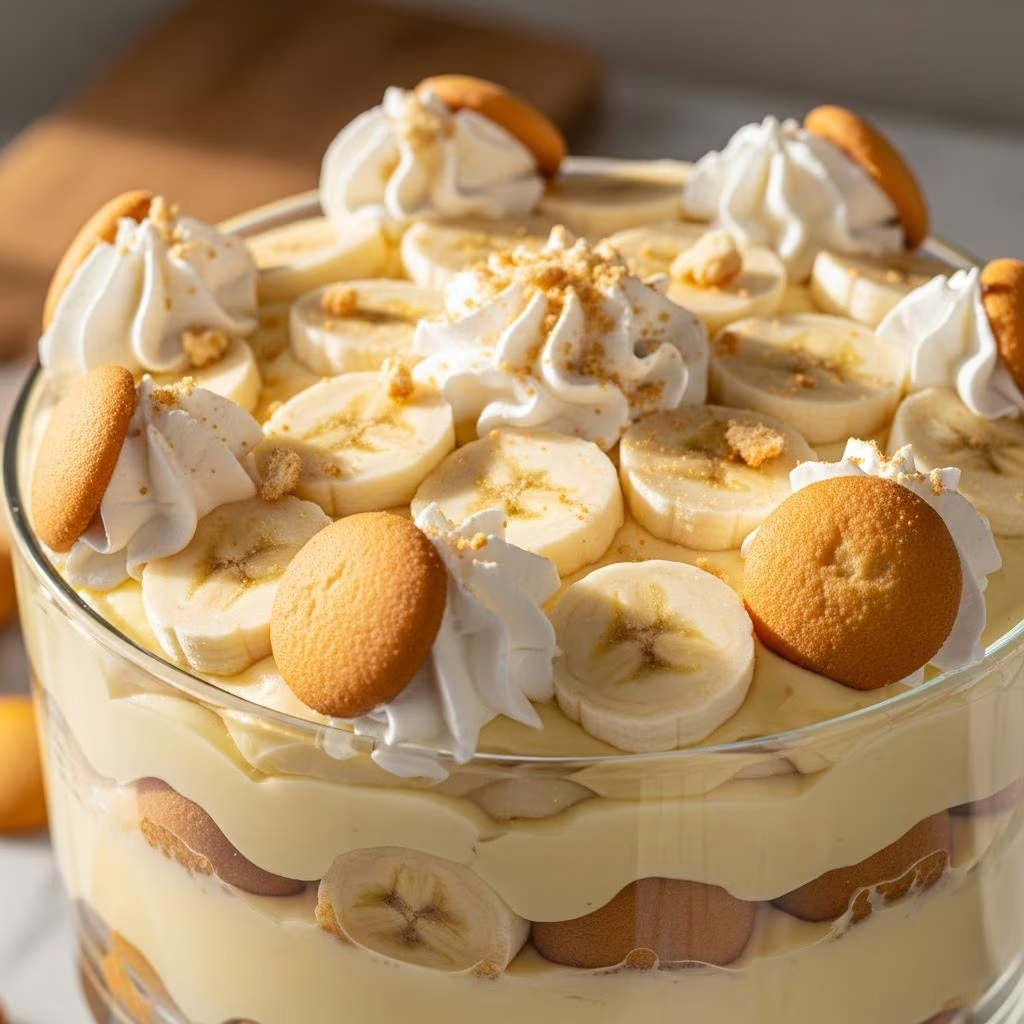
A large trifle bowl provides the most visually dramatic presentation, allowing guests to appreciate the layered structure as they serve themselves. The clear glass showcases the beautiful color gradations and distinct layers.
A large mixing bowl works as a casual alternative, particularly for intimate gatherings or family meals where presentation formality matters less than comfort.
Timing and Refrigeration Requirements
Banana pudding requires adequate refrigeration time for its components to meld properly and achieve ideal texture. Most recipes recommend refrigerating for at least 4-6 hours, with some sources suggesting overnight refrigeration for optimal results. This extended chill time allows the wafers to soften slightly through moisture absorption while the pudding mixture firms to perfect consistency.
Planning ahead ensures your pudding reaches peak readiness precisely when serving time arrives. Assembling the pudding the evening before a dinner party allows you to focus on final preparations while your dessert perfects itself in cold storage.
Critical Ingredient Selection Guidelines
Banana Selection Criteria
- Choose bananas that are ripe but still firm to the touch
- Look for deep yellow color with just a few brown speckles
- Avoid overly soft bananas that will fall apart during layering
- Never use green bananas—they lack sweetness and proper flavor development
- Plan to slice immediately before layering to prevent browning
Pudding Mix Considerations
- Instant vanilla pudding mixes provide consistent results and proper thickening
- Avoid substituting with other pudding flavors unless intentionally creating variations
- Use the larger 5-ounce boxes rather than smaller individual packets for better proportions
- Store unopened pudding mix in a cool, dry location away from moisture
Cream Cheese and Dairy Quality
- Use full-fat cream cheese for richest results—reduced-fat versions alter the final texture
- Soften cream cheese to room temperature for smooth, lump-free mixing
- Choose whole milk over lower-fat varieties for optimal creaminess
- Use heavy cream rather than whipped topping if making whipped cream from scratch
Frequently Asked Questions About Banana Pudding
How can I prevent bananas from browning during storage?
Slice bananas only immediately before layering, never in advance. The pudding layer on top helps protect bananas from oxidation. If making pudding ahead of time, add bananas just before the final topping layer and refrigeration.
Can I make banana pudding a day in advance?
Yes, you can assemble the complete pudding without the bananas up to 24 hours ahead. Add fresh banana layers just before serving to maintain optimal texture and prevent browning. Add the top whipped cream layer just before serving for the best presentation.
What’s the difference between using instant pudding mix and making pudding from scratch?
Instant pudding mix provides consistency and convenience while creating a lighter dessert when combined with cream cheese and whipped cream. From-scratch custard-based puddings offer deeper flavor but require cooking and cooling steps. Both approaches produce excellent results depending on your time availability and flavor preferences.
How long does banana pudding keep in the refrigerator?
Properly stored banana pudding maintains optimal quality for 2-3 days in the refrigerator when covered with plastic wrap or transferred to an airtight container. The wafers gradually soften as they absorb moisture, which many people prefer, though texture continues changing after the third day.
Can I freeze banana pudding?
Freezing is not recommended, as the thawed pudding becomes watery and the wafers develop an undesirable texture. Fresh preparation or refrigeration for a few days yields far superior results.
Storage and Make-Ahead Strategies
For those planning ahead, strategic assembly prevents quality degradation while maintaining convenience. Prepare the pudding mixture up to 24 hours in advance, storing it in an airtight container in the refrigerator. The flavors actually develop slightly during this resting period, creating deeper complexity.
Assemble the complete pudding without bananas up to 12 hours before serving. Cover tightly with plastic wrap to prevent the pudding surface from developing a skin. Add the banana layers and final whipped cream topping just before serving for the most vibrant appearance and optimal texture.
Keep ingredients at proper temperatures by assembling your pudding in a chilled bowl or dish. Cold ingredients firm more quickly, creating better structure and more defined layers.
Troubleshooting Common Issues
If your pudding seems too thin after mixing, the pudding mixture may need extended beating time to fully hydrate and thicken. Continue mixing for an additional 2-3 minutes on high speed. If still too thin, you may need slightly less milk in future batches.
If your pudding appears lumpy, the cream cheese likely wasn’t fully softened or incorporated before adding other ingredients. Use a whisk or immersion blender to break apart remaining cream cheese lumps, then continue mixing until completely smooth.
If wafers become excessively soggy before serving, you may be over-layering the pudding or using insufficient wafers. Increase wafer quantity or reduce pudding depth per layer in future preparations.
Variations and Creative Adaptations
While the classic banana pudding recipe stands unrivaled, thoughtful modifications allow personalization. Incorporate a layer of crushed wafers mixed with melted butter for added texture and richness. Experiment with different cookie varieties—shortbread cookies provide buttery elegance, while vanilla wafers offer traditional familiarity.
For adventurous palates, add a teaspoon of rum or banana liqueur to the pudding mixture for sophisticated depth. A sprinkle of toasted coconut or chopped nuts adds unexpected complexity while maintaining the dessert’s essential character.
Serving Suggestions and Presentation Tips
Present banana pudding in individual glass cups for elegant plating at formal occasions. Layer components directly in glasses before refrigeration to showcase the beautiful striped effect. Alternatively, serve from a large trifle bowl, allowing guests to observe the beautiful layering as they serve themselves.
A light garnish of crushed wafers or banana slices on top adds visual interest without overwhelming the clean presentation. A small mint sprig provides elegant simplicity that enhances rather than distracts from the pudding itself.
Banana pudding pairs beautifully alongside lighter main courses, as its richness satisfies without becoming oppressive. Serve with coffee or tea for a perfect afternoon treat, or as a sophisticated finish to a dinner party.
References
- The Flavor Bender — Best Homemade Banana Pudding Recipe — The Flavor Bender. Accessed 2026-04-09. https://www.theflavorbender.com/best-homemade-banana-pudding/
- The Domestic Rebel — The Very Best Banana Pudding Ever — The Domestic Rebel. 2021-03-17. https://thedomesticrebel.com/2021/03/17/the-very-best-banana-pudding-ever/
- Cookies and Cups — The Best Banana Pudding Recipe — Cookies and Cups. Accessed 2026-04-09. https://cookiesandcups.com/best-banana-pudding/
- The Country Cook — The Best Banana Pudding — The Country Cook. Accessed 2026-04-09. https://www.thecountrycook.net/best-banana-pudding/
- Preppy Kitchen — Easy Banana Pudding Recipe — Preppy Kitchen. Accessed 2026-04-09. https://preppykitchen.com/banana-pudding/