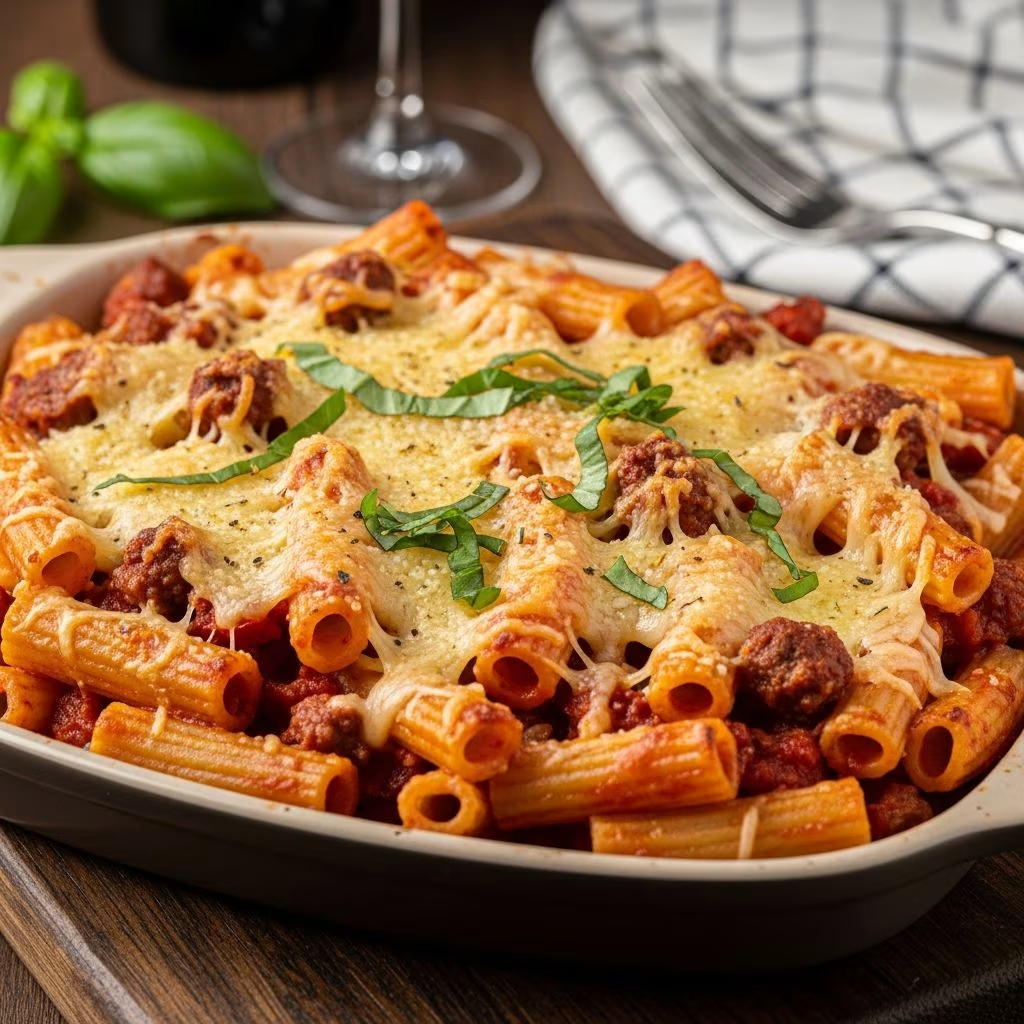
Few dishes evoke the warmth and satisfaction of home-cooked Italian-American cuisine quite like baked ziti with sausage. This layered casserole combines tender pasta tubes with seasoned ground meat, rich tomato sauce, and an abundance of melted cheese, creating a meal that feeds a crowd while remaining simple enough for weeknight preparation. Whether you’re planning a family dinner or entertaining guests, this versatile dish offers endless opportunities for customization while maintaining its essential appeal.
Understanding the Foundation: What Makes This Dish Special
Baked ziti with sausage represents a perfect intersection of Italian culinary tradition and American comfort food culture. The dish’s appeal lies in its straightforward assembly method and the way its components interact during baking. Unlike some casseroles that can become dry or separated, this pasta dish relies on the natural moisture from sauce and cheese to create a cohesive, satisfying result.
The choice of ziti pasta—those small cylindrical tubes—proves intentional rather than arbitrary. The hollow center of each piece captures sauce and sausage particles, ensuring every forkful delivers balanced flavor and texture. This structural advantage distinguishes baked ziti from dishes using other pasta shapes, though penne and rigatoni offer acceptable alternatives when ziti isn’t available.
Essential Ingredients and Their Roles
Success with this casserole begins with understanding how each ingredient contributes to the final result. The following components work together to create depth of flavor and appealing texture:
- Ground Italian sausage: This ingredient serves as the primary flavor driver. Sweet Italian sausage provides a milder, more herb-forward profile suitable for family meals, while spicy varieties appeal to those preferring heat. The fat content in sausage contributes essential flavor and moisture during cooking. Ground turkey or chicken offers leaner alternatives without sacrificing satisfaction.
- Tomato-based sauce: A combination of marinara or spaghetti sauce with crushed tomatoes creates a well-rounded tomato flavor. Some recipes incorporate both sauces to balance acidity and depth.
- Multiple cheese varieties: The classic trio includes mozzarella (shredded and sometimes diced), ricotta, and Parmesan. Each cheese serves a specific purpose—mozzarella provides stretchy melted coverage, ricotta adds creamy richness, and Parmesan contributes sharp, nutty notes.
- Aromatic vegetables: Onions, garlic, and celery build flavor foundations when included, though simplified versions omit these elements.
- Seasonings: Dried oregano, salt, black pepper, and optional red pepper flakes round out the flavor profile.
Preparation Methods: From Stovetop to Oven
The cooking process divides into distinct phases, each requiring attention to detail for optimal results. Understanding these stages allows for flexibility and troubleshooting.
Cooking the Sausage
Begin by browning ground Italian sausage in a large, deep skillet over medium-high heat. Break the meat into small pieces as it cooks, creating even browning and texture. Most sausages contain sufficient fat for cooking without additional oil, though lean varieties may require a tablespoon of olive oil. The sausage should reach complete doneness without remaining pink—this typically requires five to six minutes of cooking.
Once browned, transfer the cooked sausage to a separate plate using a slotted spoon, leaving behind approximately one tablespoon of fat for building subsequent flavors.
Building the Sauce Base
Reduce heat to medium and add minced garlic to the remaining fat, stirring constantly for about one minute until fragrant but not browned. If your recipe includes diced onions, carrots, and celery, add these now and cook for approximately eight minutes until they begin softening.
Pour your chosen tomato sauce into the pan, along with any crushed tomatoes. Return the cooked sausage to the mixture and add dried oregano, salt, black pepper, and red pepper flakes to taste. Some recipes incorporate a teaspoon of sugar to balance acidity in tomato products. Allow this sauce to simmer gently while you prepare the pasta.
Cooking the Pasta
Boil one pound of ziti pasta in salted water until slightly undercooked—what Italians call “al dente.” This intentional undercooking prevents mushiness when the casserole bakes, as the pasta continues absorbing moisture from the sauce. Drain the pasta but avoid rinsing it, as the starch helps bind ingredients and sauce.
Assembly Techniques for Optimal Results
How you layer this casserole significantly affects both appearance and eating experience. Two primary assembly approaches exist, each producing slightly different results.
The Simple Blend Method
In this approach, combine the drained pasta directly in the cooking pot with the sausage sauce, roughly half of your total mozzarella cheese (diced into small cubes), and any ricotta by gently stirring everything together. Pour this mixture into a prepared baking dish, then top with remaining shredded mozzarella and grated Parmesan cheese before baking.
The Layered Approach
This technique creates visible layers and more controlled cheese distribution. Begin by coating the baking dish bottom with cooking spray and spreading a thin layer of sauce. Arrange half the pasta mixture in an even layer, followed by ricotta (dolloped in small amounts across the surface), half the mozzarella, and Parmesan. Repeat with remaining pasta, sauce, and cheese, ending with a generous topping of mozzarella and Parmesan.
The layered method typically produces a more visually appealing presentation and ensures every portion contains all component flavors.
Baking Guidelines and Time Management
Cover your assembled casserole with aluminum foil and bake at 375°F (190°C) for approximately 45 minutes. The foil prevents excessive browning on top while heat penetrates throughout the dish. After 45 minutes, remove the foil and continue baking for an additional five to ten minutes until the cheese on top becomes bubbly and develops golden-brown spots.
Baking times may vary depending on your specific oven, the depth of your baking dish, and whether the casserole started at room temperature or was pulled directly from refrigeration. The casserole is ready when you observe consistent bubbling around the edges and the cheese appears melted and beginning to brown.
Make-Ahead Strategies for Convenience
One of this dish’s greatest advantages is its make-ahead potential. After assembling the casserole but before baking, cover it tightly with plastic wrap or aluminum foil and refrigerate for up to one day. When ready to bake, add approximately ten to fifteen minutes to your total cooking time since the dish starts cold.
For longer storage, freeze the assembled casserole for up to three months. Thaw in the refrigerator for at least 24 hours before baking, or bake directly from frozen, adding 20 to 30 additional minutes to the cooking time. These flexible options make this dish ideal for advance meal preparation or last-minute entertaining.
Customization and Variation Ideas
While the classic version remains beloved, numerous variations accommodate different preferences and dietary needs:
- Protein substitutions: Replace Italian sausage with ground beef, ground turkey, or omit meat entirely for vegetarian versions.
- Vegetable additions: Incorporate roasted red peppers, sliced mushrooms, spinach, or zucchini between layers for added nutrition and flavor complexity.
- Sauce variations: Experiment with vodka sauce, white cream sauce, or pesto-based sauces for entirely different flavor profiles.
- Cheese alternatives: Substitute ricotta with cottage cheese (blended smooth) for a lighter option, or use fontina and Asiago for sharper flavor notes.
- Spice level adjustments: Use spicy Italian sausage if you prefer heat, or add red pepper flakes directly to the sauce.
Storage and Reheating Instructions
Properly stored baked ziti maintains quality for several days. Allow leftover casserole to cool completely before transferring to airtight containers. Refrigerate for up to four days, or freeze individual portions for up to three months.
Reheat refrigerated portions in a 350°F oven, covered with foil, for approximately 15 to 20 minutes until heated through. Alternatively, use a microwave in short intervals, stirring between sessions to ensure even heating. Frozen portions require thawing in the refrigerator and longer reheating times.
Troubleshooting Common Issues
| Problem | Cause | Solution |
|---|---|---|
| Dry casserole | Insufficient sauce or overcooked pasta | Ensure adequate sauce volume; cook pasta al dente |
| Watery result | Too much liquid or excess vegetable moisture | Reduce sauce quantity; pat dry excess vegetables before adding |
| Unmelted cheese | Oven temperature too low or insufficient baking time | Verify oven temperature accuracy; extend baking time |
| Burned top | Foil removed too early or oven too hot | Keep foil on longer; verify oven temperature |
| Mushy pasta | Pasta cooked too long before assembly | Cook pasta one to two minutes under al dente |
Frequently Asked Questions
Can I prepare this dish a full day in advance?
Yes, you can assemble the casserole up to 24 hours ahead. Cover tightly and refrigerate until ready to bake, then add 10 to 15 minutes to the cooking time since it will start cold.
What pasta shapes work if I don’t have ziti?
Penne, rigatoni, and rotini all work acceptably. Any pasta shape that holds sauce works, though the hollow tubes of ziti specifically enhance the eating experience by trapping sausage and sauce inside.
How do I adjust the recipe for a crowd?
Double or triple all ingredients and use larger baking dishes or multiple standard 9×13 dishes. Baking time may extend slightly when using larger quantities, so monitor for doneness rather than relying solely on timing.
Can I use frozen vegetables to simplify preparation?
Yes, frozen diced onions and peppers work well. However, drain them thoroughly to prevent excess moisture in the final casserole, which could make it watery.
Is this dish suitable for freezing before baking?
Absolutely. Freeze the uncooked casserole for up to three months, thaw in the refrigerator for 24 hours, then bake as directed, adding 10 to 15 minutes for the initially chilled temperature.
Serving Suggestions and Pairings
Baked ziti with sausage stands wonderfully on its own but benefits from complementary dishes. Serve alongside a crisp green salad dressed with vinaigrette to cut through the richness. Garlic bread or Italian breadsticks provide texture contrast and an ideal vehicle for soaking up sauce.
A light white wine such as Pinot Grigio or a medium-bodied red like Chianti pairs beautifully with this dish. For non-alcoholic options, sparkling water with lemon or unsweetened iced tea refreshes the palate between bites.
Conclusion: Why This Casserole Endures
Baked ziti with Italian sausage represents more than simply combining ingredients and baking—it embodies accessible, satisfying cooking that brings people together. The dish’s flexibility allows cooks of all skill levels to achieve impressive results while accommodating individual tastes and dietary preferences. Whether prepared for a family Tuesday night or a weekend gathering, this casserole delivers consistent satisfaction and often becomes a treasured family recipe passed down through generations.
References
- Easy Baked Ziti with Sausage — Brown Eyed Baker. 2024. https://www.browneyedbaker.com/baked-pasta/
- Baked Ziti with Sausage Recipe — Savory Nothings. 2024. https://www.savorynothings.com/baked-ziti-with-sausage/
- Baked Ziti Recipe — Once Upon a Chef. 2024. https://www.onceuponachef.com/recipes/baked-ziti-with-sausage.html