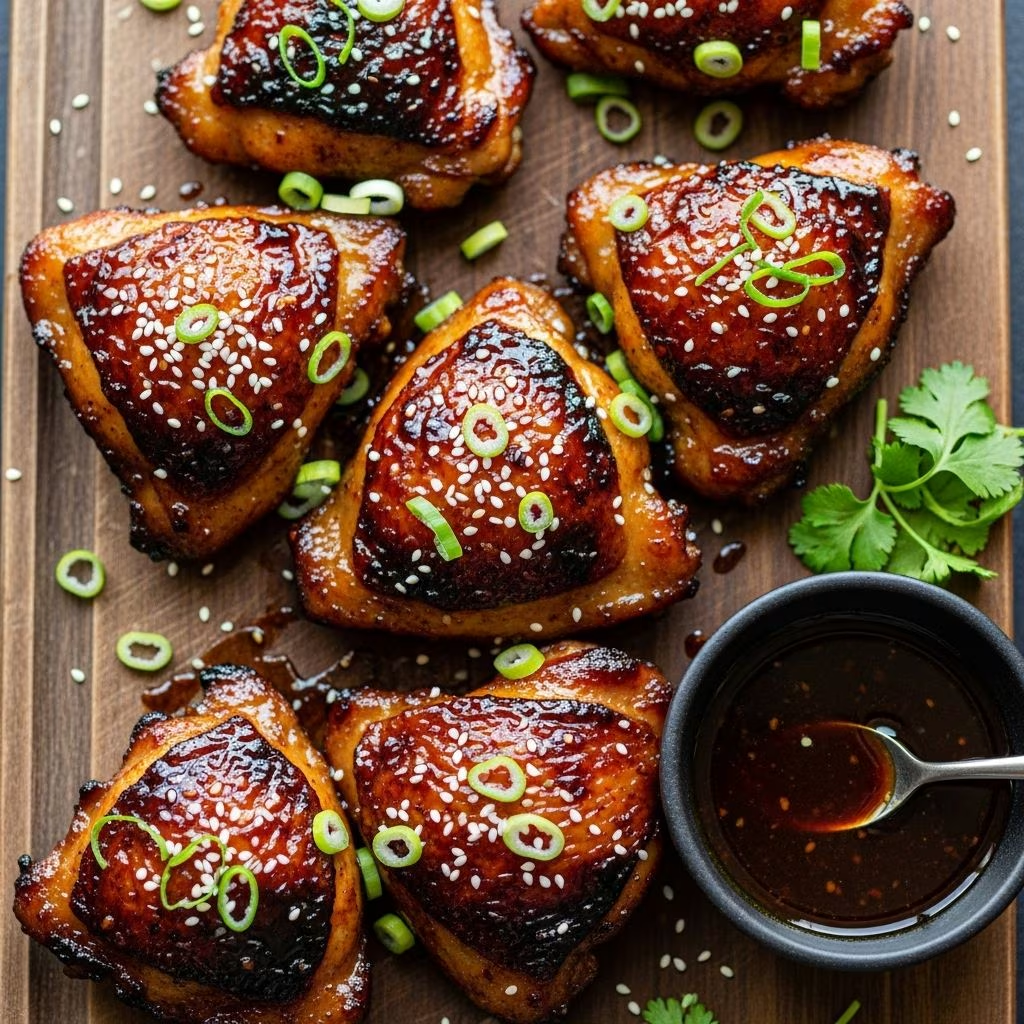
Asian-glazed chicken thighs represent one of the most approachable yet impressive dishes you can prepare in a home kitchen. This preparation method combines the natural richness of chicken thighs with a sophisticated flavor profile built on soy sauce, ginger, garlic, and honey. The result is a dish that appears restaurant-caliber while requiring minimal technical skill. Whether you’re planning a weeknight family dinner or entertaining guests, this recipe delivers consistent, delicious results with straightforward techniques and readily available ingredients.
Understanding Why Chicken Thighs Are the Ideal Choice
Chicken thighs have become increasingly popular among home cooks and professional chefs alike, and for good reason. Unlike chicken breasts, which can easily become dry and bland, thighs contain significantly more fat and connective tissue. This composition makes them nearly impossible to overcook while keeping the meat exceptionally moist and flavorful. The higher fat content also means the skin crisps beautifully during cooking, creating an appealing textural contrast with the tender meat underneath.
When selecting chicken thighs, you’ll encounter two primary options: bone-in skin-on or boneless skinless varieties. Bone-in skin-on thighs are generally preferred for this preparation because the bones conduct heat evenly throughout the meat while the skin provides a vehicle for browning and crisping. If you prefer boneless skinless thighs for convenience or dietary reasons, they work equally well, though cooking time may be slightly reduced.
Deconstructing the Asian Glaze Components
The magic of this dish lies in the glaze, which combines complementary Asian flavoring elements into a cohesive whole. Each ingredient plays a specific role in creating depth and complexity.
Soy Sauce: The Umami Foundation
Soy sauce provides the savory backbone of the glaze. This fermented soybean product delivers umami, the fifth taste sensation that creates a satisfying, mouth-filling quality. Typically, recipes use between ¼ cup and ⅓ cup soy sauce for a standard batch. If you’re sodium-conscious, low-sodium varieties work admirably, though you may need to slightly increase quantities to achieve the same flavor intensity.
Honey and Brown Sugar: Sweetness and Caramelization
Sweet elements balance the saltiness of soy sauce while promoting caramelization during cooking. The combination of honey and brown sugar creates a more complex sweetness than either ingredient alone could provide. Honey contributes subtle floral notes and aids in creating a glossy glaze, while brown sugar provides deeper molasses undertones and helps with browning. Together, they create a glaze that caramelizes beautifully without burning.
Rice Vinegar: Brightness and Tangy Balance
Rice vinegar, specifically the mild Japanese variety, adds crucial brightness and prevents the glaze from becoming cloying. The acidity cuts through richness and adds complexity. Typically, recipes incorporate 2.5 to 3 tablespoons of rice vinegar. This ingredient is essential for preventing flavor fatigue—without this acidic element, the dish would feel heavy after a few bites.
Sesame Oil: Aromatic Finishing Touch
Sesame oil provides distinctive nuttiness and aroma. This potent ingredient should be used judiciously—typically 1 to 2 tablespoons per batch. Its strong flavor means a little goes a long way. Adding sesame oil during the final stages of cooking, rather than at the beginning, preserves its delicate aromatic qualities.
Ginger and Garlic: Aromatic Complexity
Fresh ginger and garlic form the aromatic base that provides pungency and depth. Depending on your preference, you might use anywhere from 1 to 2 teaspoons of fresh ginger and 4 to 5 minced garlic cloves. These ingredients should be minced finely so they distribute evenly throughout the glaze and cook thoroughly.
Step-by-Step Preparation Instructions
Initial Setup and Oven Preheating
Begin by preheating your oven to 425°F (220°C). This temperature is hot enough to promote browning and skin crisping without cooking the exterior too quickly before the interior is done. Allow 15 minutes for your oven to reach full temperature—this ensures consistent results.
While the oven preheats, prepare your cooking vessel. An oven-safe skillet or baking dish works perfectly. If using a regular skillet, ensure it has an oven-safe handle (wooden handles won’t work). Otherwise, transfer the chicken to a baking dish before placing it in the oven.
Building the Glaze
In a medium saucepan, combine your soy sauce, rice vinegar, honey, brown sugar, ginger, and garlic over medium heat. Bring this mixture to a boil, stirring occasionally to ensure the sugar dissolves completely. Once boiling, reduce the heat to low and simmer for 3 to 5 minutes, allowing the glaze to thicken slightly. The glaze should reach a consistency where it coats the back of a spoon lightly. Remove from heat and stir in the sesame oil. Set aside approximately one-third of the glaze to use as a finishing sauce later.
Preparing the Chicken
Pat your chicken thighs completely dry using paper towels. Moisture on the surface prevents proper browning, so take time to ensure the skin is thoroughly dried. If desired, season the thighs lightly with salt and pepper before placing them in your prepared cooking vessel.
Coating and Initial Cooking
Pour approximately two-thirds of the glaze over the chicken thighs, reserving the remaining portion. Using tongs or your hands (hands actually work best), rotate each thigh to ensure even coating with the glaze. Position the thighs skin-side down in the pan. This orientation allows the skin to cook directly against the hot surface, promoting browning and rendering fat.
Place the pan in your preheated oven and bake for 30 minutes skin-side down. This initial phase cooks the thighs while the skin side makes contact with residual heat from the pan, beginning the crisping process.
Flipping and Final Baking
After 30 minutes, carefully remove the pan from the oven and flip each thigh so the skin faces up. At this point, brush the reserved glaze over the top of the thighs. Return to the oven and bake for an additional 15 to 20 minutes, or until the skin is deep golden brown and the internal temperature reaches 165°F (74°C) when measured with a meat thermometer inserted into the thickest part of the thigh without touching bone.
If the thighs aren’t browning adequately, increase the oven temperature to 450°F (232°C) for the final 5 minutes. Watch carefully to prevent burning.
Creating Complementary Side Dishes
Asian-glazed chicken thighs pair wonderfully with several side options that either provide textural contrast or complement the savory-sweet glaze.
Vegetable Accompaniments
Steamed bok choy provides an elegant, slightly bitter counterpoint to the sweet glaze while delivering nutritional balance. Simply steam for 3 to 5 minutes until tender-crisp. Alternatively, steamed broccoli or stir-fried snap peas work equally well. For a more substantial preparation, try blanching and then quickly pan-frying vegetables in a touch of sesame oil with garlic.
Grain-Based Sides
Steamed white or brown rice serves as an ideal foundation for catching the flavorful pan juices. Jasmine rice, with its subtle floral aroma, pairs particularly well with Asian-inspired dishes. For added nutrition and texture, try quinoa or farro, which provide earthiness and substance.
Building Composed Plates
For a restaurant-style presentation, arrange a bed of rice, top with glazed chicken thighs, add steamed vegetables to one side, and drizzle any remaining pan sauce around the plate.
Adjusting the Recipe to Your Preferences
Managing Sweetness Levels
If you prefer a less sweet glaze, reduce the honey and brown sugar by 25 to 50 percent and increase the rice vinegar slightly. Conversely, if you enjoy sweeter flavors, add an additional tablespoon of honey. The beauty of this recipe is its flexibility—you can adjust the balance to match your taste preferences.
Adding Heat
For those who enjoy spicy foods, incorporate sriracha sauce, gochujang (Korean red chili paste), or fresh chili flakes into the glaze. Start with 1 teaspoon of sriracha or ½ teaspoon of chili flakes and adjust upward based on your heat tolerance. Add these ingredients during the simmering stage so the heat distributes evenly throughout the glaze.
Incorporating Additional Aromatics
Fresh lime juice (2 to 3 tablespoons) adds brightness and subtle sweetness. Star anise or a cinnamon stick during simmering introduces warming spice notes reminiscent of Chinese five-spice flavors. Lemongrass, when finely minced and added to the glaze, creates subtle citrus undertones.
Timing and Make-Ahead Strategies
This recipe requires approximately 50 to 60 minutes from start to finish, including oven preheating. For weeknight cooking, you can prepare the glaze earlier in the day and store it in a sealed container in the refrigerator for up to 3 days. When ready to cook, simply reheat the glaze gently before combining it with the chicken.
Alternatively, you can marinate the chicken in the glaze for up to 24 hours before cooking, which intensifies flavors. Remove the chicken from the refrigerator 20 minutes before cooking to allow it to come closer to room temperature, which ensures more even cooking.
Storage and Reheating Considerations
Cooked Asian-glazed chicken thighs store well in an airtight container in the refrigerator for 3 to 4 days. To reheat, place the chicken in a covered oven-safe dish at 350°F (176°C) for 10 to 15 minutes until heated through. Alternatively, reheat gently in a skillet over medium-low heat, covered, for 5 to 8 minutes. Reheated chicken maintains its moisture and flavor better than many other preparations.
Frequently Asked Questions
Can I use chicken breasts instead of thighs?
While technically possible, chicken breasts don’t yield the same results. Because breasts contain less fat, they’re more prone to drying out during cooking. If you must use breasts, reduce cooking time by 10 to 15 minutes and monitor carefully to prevent overcooking. The texture and flavor will be noticeably less satisfying than when using thighs.
What if my glaze doesn’t thicken?
If your glaze remains too thin after 5 minutes of simmering, continue simmering for an additional 3 to 5 minutes. If it still doesn’t thicken adequately, mix ½ teaspoon of cornstarch with 1 tablespoon of water to form a slurry, then whisk it into the glaze while simmering. This quickly creates the desired consistency without affecting flavor.
Is it necessary to marinate the chicken?
Marinating is optional but recommended if you have time. Even 2 hours makes a noticeable difference in flavor depth. However, the recipe works perfectly well without marinating if you’re short on time—simply coat the chicken with the glaze and proceed with cooking.
Can this recipe be adapted for an air fryer?
Yes, absolutely. Preheat your air fryer to 380°F (193°C), arrange the thighs in the basket in a single layer skin-side up, and cook for 18 to 22 minutes for bone-in thighs or 14 to 16 minutes for boneless thighs. Brush with glaze halfway through cooking. Check that the internal temperature reaches 165°F before serving.
Troubleshooting Common Issues
Skin Isn’t Crispy
Ensure the chicken skin is completely dry before cooking, and make certain the thighs spend adequate time skin-side down in the initial baking phase. If your oven runs cool, increase the temperature slightly for the final 5 minutes of cooking to promote browning.
Glaze Burns Before Chicken Cooks
This typically indicates oven temperature is too high. Ensure you’re following the recipe temperature of 425°F. If burning occurs, cover the pan loosely with aluminum foil for the majority of the cooking time, removing it only in the final 5 minutes to allow browning.
Uneven Cooking
Ensure all thighs are roughly the same size. If using mixed sizes, position larger thighs toward the hotter parts of the oven. Alternatively, rotate the pan halfway through cooking to ensure even heat distribution.
References
- Roasted Asian Glazed Chicken Thighs (Sticky Sweet Glaze) — Cafe Delites. Accessed April 10, 2026. https://cafedelites.com/roasted-asian-glazed-chicken-thighs/
- Baked Chicken Thighs with Asian Glaze — The Lemon Bowl. Accessed April 10, 2026. https://thelemonbowl.com/baked-chicken-thighs-with-asian-glaze/
- Asian-Glazed Chicken Thighs — For the Love of Cooking. Accessed April 10, 2026. https://fortheloveofcooking.net/2011/12/asian-glazed-chicken-thighs.html
- Soy-Ginger Glazed Chicken Thighs — Familystyle Food. Accessed April 10, 2026. https://familystylefood.com/ginger-baked-chicken-thighs/