Angel food candy represents a nostalgic treasure in American confectionery traditions. Also known as sponge candy, honeycomb candy, or fairy food depending on regional preferences, this delightful treat features a distinctive light and airy center with a satisfying crunch, typically enrobed in a protective chocolate coating. The candy’s unique texture results from a chemical reaction between basic ingredients, creating an almost miraculous transformation that appeals to candy enthusiasts of all ages. Understanding the science and technique behind this classic confection allows home cooks to recreate this beloved treat with confidence and consistency.
Understanding the Essence of Angel Food Candy
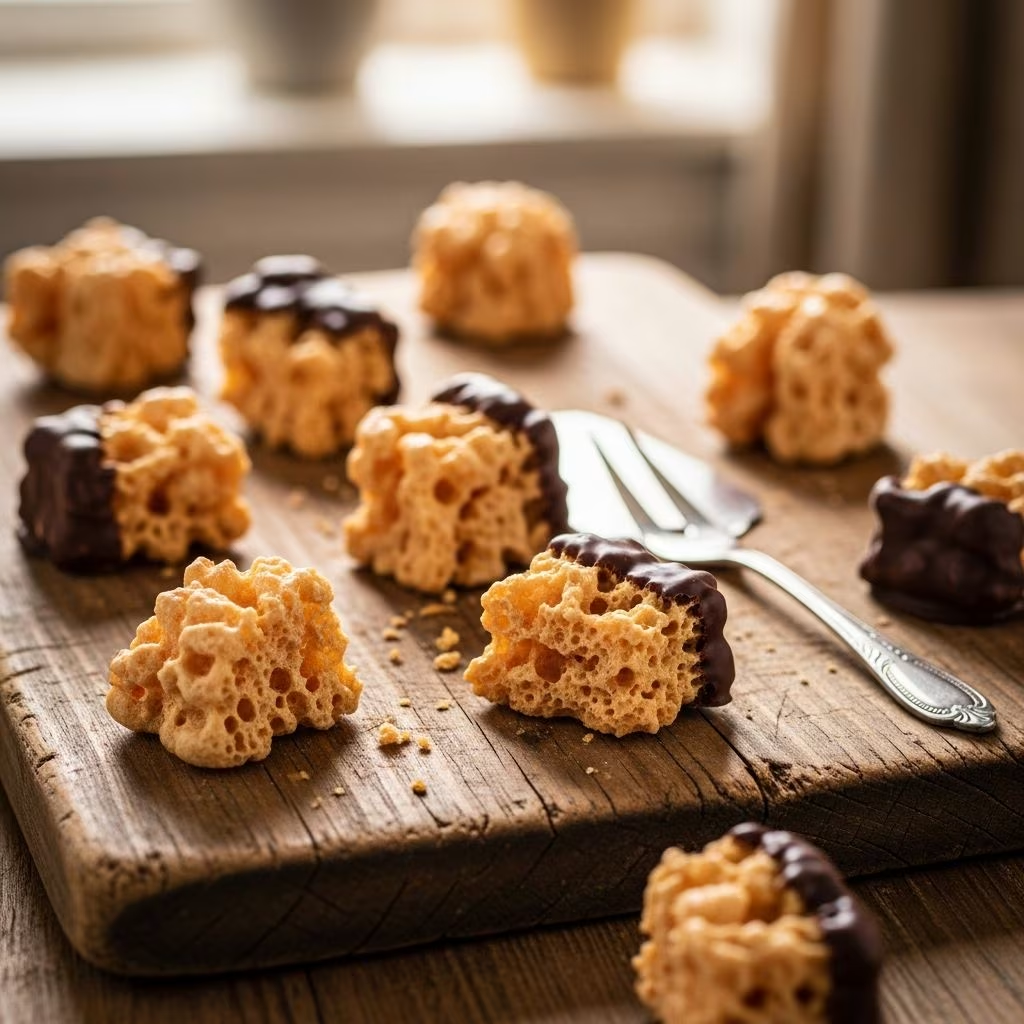
At its core, angel food candy represents simplicity in confectionery craftsmanship. The candy’s most distinctive characteristic is its honeycomb structure—a network of tiny air pockets throughout the candy that creates that signature light, crispy texture. This structure develops through the careful interaction of heat-treated sugar syrup and baking soda, which causes rapid expansion and creates countless microscopic cavities within the mixture. The resulting candy base possesses a brittle quality with a pleasant bitterness from the toffee notes, making it an ideal candidate for chocolate coating.
The appeal of angel food candy extends beyond mere texture. The combination of sweet candy shell with mildly bitter chocolate creates a sophisticated flavor profile that transcends typical confections. Many who encounter this candy for the first time describe it as having qualities reminiscent of traditional brittle but with a distinctly airier composition. This balance between sweetness and subtlety makes it particularly popular during holiday seasons and special occasions.
Essential Ingredients for Success
Creating authentic angel food candy requires only a brief list of fundamental ingredients, making it accessible to novice candy makers:
- Granulated Sugar: Forms the foundational sweetness of the candy base, typically requiring one cup for standard recipes
- Dark Corn Syrup: Adds depth of flavor and helps prevent crystallization during the cooking process, usually one cup per batch
- White Vinegar: Contributes to the cooking chemistry and develops subtle flavor complexity, typically one tablespoon
- Baking Soda: The crucial ingredient that creates the honeycomb structure through chemical expansion, typically one tablespoon
- Chocolate Coating: Provides the protective outer layer and complementary flavor, usually two cups of chocolate chips or candy coating
- Cooking Oil: Facilitates chocolate melting and ensures smooth coating consistency, typically two tablespoons of neutral oil like canola
Some modern variations include brown sugar in combination with white sugar for enhanced molasses notes, while others experiment with different vinegar types or specialty chocolate coatings. However, the traditional formula remains remarkably consistent across generations and regional variations.
Equipment and Preparation Essentials
Successful angel food candy production depends on having appropriate equipment and proper preparation:
- Candy Thermometer: Absolutely essential for monitoring precise temperature milestones; accurate temperature control determines candy texture and consistency
- Medium Saucepan: A appropriately sized vessel prevents boiling over while maintaining adequate heat distribution
- Baking Pan: An 8×8-inch or 9×13-inch pan, properly prepared with butter or cooking spray, prevents sticking and contains the mixture during expansion
- Parchment or Wax Paper: Provides a surface for dipping and prevents chocolate-coated pieces from adhering to work surfaces
- Microwave-Safe Bowl: Used for melting chocolate to proper consistency without scorching
- Wooden Spoon or Heat-Resistant Stirrer: Allows safe stirring of extremely hot mixtures without risk of melting or breaking
Preparation involves lining the baking pan with parchment paper or applying a light coating of cooking spray or butter. This seemingly minor step proves critical for easy removal of the cooled candy block. Temperature control equipment should be tested beforehand to ensure accuracy, as even slight variations can affect the final product.
The Cooking Process: Step-by-Step Technique
Creating angel food candy involves a relatively straightforward yet precise cooking sequence that rewards attention to detail:
Initial Mixture Preparation: Combine the sugar, dark corn syrup, and vinegar in your saucepan over medium heat. Stir constantly during this initial phase until the sugar completely dissolves and the mixture begins producing gentle bubbles. This stirring phase typically lasts several minutes and ensures even heating and complete sugar dissolution.
Temperature Elevation Without Stirring: Once the mixture reaches a gentle boil, insert your candy thermometer and cease all stirring. This non-intervention phase allows the temperature to rise uniformly to the critical 300-degree mark. The mixture will bubble and foam somewhat, which represents normal behavior. This stage requires patience and resistance to the urge to stir, as stirring can cause unwanted crystallization.
Color Development and Chemical Reaction: As the mixture approaches 300 degrees Fahrenheit, you’ll notice gradual darkening of the syrup. This color change indicates caramelization and proper temperature progression. The exact moment you reach 300 degrees marks the transition point where the candy base becomes ready for the crucial next step.
Baking Soda Integration: Upon reaching the target temperature, immediately remove the pan from heat. The timing here proves absolutely critical—the hotter the mixture, the more vigorous the baking soda reaction. Quickly add the baking soda and stir rapidly until the mixture expands and becomes frothy. This dramatic transformation resembles a controlled volcanic eruption, with the mixture rising and bubbling as the chemical reaction creates countless air pockets. Continue stirring just until the color appears relatively even throughout, eliminating visible streaks of darker or lighter areas.
Transfer to Prepared Pan: Working quickly but carefully, pour the foaming mixture into your prepared pan. Do not attempt to smooth or spread the mixture—it will naturally level out as it cools. The mixture may rise above the pan edges or develop an irregular top surface, which constitutes normal behavior. This appearance frequently surprises first-time candy makers, but the final product settles as cooling occurs.
Cooling and Chocolate Application
The cooling phase demands patience and restraint. Allow the candy to remain completely undisturbed in the pan until it reaches full room temperature. Resist any temptation to touch, poke, or test the candy during this critical period, as disturbance can affect texture development. Once completely cooled and hardened, flip the pan over onto a cutting board—the candy block should release easily from the pan due to proper preparation.
Using a sharp knife or candy cutter, break or cut the cooled candy into bite-sized pieces. The naturally porous structure may fracture along natural lines, creating organic irregular shapes that add to the charm of homemade candy.
For the chocolate coating, combine chocolate chips or chopped chocolate with canola oil in a microwave-safe bowl. Microwave at full power while stopping every 20 seconds to stir. This interval approach prevents chocolate overheating and scorching. The process typically requires about 60 seconds total to achieve completely melted, workable chocolate. Some recipes suggest using specialty chocolate coating products, which melt more smoothly and create glossier finished products than standard chocolate chips.
Dip the cooled candy pieces into melted chocolate, coating approximately one-third to one-half of each piece. This partial coating allows the airy candy texture to remain somewhat exposed while providing the flavor and visual appeal of chocolate. Place dipped pieces on parchment paper to set. Repeat the process if additional batches of candy exceed the available melted chocolate supply.
Common Challenges and Solutions
| Challenge | Likely Cause | Solution |
|---|---|---|
| Candy becomes too hard and brittle | Temperature exceeded 300 degrees or cooking continued too long | Use precise thermometer; remove from heat immediately upon reaching target temperature |
| Candy remains too soft or sticky | Temperature insufficient or mixture removed from heat too early | Ensure thermometer reaches 300 degrees before adding baking soda |
| Mixture doesn’t expand when baking soda added | Mixture cooled too much before adding baking soda or baking soda quality compromised | Add baking soda while mixture remains very hot; verify baking soda freshness |
| Chocolate coating cracks or separates | Temperature shock from hot candy pieces or insufficient oil in chocolate | Ensure candy pieces cool completely before dipping; add more oil to chocolate mixture |
| Uneven color throughout candy | Insufficient stirring after adding baking soda | Stir mixture thoroughly but quickly until color appears uniform |
Storage and Shelf Life Considerations
Properly made and stored angel food candy maintains quality for extended periods. Once completely cooled and chocolate has hardened, store pieces in an airtight container away from direct sunlight and heat sources. Stored under proper conditions, this candy keeps fresh for approximately one week, though it often disappears much sooner. The key to longevity involves protecting the candy from moisture and temperature fluctuations.
For gift-giving purposes, layer candy pieces between parchment paper in decorative containers. This presentation protects individual pieces while creating an attractive presentation. The candy’s distinctive appearance and homemade quality make it particularly popular for holiday gift baskets and special occasion presentations.
Variations and Creative Interpretations
While the classic recipe remains beloved, modern candy makers have developed thoughtful variations. Some experiments involve using specialty chocolate types such as white chocolate or flavored coatings. Others incorporate different vinegar varieties or adjust the ratio of brown to white sugar. Temperature variations between 295 and 310 degrees create subtle textural differences, allowing cooks to personalize their candy based on preferred crispness levels.
Regional naming conventions reflect the candy’s diverse cultural acceptance. The term “fairy food” appears particularly common in certain Midwestern traditions, while “sponge candy” describes its distinctive porous interior structure. These regional variations in naming underscore the candy’s long-standing presence in American confectionery culture.
Frequently Asked Questions
Why is a candy thermometer essential for this recipe? Temperature precision determines the final candy texture and consistency. Reaching exactly 300 degrees ensures proper caramelization and creates the ideal candy base for successful baking soda expansion. Variations as small as 5 degrees significantly alter the finished product.
Can this candy be made without a candy thermometer? While possible using older cold-water testing methods, modern thermometers provide superior accuracy and safety. Professional candy makers universally recommend thermometers for consistent, reliable results.
Why does the mixture bubble and foam when baking soda is added? The baking soda reacts with the acidic vinegar and sugar compounds, producing carbon dioxide gas. These gas bubbles create the characteristic honeycomb structure throughout the candy.
What should the candy look like when cooling? The cooled candy appears as a tan to light-brown brittle block with an uneven, bumpy surface texture. The interior reveals countless tiny air pockets when pieces are broken or cut.
Can melted chocolate substitute different oils besides canola? Yes, neutral oils like vegetable or coconut oil work effectively. Avoid strongly flavored oils that might compete with chocolate taste.
How can candy gifts be safely packaged for shipping? Layer pieces generously between parchment paper in rigid containers with cushioning material. Include silica gel packets to manage moisture during transit.
The Enduring Appeal of Homemade Angel Food Candy
Angel food candy endures as a beloved confection because it combines simplicity, affordability, and impressive results. The straightforward ingredient list and basic technique prove accessible to home cooks at any skill level, yet the resulting candy rivals commercial confections in quality and appearance. The magical transformation from simple syrup to airy, chocolate-covered confection maintains its wow factor across generations. Whether prepared as holiday gifts, party favors, or personal indulgences, angel food candy continues to bring joy through its delightful texture and nostalgic charm.
References
- Old Fashioned Angel Food Candy (aka Sponge Candy) — The Yummy Life. https://www.theyummylife.com/angel_food_candy
- Sponge Candy Recipe — Bitz & Giggles. https://bitzngiggles.com/sponge-candy-recipe/
- Wisconsin Fairy Food — 12 Tomatoes. https://12tomatoes.com/wisconsin-fairy-food/